Text in a concentric circle
Hello
I am trying to create a wheel similar to the image below except that I need three segments instead of twelve. I also need a few lines of text for each segment, but I'm not sure that the best way to insert it. I tried to use the 'polar grid tool' and using 'Text on path', however, I am not able to type within a segment / arc without the text goes around the circle.
Does anyone have suggestions as to how I can go about this? (I hope that's clear!)
Thanks in advance
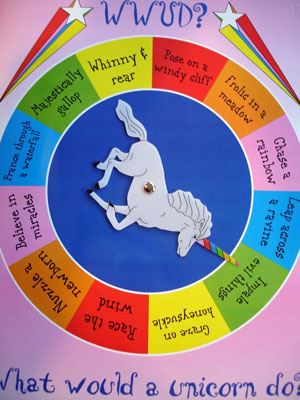
Three groups ar easy once you.
Back to the polar grid tool.
Set it to the desired diameter.
set the radial dividers to 3 and concentric circles on "0".
draw an ellipse size you want the internal diameter must be
align the two using the Align Panel (center vertical and then centered horizontally.)
Select the inner circle and and polar grid object and click on theLive paint bucket tool to turn it into a live paint group
You can fill out any section with any desired shade, including a background or outline of none.
Very easy to do with the live paint group. (Note that I completed the sections of Center with a fill of none).

The text describes earlier if you want to make the curved text and I think you want to do with only the sections tree due to the amount of curve sections require.
You make to concentric circles which will reflect the amount of attack between two text lines that you must ad the size necessary to correctly place
the sections.
you place these two concentric circles on the cut circle you have done as a live paint group.
Locks the live paint group
with the scissors tool, cut you concentric circles at the sections radial dividers
then turn them into text paths
then the pair the two in each of the sections by making text son Type > text Thread > Create
Now, type your text for each section. You can do this with two triangles if you want the text to the right

Tags: Illustrator
Similar Questions
-
How to draw concentric circles using shapes in illustrator drawing
I am on the iPad and try to draw concentric circles from a diameter of 1 cm
the circle of form Adobe seems to have that one size.
am I missing something?
Hello Gita,
The circles in the menu form from raffle can be resized.
When you click a shape, Slide Touch open with her.
Tap one finger (concentric circles) guides to get the shape you want to change (circles, squares and triangles).
Once you see the shape you want, it can be reduced or enlarged by placing your fingers or the other side of the contour and making dragging/pinch.
You can 'stamp' shape on the canvas by double-clicking on the contour (will be described with all that brush you chose).
If you want to change a circle to an oval, when you have the size you want, now pressure on the main lines. Depending on where the sketch you press you will see either a vertical or a horizontal line in the middle of the form. As soon as you see who... Drag. Give it a try.
Hope that helps.
Sue.
-
How can I Center text placed in a circle?
I have text placed in a circle object but he refuses at the Center, does anyone know a solution?
Here is a square and a circle, both with the same paragraph styles applied, so same specific settings. As you can see, the two must be centered horizontally, but only the one square is.
The text is 3.5pt, and the square/circle are 0.1 in. wide/tall.

Thank you!
You can do and 'copy' in the text block in the circle, too!

-
Concentric circles, centering and thickness...
Hello
I would like to create a logo based on the space agency European:

I started on Illustrator and I have your opinion on the best way to reproduce this game of concentric circles... Under I am CS6!
Thank you pour your advice!
Robin
Robin,
If I (put) understand (you want cuts in parts of the shown circles and you want to change the color of these environments), you can fix both if you:
(1) select the clipping mask and object > clipping mask > release.
(2) select the circles and change the color (you can select them with the direct Selection tool without letting go of the mask, but you will need to release anyroad);
(3) create the cuts as described in the first post, in the last paragraph (see below), and then select the entire document and opposition > clipping mask > make to reapply.
Once you have the circles, you can create the circle (or if she) path to the related to them, select all and opposition > clipping mask > make. If you need cutouts like the circle and the e, you can start creating those on top of the track and object encompassing > compound path > make (if you have indications of the exact path, you can correct in the attributes palette if necessary (use Even-Odd winding rule)), or you can window > Pathfinder (pallet) > less front
-
How can I create concentric circles in Photoshop CC?
I'm sure that there must be an easy way, but I can't get out :-(
Concerning
Bob
Each circle can be made by using the elliptical selection tool and bearing the same numbers of H & W in the Options bar
Edit > stroke
Place each anywhere in the area of the image, but each on a separate layer
Select all the layers in the layers panel
Use the move tool and in the Options bar, click on the vertical, then horizontal alignment symbols.
Flatten the layers if you wish.

-
Hello
Im trying to do a series of concetric circles. From 4.5 mm and 104 have circles all together each circle 4 mm larger than the previous. Thought, it would be quite simple using mixture, but for some reason, it's just a little next door (first is 4.5, is then 8 505, 12,51 another and so on). No idea what I am doing wrong? Or y at - it another way to do this?
Thank you
1. draw a circle size: 0.45 cm
2. draw a circle size: 41.65
3 - Select the two circles and vertical and horizontal alignment
Tool 4 - Select smoothing: specified as follows: 102, specified distance: 0.4 cm
5 - If you apply terms to the circle, uncheck the box: use a snippet of the limitations on the General preferences.


-
Text on the inside of the track of circle CS4 PSD only
Hello
Try to get the text on the circle below the text is at the bottom of the circle path AND is right side up. I use CS4 PSD. I read somewhere that he's like "get the text inside of the circle path" but were not able to understand.

Thank you.
http://www.photoshopessentials.com/basics/type-on-a-path/
Found.
-
Text on the bottom of the circle
I have a circle that I added some text and it goes from left to right works fine.
The issue is adding text down to the circle. I have a book Illustrator, but it is not covered.
Please enlighten me and tell me this process.
Thank you,
Just to clarify, DigitalBiz:
If you cut the circle, you can object > transform > reflect the lower part vertically to take the direction of right instead of ClickDragging.
-
I can't find a way to select chunks of text in the program of Quickoffice Quickword. Anyone know if it is still possible, and if so, what is the trick?
Thanks in advance for your help...
I just press and hold the screen, then a menu appears. Then choose select text and move the circles where you want to start and end your selection.
-
Follow the circle with overlay
Hello
I have a few messy data a camera. It's a pattern of concentric circles that changes with the times - each ring splits into two, each of these components of movement away form between them. I want to set up a set of these rings.
Someone could point me in the right direction or have any advice for a strategy game start? I thought I could use the superposition of the ring the user select a set of rings, and then somehow have the overlay 'follow' the data he was moving (easy or hard?).
I removed the components of acquisition IMAQ and took a series of images, load them into a loop to try to show the effect as an animation (vi and associated data).
Any help would be appreciated.
I watched this example: http://forums.ni.com/t5/LabVIEW/Fit-2D-data-in-to-Circle/td-p/668858/page/2?view=by_date_ascending
who can be of some use if I manipulate data, but is it the right way to go?And have tried to use machine vision-> analytic geometry-> control 'IMAQ made circle 2', but there is no example vi or tutorial for this control (or most of the other tools of analytic geometry).
so not sure exactly how it works.
Thank you
I'd probably watch the line profile. If it is noisy or has spots, you might on average several radial lines (up, down, left, right) to get more consistent data.
Ridge detection would probably find the part the clearest of each circle and could find maximums the. You could treat these to find what you are looking for. Two very close circles would probably be identified as a single peak. Looking at the data would be the first step.
You can use overlays draw the circles located on the original image. This would help you to know if you followed them correctly.
Bruce
-
Configuration file for the VPN concentrator
Hello
I have a text-based VPN concentrator configuration file, and I want to know if there is a configuration guide of Concentrator VPN that I can use to refer to this file. The configuration on cisco.com guide is currently for the GUI based configuration.
Furthermore, if there is a tool/utility that will read the configuration file in the format GUI without physical access to the device, which will also help.
Thanks in advance for any assistance.
There is a "XML export screen" in the management section of the files on the VPN concentrator. You can export the current configuration of the concentrator in a XML format, which provides the labels and values for the fields in the configuration file.
-
Question - integrate the shape text
I have text that overlays a circle. The text extends beyond the circle on the left and right sides. I am wanting to integrate my text in this circle, with my text being non-remplissage (taking on the background color). However, whenever I have incorporate the text that the middle part is very good (non-filled), but the letters circulating on the circle briefly take on the outlines incorporate it. For example, my "O" that rolls on the outline of the circle brings a part of the outline of the circle passing by my "O". How can I get the command to embed to account for the portion of the outline of the circle during the integration process? Maybe it's a question of how to eliminate the line after the fact, or possible, remove the outline of the front of circle to incorporate (don't know how). Appreciate any help.
Kind regards
Bryan
Put the text in vectorised text, use pathfinder at least before the type and the elected circle.
-
Pull quotes - bringing the text forward, he's not coming!
I'm doing a quote in a circle. I drew the circle, in fact the text wrapping, etc etc, but now the writing I'm putting in the circle will not come to the front. I made the option "forward", but it just won't come before be seen!
Are you add text directly in the circle, or by adding new framework on top? I suspect the latter, and the text in this context is also affected by the text wrapping. Select the image, open the text frame Options dialog box and check the box in the lower left corner to ignore the dressing.
-
Change the color of the outer line of the circle
Hi all
I drew a circle with no fill on the inside, to show where will be the location of my storm of Highway culvert.
I changed the thickness of the outer line of my circle by creating an edge to options merge → → STROKE layer effect; then I changed the thickness of the line by right-clicking in the race to the layers panel and then choose "scale effect".
But the problem I have is that the outer line is gray, and I want it to be black.
The outer line was originally red then I changed my image → grayscale, because I couldn't find a way to change the color while keeping my image in RGB color. So I managed to make the gray outer line by changing the mode of the image, but I can't always change the color of the outside line to black.
I'm sure there must be other ways to change the color of the outer line without having to change the mode of the image, but I am naïve.
Here is my drawing:

The text next to the circle says "Obra desagüe. It is Spanish for "drainage construction site.
You see, I can't change the color because I have no idea where the color option 'change' is. I tried to go to the layer → layer properties, but there are only 7 colors to choose from. I chose a color at random, just to see what is happening and what really changed color was the layer in the layers panel. not the form contained in the layer.
So I'm lost here, any help please?
Unfortunately I'm still not an expert in Photoshop right now.Thank you for reading my post.
Fill shape layer opacity 100% 0% to make the transparent fill or add a blank layer make a circular selection caress black.

-
Hello
How can you do concentric circles as image 1 ?
And how are padded as le Photo 2 ?Photoshop cs6
Thank you :-)
I think it more accurate to define the guide line by using the new guide dialog box and enter the exact location using numbers. Here I put guides at 25%, 50% and 75% vertically and horizontally on a high 1024px by 768px wide document. I created an action of the two step. Step 1 the path with brush, 2 transform Path width and height of 140%. I chose the toolset 4px round 100 hard brush mix normal mode 100% flow and opacity. Set the foreground color of red. I filled the white paper for I can see the guidelines. Then used the Ellipse tool to draw on a track of circle of 30px at one of the intersections of line nine guide. I played the action recently and has stopped playing the action when the work path went out of the surface of the canvas. Then I deleted the way to work and repeat the process of drawing on a track of 30px circle and play action for the othet 8 junctions.


Maybe you are looking for
-
Windows Update: KB982168 and KB982524 are repeatedly offered
Updates keep reappear after you restart the computer. They appear as successful in the history of the update. Tried the fix .net and reinstalled .net framework 3.5 SP1, but still no joy.
-
See title
-
I'm not able to get the action shot of bezel superior to register on the Dev Alpha for any of my applications. I tried everything I found these tips and on github. I tried the sample project swipemenu.js WebWorks https://github.com/blackberry/WebWor
-
I have a HP Pavilion dv6 new and everything is fine, but... I set my homepage to msm.com and it gets hijacked (modified) for hp - notebook.us.msn.com. It seems that HP is changing the home page. I can change the GEP home msn.com but HP (some progra
-
Latest version Adobe Muse does not open
I get the error (see photo), I installed a version of Adobe Air, a new version of Muse, restarted the computer and still get the question.Can someone help I am working on a site right now and I need to use the Muse.Thank youJean Luc