black ink
Installed new black ink cartridge & black ink not print... prints one red light (can not read)
Model # B210e - HP Photosmart Plus printer
In the here document troubleshooting steps may help resolve the black does not print printer Photosmart b210e.
Tags: HP Printers
Similar Questions
-
My Officejet 4620 do not print black ink
I replaced the black cartridge on my Officejet 4620 with a new high-capacity HP cartridge and it won't print black ink on the test page, any application or function of Copier. I have reset the printer nothing helps. The ink level indicates that it recognizes the new cartridge and says it's full. Black ink out of the cartridge when I put my finger against the exit hole. I cleaned and aligned the print heads, but still no go.
just in case someone else has this problem, heres whats really past and heres how to fix this annoying problem. its relatively easy to do and more efficient than wasting money on a new printer or have that he repaired as most people eventually do.
going on what? the ink has clogged print heads and solidifies closed. the function of "clean print heads" the printer comes with doesn't have the ability to solve this problem. This feature is to clean the heads Sales, not clogged heads. Why hp decided to make this model without a simple to remove the cradle is beyond me, but fortunately the cradle out and can be cleaned with hot water.
theres a few items, you will need to get there easily, or you could just burst the branch loppers, like I did and vent your frustrations.
you will need: a pair of slender beak pliers, a screwdriver torx T9 (selling auto parts stores them for a few dollars), paper towels and a space for work (its easier to do this in a corner of a room, on a small table or floor). Keep in mind that you are dealing with ink, then change your clothes right just in case and also catch a paper plate or a few sheets of paper to print to set ink cartridges while you work.
(1) ok. lets start. !!! FIRST UNPLUG THE PRINTER RIGHT NOW, IF YOU DO NOT ACCIDENTALLY DIE BY ELECTROCUTION! I forgot and when I started unscrewing the first 6 screws, kept chime jump and im like * beep *? I was impressed by the security measures hp took as model engineering.
(2) the printer is now disconnected and then go to your corner your work surface and place the printer, so there is a wall or a barrier on the left, and also, a wall or a fence behind it. This just in front of her as if you were about to use it.
(3) now, what you have to do, is to open the printer as you will change the ink and on the right side, there is a plastic guide that prevents opening all the way to the top. Look on the side and you'll notice that he could jump off with fingers. pop off and open it completely open, so you can get to the screws of the cover you would have prevented access to.
(4) press the scanner part and the upper part against the back wall.
(5) all the screws you will be remove are the size T9H torx screws. There are ten total. There are 2 black screws in the top of the forehead and then 4 black screws in the top of the back. Remove them and put them on your paper plate.
(6) following is 1 screw silver short located under the Control Panel, use your finger and feel under the * button. Unscrew, place it on the paper plate.
(7) depending on whether you want to remove the face/Control Panel to get in the last 3 screws so locate the illustrations on the top of the printer, there are 2 on the lower left and 5 at the bottom right (1 and 2 on the left explain removals of paper jam and 1-5 on the right then explain change in ink cartridges). then about half an inch South of the illustration of the number 5 on the lip, is a plastic stand. six inches to the left is an another then 6 inches to the left, under the number of the illustration 2 (remove the paper jam) is a third support. Unscrew using your nails. Flip it up just like the hood of the car, and eten on the main top of the printer, keep the flat wire which is connected to the frame of the control panel (if the flat wire jumped because you got too loud, then simply insert it in when you go back).
(8) then unscrew the 3 long silver screws that are located under the Panel you just popped off the coast. There is 1 on the left and 2 on the side rightish. mix 'em on the paper plate.
(9) now that all the screws are removed, take the Panel front and partially pop it back together.
(10) then take all over (the part with the small illustrations and lift like a hood of car, ONLY THIS TIME OPEN IT LEFT and he balanced on the edge of the printer, to lean over towards the wall or an obstacle on your left.) MAKE SURE NOT TO PULL ON THE STRIP OF COLORFUL SON FRUITS LEFT AND ALSO THE FLAT BLACK WIRE CONNECTING PART SCANNING FOR THE MAIN OF THE PRINTER PART.
(11) then take the pliers to tapered spout and remove the 2 silver tension springs located behind the printer cartridges. Pay attention to where they were attached so you remember where they go during the Assembly. take a picture with your phone if you have to, or simply re - understand it like I did. mix 'em on the paper plate.
(12) then disconnect the 2 large flat wire and 1 small flatwire attached to the back of the ink cart. take a picture or can remember like I did. I guess bad things can happen if you reverse the on re-Assembly. Pick up the phone and take a picture of quik to be sure.
(13) now remove the cart ink, cartridges and all, by lifting the front first. Be careful of the transparent tape little there that moves the carriage from left to right and vice versa. you don't want to damage this little guy. now take the transport to your paper plate. not some ink or accidentally get it on your fingers without knowing or will make a mess.
(14) remove the ink cartridges and put them on the paper plate, side ink to avoid a mess, these things sometimes drip. put the plate side. its time to clean the print heads.
(15) then go to the sink, to the distribution of empty ink and turn on the hot water and then let the transport of empty ink sitting there with the water mainly through the clogged color screen (inspect and make you is not a small rubber seal surrounding the small screen, if there is do not waste it. I didn't look too closely and I don't think that hp has them but I have a few other printers). It will stain the sink but water ink he comes out to be sure. notice there is also a small circuit attached to it. don't bang it upward but getting wet does not matter.
(16) continue to do this until the water is clear.
(17) then use your finger and rub the screen gently with your finger and then rinse it, taking ink until the water is clear. This continues until there is no more ink and screens are clean. do it for all the colors just for good measures. the color of problem that would not print, you'll notice takes longer to clean than the other colors.
(18) now look on the lower side of the transport. these strange looking things are the leaders. Rinse in hot water and dry them with paper towels. then flip it over and the breath on the side of the screen again. also between the screenside and heads (on the side of the transport) is an opening which is also probably gunked up. It blows with water too. Then, turn it over and wipe the head again. Repeat this step until no fades or until you are sick and tired.
(19) shake, then use paper towels to dry the entire unit. Make sure that the device is dry. especially inside the female plugs. blow inside or out dry hair and dry gently. do not stand there and melt the but with the blow dryer. but the sooner it dries less your ink cartridges, sitting on the paper plate will dry out. the custom of the ink dry quickly just do not take a NAP or go on a date until you're back with part of the ink.
(20) now you have finished cleaning the heads and probably don't need to do it again for the length of time, it was because you bought the printer. and just as a roadtrip you used a map to navigate, you will use these instructions in reverse for reassembly. but keep in mind when re - insert the 3 flatwires that you disconnected from the back of the ink cart, make sure you that have small metal contact on the flatwires points (side male) inserted so they affect small metal contact points on the caps of transport (feminine) side. ALSO BE VERY CAREFUL NOT TO DAMAGE BLACK FLATWIRE CONNECTING THE SCANNER PART PART HAND PRINTER. THERE IS A SMALL GROOVE IN THE PLASTIC WHERE IT CAN SIT TO GUARANTEE NO CRIMPAGE. USE IT. also make sure that the 2 hinges to the scanner portion/cover are placed correctly before the fixing of the top with the 6 black screws.
now raise the printer and reinstall the ink cartridges. then plug in the appliance and turn it on. If you get notifications on the control panel telling the custom of transport move, then open the trunk and remove the ink cartridges, hustles and ensure that transport is installed and that the tensioner springs are in place correctly. Repeat the operation if necessary until notifications go away or just do a test print and do not take into account the notification if you messed with it a few times already. That's what happened to me and the notification went his own. Once its online, open the hp utility and press the button "clean the heads. do 2 x in a row and you will be in style, with colors extremely rich and "BOLD" and Yes, printed black raven.
p. s.
You can always take your aggression out with tree limb loppers or Tin shears like I did and cut the plastic Center keeps you to transport directly outside. Completely eliminates the disassembly and reassembly. Make sure you DO NOT CUT THE TRANSPARENT TAPE THAT MOVES BACK AND FORTH TRANSPORT. This way the next time it happens it takes you only 10 minutes before you are upward and printing.
Enjoy! -Porf
-
Black ink cartridge will not print
Putting in a new black ink cartridge the printer says it's there and full of new ink but when printing it don't use it. It happened the last time that I put in the black cartridge and I managed to do it finally work but don't remember what I did. Why is this happening?
With printing black ink is not like that, there are only a few things you can try, and it looks like you did most of them. If the steps described in the following paper the link did not help, then you might make a physical print head cleaning. Bob_Headrick gave the steps to do this in the post below. If none of this does not work, you can either replace the printhead by contacting the support of HP, or you will need to replace the printer. If you are still in warranty, HP can replace the printer without cost to you. I'll link the information to get in touch with them below. The link takes you to a form to fill out. Once you fill it and she is treated, it will give you the printers warranty information, a file number and the phone number to call.
HP Technical Support call case form:
http://goo.GL/w7Hgh
Troubleshooting print quality problems:
http://goo.GL/FHypA
Physical cleaning print head:
http://goo.GL/DfroJ -
Black ink failure Photosmart 5510 e - All in one series
Hi all
Just bought the 5510 all-in-one PC world.
2 questions.
1. I can print it, but no (or little) black ink. I swapped the cartridges (in which case one provided in the box was a dud) but the same thing happens. No impression, or very light gray.
2. I can print an alignment page, but the analysis fails, no suggestion of how to solve the problems, if alignment is dead in the water
I lived all the troubleshooting onboard and used the mac based system to solve problems too.
Nothing helps.
(With no black ink), I can print from iphone or mac.
Please help if you can.
Thank you
Ben
Hold button power for 20 seconds and then turn off the machine, then hold for 20 seconds then turn on the machine and this machine is turned on, press and hold the power button for three seconds following. This piece of lunatic of advice was given to me by the support. It worked. Which is lucky for them. Apparently not a ridiculous idea.
-
Photosmart 6520 does not print the new black ink cartridge
My new black ink no longer works on the printer. This seems to be a problem throughout all of the printers HP no matter what model. Did someone with similar problems had success getting their black to print despite all recommendations of manufacturing without success? I have my printer just over a year. I think it's ridiculous that a product falls down that quickly for money which is devoted to this topic. I called HP for technical support and after doing all the things, he recommended that he told me that my printer is broken... is no longer under warranty... but he will sell me gladly one handed to nine for more than the cost I would pay if I bought it new from Amazon. I trust is no longer the product... Why would I want one handed to nine? Just looking for more tips out there who may have worked for others, before going out and buying an Epson.
Had same problem, went out and bought new cartridges ink and all but worked black, what to do, throw it in the trash? or have a go at fixing, because I had just spent more than $90 on new cartridges, I thought I'd be there is attachment.
To cut a long story short, that I managed to detach, scratching the dining room in the process, wife not impressed! puledl the ink outside, white liquor dispenser put spray gave him a good squirt, put back together, it now works like a new! Yay! Geez I'm so smart.
-
HP Photosmart 7510 won't use photo black ink
I have a photosmart 7510 printer and I am printing from microsoft word 2010 on a windows 8. I print a word with no pictures in document. Printer preferences are on plain paper with normal quality. I can't the printer to use the XL Black ink cartridge. It only uses photo black ink. Is there a setting that I can choose to let him use the regular black ink?
Hi shirsar,
I understand that you have a Photosmart 7510 which seems to use a lot more than regular black ink black photo. I'm sorry to hear that, but think I can help you with a solution.
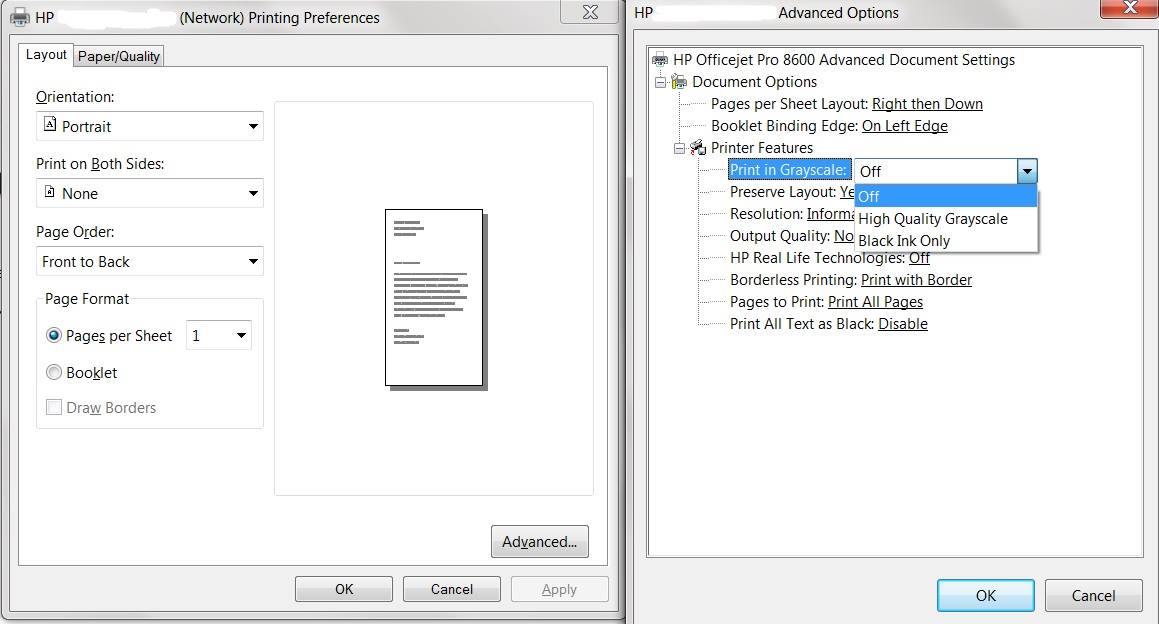
You can set the printer to use only black ink when printing from the PC and ensures that it uses black ink and no ink picture. My instructions will be set up in the pilot if he does for all programs (if you just want to program it please let me know, and I advise you more). You'll want to start by going to your start screen, and simply start typing devices and printers, and you want to open that (if that is not in the work Panel type and then proceed to open devices and printers). Once the devices and printers is open, right-click on your Photosmart 7510 icon and select Printing Preferences. You'll want to then click on the Advanced Options button at the bottom right of the screen. The next page that appears will allow you to set the printer to use black ink only when printing from the PC (please follow the screenshot below for any clarification).
Hope this helps, have a nice day!
-
With the help of black ink instead of black ink cartridge Photo
I have a HP Photosmart Premium 309 has and would like to know what are the settings that I need to change so that when you print a text document it uses black ink instead of the photo black ink.
OR
What settings should I change my 309 uses a black ink instead of black in photo is not serious what I print?
See the solution here:
-
HP 3510: HP 3510 is not printing black ink
My HP 3510 print is out of black ink. I went through the troubleshooting guide and called the 1-800 number, but they ask for me to pay for the support. Even new ink cartriages do not work. All solutions?
I dipped the printer heads in boiling water for 20 seconds and dry them on paper absorbing by a youtube video. Took me days just to find a solution. Works perfectly now. Simple.
-
HP6520 ALL IN ONE PRINTER: BLACK INK WILL NOT PRINT
I TRIED ALL THE PROPOSED SOLUTIONS. NO WORK FOR ME. I HAVE TRIED SEVERAL TIMES TO RUN THE CLEAN CARTRIDGE HEADS. SAME RESULT (WASTED A LOT OF VERY EXPENSIVE INK IN THE PROCESS). ANOTHER USER HAS SUGGESTED TO USE SOLVENT TO CLEAN A CLOGGED INKJET PORT. I DIDN'T KNOW WHERE REPRESENTATIVE HP APPROVED THAT. THE PAGE OF DIAGNOSIS THAT PRINTS AFTER HAVING CARRIED OUT THE SYSTEMATIC CLEANING HEAD PRINT BLACK TEXT, BUT THE BOX FOR BLACK PRINTING IS TOTALLY WHITE. IS THERE ANOTHER SOLUTION TO TRY? Help!
The printhead on the HP Photosmart 6520 is not designed to be removable by the user. While you can find messages with information on the withdrawal of the printhead for soaking, it's really not recommended. If you decide to do this don't forget to read the entire thread, these discussions often end with a printer damaged due to damage or damage to the encoder system, electrical connectors which can make the printer unusable.
You may have already taken the steps of troubleshooting in the paper here, if not go through each of them in order. Check the vents on the black print cartridge and that it sits correctly.
If the above does not solve the problem you could try manually to clean the printhead, as described in the post here for a different but similar printer.
Note that the printer uses a mixture of color and black inks to print a diagnostic page. This is so that the information can be read even if black or one or more colors do not work. Although it may seem from this page your black works that is unfortunately not. You can simulate this by selecting "Photo paper", as the media type in the driver, it would force the printer to use the same color ink to print black text.
-
HP Photosmart Premium C309g do not print black ink
Hello
My HP Photosmart Premium C309g (CD055A) will not print black ink even if the cartridge is full. He's going through the motions of printing but the pages come out blank. It prints colors, they are not as dark as before, so I know that black is not working. I have cleaned the print heads, turned off the printer, unplug the printer, restarted the computer, but nothing works. I get colors on the report of the print quality, but the printer status report comes out blank. I bought a new black ink cartridge (564XL) think the previous one was defective (levels showed a 75% ink) but I still have the same problem. Any suggestion would be appreciated. Thank you.
Hey,.
I see you have done some troubleshooting on the issue of the print quality that you are experiencing. I would make sure you did all the troubleshooting steps available for your research problem in the document following the link.
Print colors are the colors should not when the C309 Photosmart Premium printing.
If you have completed all these steps, then I check the status of your printer warranty. If it is out of warranty, you should consider the solution provided by Bob_Headrick in the thread found here.
Hope this helps,
Jason
-
poor quality of black ink HP DESKJET 3520
I'VE JUST SET UP MY DESKJET 3520 TRIED TO PRINT MY DOCUMENT FIRST AND BLACK IS VERY BAD QUALITY, SO SMALL THAT IT IS BARELY READABLE, IVE TRIED TO RE PRINT 5 TIMES AND STILL THE SAME... CAN SOMEONE HELP ME? THE BLACK INK CARTRIDGE IS DATED...
I've sorted it my self, I took the black cartridge and wipe the tip with paper, the was not sink much ink was out at first, but more I wiped the most ink began to flow,
Made a few test prints and now it seems in good condition.
Maybe a blockage on the cartridge -
HP Photosmart B209A more
MAC
No error messages but trying to align or check colors - black doesn't print at all
No change - knew ink was low so I tried to install a new black ink cartridge - then one day later tried an another new black ink cartridge
I tried all the techniques of "Troubleshooting" listed on the page Web - align, clean the print heads, install the new cartridges, looking for trouble with the vents, etc. I have only used HP ink cartridges.
Hi abruce,.
Usually, it is a result of dried/clogged ink nozzles in the printer or the print head.
According to some other users on the forums, you can remove the print head (use this guide if you are unsure how: http://support.hp.com/us-en/document/c01944580)
Make sure the cartridges are removed from the print head
Dive head in hot water, nozzles downwards. (about 1 in. of water) and leave any residue of ink to flow. This process should take about 15 minutes. Ensure that the print head is completely dried out and there is no moisture in the electrical contacts or the rest of the part.
I hope this helps!
-
my printer cannot print black ink and cartridges are all brand new
my printer doesn't print black ink and cartridges are all new... any suggestions how to solve this problem?
See the solution in this post. Be sure to check the vents, as described in a link in this post.
-
HP ENVY 4504: HP ENVY 4504 does not print black ink even with full cartridge
Used by my office printer is not printing black ink. It does not, it is out of black ink, but anything on a page I print requiring black ink is absent. I checked the cartridge to see if she had missed and the printer was not to tell me, but she didn't. I also tried to put in a new black ink cartridge, but it wouldn't print black to help anyone.
There is no problem with color printing and the problem started only today. The black cartridge is certainly compatible with this printer as it had been good working with it so far.
We bought this printer less than a year ago now.
Until outside to change the cartridges I also turned the printer off and on again, but neither helped.
I would appreciate greatly any assistance that we currently only this one printer at the office and we rely on it for a lot of work.
Thank you very much.
Try here.
Ink cartridge information after doing all the recommendations of HP:
Once you check the vents turn the cartridge and check the underside near the opening of the ink. They can be of four plastic tabs near the opening are resurrected. Make sure that the raised tabs are removed and made flush with the body of the cell. This will cause the cartridge do not do sit properly in all of the print head and cause air that are expected. This will affect especially the black ink cartridge.
In particular, let us know if you find the above to be true.
-
HP Photosmart more B210A: black ink cartridge will not print.
The black ink will print on my printer. I installed new ink and cleaned the print heads. I did a review of the printer and the ink of color appeared only. The printer is recognizing the cartridge when I check the ink levels. The first page after cleaning came out very faint then anything. At first, I thought that the new black ink cartridge was defective. So I replaced it with another new - no difference.
The only change is that I have installed all new cartridges when all printing has become very low.
Help, please. Thank you.
Fushing did not work, however, we used a demo on Utube and has not used the distlled water. That could be the problem. The printer is about 8 years old, we decided to get a new one. Thank you very much for your help.
-
Photosmart 6515 does not print black ink after replaced the cartridge
I am very frustrated! I can't get my Photosmart 6515 print black ink.
Our school sends the documents by e-mail now that we have to print at home. Ideal for them, but not for me. They are usually in PDF format, so I do not have the ability to edit and change the blue color to print, either.
I only use HP cartridges on this printer. I know it's more than a year, in order to call phone support will do no good.
I replaced both cartridges and now it shows black ink completely full, but when I print the printer status report, black is not displayed. Black does not appear on the tool pages, either.
I tried the command "clean printhead" several times. I unplugged and waited. I took all the cartridges. Connections look clean.
What should I do to perform a partial reset or full?
Hi Photokool,
I understand that this has been a frustrating experience for you, and I want to help him.
I will send you a private message, please check the little envelope on the upper right of the forums page to check your Inbox of Forums.

Maybe you are looking for
-
I can't display icons in the header of the yahoo mail, how to fix?
The yahoo icons do not work with Mozilla Firefox for the desktop browser, are there patches?Thank youMichelle
-
I've done everything I can find in the support section, and every time I open a new tab, I get searchnu. Whenever I use the search url bar, it uses searchnu. I have the google search bar, but it does not work. I einto gon subject: config I don't know
-
Hi all I bought a lenovo thinkpad tablet 2 with serial No.: xxxxxxx I put in the SIM with 3g support in the sim slot, but it does not work.i read in a forum that perhaps my tablet is without modem for 3g. My question is: (1) my tablet can support the
-
How to use the timestamp on the layer 2 of PCI-1588
Hello I want to use PCI-1588 as a master of the node of 1588 version 2 (multicast Ethernet). But sample program is only for the version of 1588 2 node (multicast UDP/IPv4). Please give me information on how I can configure PCI - 1588 1588 Ethernet no
-
Ago suddenly thin line yellow vertical from top to bottom and about two inches from the right side of my monitor S230HL. I disconnected the DVI cable and restart the monitor and the line is still there. I can't make this line go away. Any suggestions