Implement level translator in Labview
Hello
I need a design of level translator in LabVIEW, such was the level of voltage 1, 8V to 5V vice versa
I'll answer the question that is asked. Attached is a VI that will take an input range which, for the moment, is 0 to 1.8 and it dimensionnera that to a new range which, at present, is 0-5. This could be used with an analog input and output to create what you want analog.
Tags: NI Software
Similar Questions
-
lines of NI8451 output level translator 3.3 to 5V on SPI
Hi all
If I use a NI8451 to talk to my DUT via SPI. I notice that the highest level of SPI tension disc is 3.3V. However, my NI DAQ SPI lines are each connected to a UPS (74HC14) on my HAD and my ups output is given me some odd readings. I think that the 3.3V signal generated by the 8451 is not always interpreted as a TTL high signal by the ups because it is falling between the thresholds high and low level. So, I want to implement a 3.3-> translator level 5V on my SCLK, MOSI, and CS lines so that the TTL levels are not be misread by the inverter.
I tried to use a SN7407 (open collector driver) with resistance to pull-up 10 k out 5V on all 3 of my SPI lines. I don't know if this is the correct way to do because the signals on my scope are not fair (SCLK don't work) and do not know if NI8451 e/s lines can support. I have attached a diagram of my connections. If someone could help me please on how to do this, I would be very happy!
Thanks again.
Serge
So missed me the resistance of the output of my data acquisition at the entrance of my level shifter. I guess I need this voltage drop on the SPI lines so that they would not be potentially exposed to receive a kickback of 5V.
And I also had a floating floor which I forgot to connect ><>
The circuit works now with emitting SPI signals to the 5V level

-
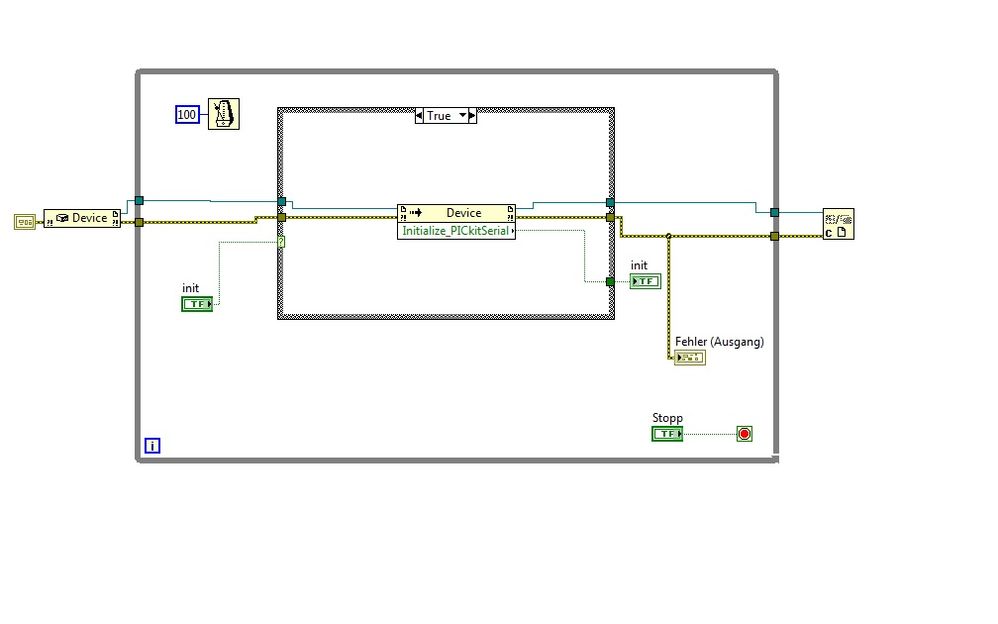
Implement pickits.dll in LabVIEW
Hello
I have problems with the pickits.dll chips. I want to implement the dll file in Labview and communicate with a material called Analyzer series of LIN of microchip.
When I run my Labview VI, it cannot communicate with the device.
It comes to my composition in Labview that does not work.
This composition is created on an OS WIN7/64 bit and a system 32-bit/WIN XP. The two does not work.
The Analyzer is run with the chip Network Analyzer(64bit) demo application.
I downloaded the LIN Serial Analyzer Update v2.05 (64-bit) of the homepage of the electronic chip and with this application, it works.
The pickitS.dll works inside LabView correct. When I run the Prototype of the "Get_PickitS_DLL_Version" function, it returns the correct Version of the DLL.
Is my composition in LabView, right?
Any that work with the Analyzer series of LINEN or similar devices of microchip?
concerning
Hello
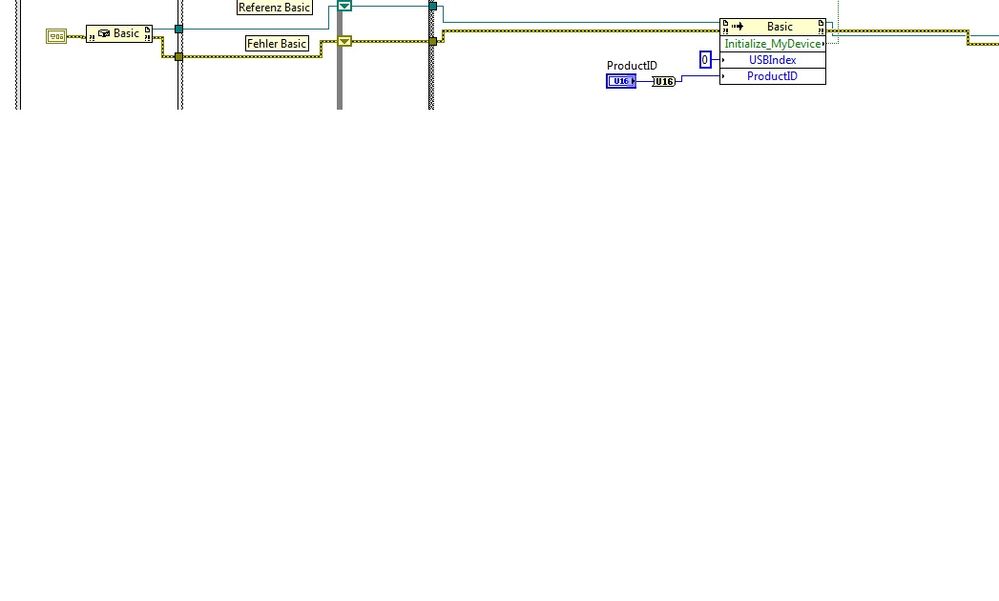
I solved the problem. For initialization of the FLAX series Analyzer, you have to take the ' base' constructor and the 'Initialize_MyDevice' method with the parameters USBIndex = 0 and ProductID = 0xA04. With this basic adjustment, you can initialize the device. Then you must set the baudrate of 19200 for Bus LIN.
Feel free to ask me if you have problems with your device.
-
Need help with implementing DLL based on LabVIEW below call Lib
Here is the list of C functions in the doc that I have, but I don't get the right result.
I need help to understand how these features and how to configure it in LabVIEW
Parameters
voltType
[in] Specifies a voltage detector to get the value of. There may be flags
VCORE (1<>
V25 (1<>
V33 (1<>
V50 (1<>
V120 (1<>
VSB (1<>
VBAT (1<>
VN50 (1<>
VN120 (1<>
ATV (1<>
retval
[out] Points to a variable in which this function returns the voltage in volts.
Typesupport
[out]
If the value is specified as a (non-NULL) pointer to a variable, it will return the types of sensors available in indicators at the level of the ILO-ORed
Return value
TRUE (1) indicates a success; FALSE (0) indicates a failure.
Remarks
Call the function first with a typesupport non-NULL of the sensors available fan and a subsequent call to get the required voltage.Thanks to all...!
I solved this problem.
There was a problem in the configuration of the VoltType. We have a cluster of bits.

-
Implementing an IVI in labview
Hello
I recently created a new IVI driver for a card of NOR-Fgen 5412 max. I'm not sure of the implementation of this driver in labview, however. Can someone point me in the right direction?
Thank you
Eric
If you have configured MAX for the driver AND then use the IVI function generator class driver on the Instrument of e/s palette.
-
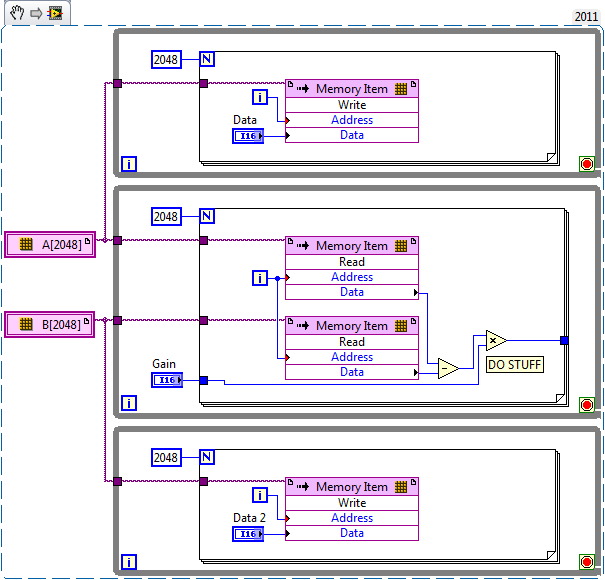
Can I implement a stack in LabVIEW?
As a company, I would like to emulate a microcontroller LC3 in LabVIEW. The memory card is like so:

It has a 16-bit word size and is addressable 16 bits. Is this possible?
Of course, it is - use a wide range of U16. In LabVIEW table indices are 32 bit, so you shouldn't have a problem with the 16-bit addresses, treated as an array index.
-
R12 implementation level and the Consolidation of the Instance
Hello
We have 11.5.10 HRMS on IBM AIX and Financials 11.5.10 on Sun Solaris servers. The plan is to upgrade the Applications for R12 and consolidate instances in a single case.
Please share your experiences to first upgrade the applications for R12 and then make the Instance Consolidation or do the Consolidation of the Instance on 11.5.10 and then perform the upgrade.
What are the advantages and disadvantages of the two approaches.
Please share your experiences, if someone has worked on similar projects.
Kind regards
VNI would say do the consolidation then upgrade the instance, this way you can avoid upgrading twice - please log an SR to confirm this with the support of the Oracle.
Thank you
Hussein -
LabVIEW Modbus TCP with VFD. Could not establish connection / error 56? Any thoughts?
Hello
I'm trying to establish a connection to a VFD (Variable frequency drive) for academic research, for testing purposes. My implementation consists of:
---> LabVIEW (Master)
---> ABB ACS880 VFD (slave) with adapter from Fieldbus FENA-01
---> (ABB motor induction)
---> (Internal Combustion Engine)
First of all, I'm new to Modbus TCP protocol, but I went through all the white papers of NOR, I have read and followed all the instructions from the manual of the VFD and the fieldbus FENA-01 adapter manual. I'm also pretty new to LabVIEW, but I'm confident, I have the knowledge to create the necessary VI.
I created a simple VI who would be able to read some registers the VFD, which is attached below. The VFD is connected by Ethernet to network local ethernet and the Master PC is connected to the same network. When I run the VI, 56 error, which as I read from other messages of the forum is to not get answer within the given time.
I tried the things:
--> Check all cables are connected properly
--> Double check the manuals
--> Checking the FENA-01 in the chassis, which gives the indication of waiting for query modbus
--> Looking for a gateway IP address, but I did not find, so I expected, I don't have to add it to the VFD parameters
--> FENA-01 refreshing settings that always translates to "offline" status
-->, I also checked in Labview > tools > Options where you check TCP/IP and there no port 502 written but I do not change it cause I had to leave the laboratory at the time. The port number was something like 3363 (something like that again)
Issues related to the:
--> Do I need to specify a new device somewhere in LabVIEW or in the control panel?
--> What I need to create a separate VI to make the connection?
--> What 'send 1150 for operating loan' and ' send 1151 for operation "means the control word?
I would be very grateful if someone had information about this before the end of the week. I'm running tight on my period and I just can't stand this VFD with the limited power of the local command of monitoring mode.
Thanks in advance for any help.
Neo
Hello, the problem is solved, and this could be a solution to problems like these.
The IP address of the car was not on the same network as the Local Ethernet network connected to it. The IP address of the disk was 192.168.0.16 and the network was on 192.168.1.1. Once the IP address of the network changed to 192.168.0.1 communicated properly.
I also have ping after and showed the communication.
Thanks for the reply TST.
Peace,
Neo
-
MOU with LabVIEW IR transmitter
Hi, I have built a system in the Arduino that reads the temperature of the meeting room, and when the temperature rises (hot), an IR Transmitter sends a signal to turn on the AC to 17 degrees Celsius, and if it's cold shuts HQ. Then I will try to implement this project in Labview using LINX, I am able to read the temperature and I can turn anything with a condition, but I don't know how to send IR signals in LabVIEW.
To caught up with the IR signal that lights up at HQ, I had to read the signal with an IR receiver, with the help of some codes out there, I found that the signal has been read as:
Encoding: NEC
Code: 38588B 1 (32-bit)...I used an oscilloscope to read the signal, and I got a bunch of bits ' 94 bits'.
000000000000000000111111111010101010101011101110111010101010111010111011101010101110101010111010111011101010101110But I didn't really need it, so my question is how can I send this signal in LabVIEW?
Help! Please, I can share what I have.
As the previous poster said, you do not have a programmatic deterministic control of LabVIEW (pretty much any platform support) - it is expected that there is support of lower level clocked by the material between the level of your application code and the actual hardware, if you try to build deterministic edge transitions or capture pins of entry at a reasonable sampling frequency.
In other environments, support can be DAQmx (or DAQmx Base) and some hardware. Or maybe some hardware third party (such as the previously mentioned RedRat), with calls to a DLL third-party-provided to manage.
My impression of LabVIEW running on an Arduino (which so far is looking over the shoulder of a colleague as he explores), is this native support for LabVIEW for the e/s is VERY limited - I think static port i/o and perhaps than I2C or SPI support. Someone here who is more familiar with Arduino can tell you if you can get LabVIEW to call a support library (as IRLib, the library used by the article you linked to). I'd be surprised if the node to call a library function is supported (yet) on the target of the Arduino.
Dave
-
tables of fixed size in FPGA compilation error - how to implement a waveform control in an FPGA?
Hello
After being stuck for two days, please let me briefly describe my project and the problem:
I want to use the cRIO FPGA for iterative control of waveforms. I want to capture a full period of the waveform, subtracting a reference waveform period and apply control algorithms on this. Subsequently the new period of correction must be sent again for the output module OR. If it does not work, the captured waveform will look like the one reference after several iterations.
I am planing to create an array of size fixed for the capture and the reference waveform (each around 2,000 items for a given period). I use so 2 paintings of each elements of 2000. I use the function 'replace the subset of table' to update each element captured in the loop sampling and a feedback for each table node to keep in memory (I also tried shift registers, but then the berries do not have a fixed size any more and I can't start the compilation process).
If I try to compile the FPGA vi, I get the following error:
Details:
ERROR ortability:3 - Xilinx this application runs out of memory or met a memory conflict. Use of current memory is 4167696 KB. You can try to increase physical or virtual memory of your system. If you are using a Win32 system, you can increase your application from 2 GB to 3 GB memory using the 3 G switch in your boot.ini file. For more information, please visit Xilinx answer Record #14932. For technical support on this issue, you can open a WebCase with this project attached to http://www.xilinx.com/support.
"Synthesize - XST" process failedBefore I added berries to my code I could compile the FPGA without problems. So, it seems that the tables are too big for the FPGA. :-(
Therefore, I would like to ask if there is perhaps a better method to implement my problem in LabVIEW FPGA? How could avoid the tables to save my waveforms on a period?
Thanks a lot for your help in advance.
Best regards
Andreas
Unfortunately, the LabVIEW FPGA compiler cannot deduct stores shipped from berries (yet). When you create these two large paintings, you are creating essentially several registers very, very large. Just by looking at your picture, I guess that there are at least 4 copies of each of the tables.
You want to use LabVIEW FPGA memories instead. You can create memories outside the loop and then read/write them where you are currently referencing the berries. The only change that you really need to do is to break down your treatment in scalar operations. I have attached a simplified version of your plan, I hope it helps. Let us know if you have any other questions.
-
I write everything in LABVIEW instead of python or SQL?
for example.
python code
Conn = _mssql.connect (server ='* ',)
data base = "mydatabase")can only be translated to LABVIEW?
This is what it looks like with the database connectivity toolkit.
I use connectionstrings.com to get the connection strings for different data sources.
-
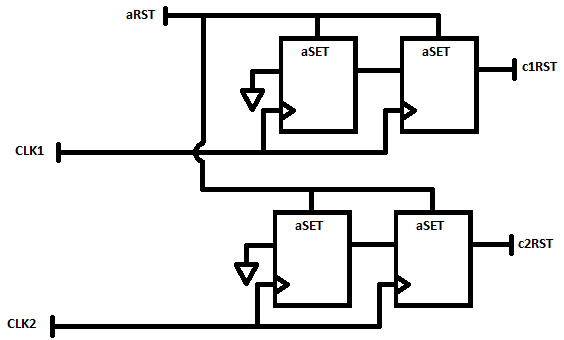
How the resets are generated in LabVIEW for FlexRIO
All,
My background is VHDL and Verilog for FPGA and ASIC implementations. I guess LabVIEW has a point, an only synchronous reset to all of its logic. I create a design that is going to be sections of VHDL IP, through IP integration node is instantiated. When writing to the top of my spec, I need to describe how a reset is spread to all the flops in the design that will be peer-reviewed of accuracy of the results. I need to understand exactly how LabVIEW handles resets to other areas of the clock.
A simple case is the following: I have a 50 MHz external source synchronous data interface and will be a limited treatment of data in this area of 50 MHz using an IP integration node. This IP is designed to have the flops to reset synchronous on the 50 MHz clock.
Separately, I have my most of my treatment and storage to the host (via DMA FIFO) in a field of 100 MHz clock, derived from the clock of 40 MHz I base I must transfer data from 50 MHz to 100 MHz using a FIFO. This treatment at 100 MHz contains a floating-point operations that are reset to zero synchronously to the field of 100 MHz.
In this scenario, you see I have two areas of clock with synchronous resets. I need to understand how LabVIEW FPGA create reset signals which are entries to my integration IP nodes, in order to understand if I need to incorporate any reset synchronization within my VHDL circuits.
Thanks for any help and if you need further details or context, please let me know and I find out additional details.
-Jim
Hey Jim,.
So, option 2 then... in this case, you are looking at a signal of asynchronous reset and must realize in your VHDL similar to the following to ensure that your resets are say synchronously.
-
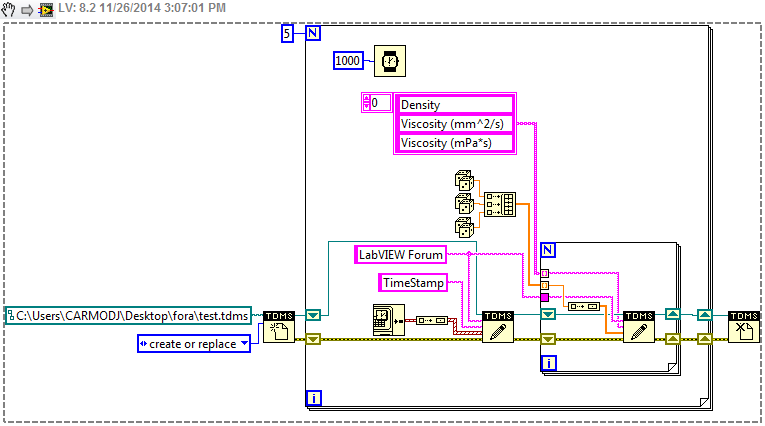
How to search a file .csv for data using its timestamp, then import into labview
Hi, I am currently get density, viscosity and temperature of an instrument, adding a timestamp data and write to a .csv file that I can view in Excel. It works very well (see attached code) but reimport what I have to do now is search this csv file of data that has been obtained at one time, temperature, density & the values of viscosity at the moment in Labview to do some calculations with them, so that the data acquisition process is still ongoing.
I found several examples on how to import a CSV together in labview, but none on how to extract data at a specific time. Also, every time I try to do anything with the file .csv for my data acquistion VI is running, I get error messages (probably because I'm trying to write and import data from the .csv file at the same time). Is there a way to get around this, perhaps using the case structures?
If you need to know my skill level, I use LabVIEW for a few weeks and before that have basically no experience of writing code, if any help would be great. Thank you!
TDMS is a little more complex than that. Here is a proof of concept quickly lifting together:
You should look at some of the examples of read/write TDMS to get a better handle on the tool. While I should...
-
HOWTO: Translation Live in C++ similar to re-translate in QML
WARNING: To come long post!
If you've built (or building) your apps BlackBerry 10 Aboriginal stunts with internationalization in mind, then you have probably dotted with QML qsTr() calls and macros tr() C++ code. When your application starts the text wrapped in qsTr() or tr() is replaced by the localized text for the local unit and the language (if defined, otherwise default text is used). This works fine unless you change the language setting on your device while your application is running. Unless you take measures to propagate the change to the language through your live webcam app, the text displayed in your application will not match the settting of language new device only when your application is restarted. QML provides this translation of 'direct' with the re-translation class, which can be used with qsTr() update of translations that soon the language setting of the device is changed:
Page {   Container {      Label {         id: label01

         // ---This label's text will be live translated         text: qsTr("Label 1") + Retranslate.onLanguageChanged      }      Label {         id: label02

         // ---This label's text will be static translated         text: qsTr("Label 2")      }   }}
In this example, label01 will be his attribute of translated text live as it is updated as soon as the device language is changed. However, label02 will have only his attribute of text translated when the software is first started and the language changes following while the application is running will not update to it.
With the help of the re-translation with QML class makes direct translation as simple as the addition of a small amount of code just after each use of qsTr(), but C++ does provide no such convenience. To implement the translation directly in C++ code, it is necessary to call setXXX() for a string with the macro tr() attribute slot once to do the initial translation and then connect the setXXX() slot to an instance of LocaleHandler that emits a signal every time the language (or locale) changes. It's complicated by the fact that the LocaleHandler knows that the language has changed, but he doesn't know which key text to provide openings, it is attached to the then must fix the LocaleHandler signal to an intermediate location that knows what translation of key to use for this attribute, and then emits a different signal with the key as a parameter that must be connected to the slot machine control setXXX() . This means that, for every single control attribute you want live, translate you'll need a separate intermediate location set somewhere, a signal linked to this site and two calls QObject::connect(). For EACH attribute that we want to live translation. Of course, this becomes very ugly, very fast.
I prefer to use C++ with QML little or not to expose my app pages so I was determined to find a solution that was easier to use than retranslating in QML (or almost) and after some trial and error I came up with a solution that I am very satisfied. The core of this technique is a C++ class called LiveTranslator. The syntax to use is a bit more complicated to use QML re-translation, but as re-translation you only need to add a line of code for each attribute that you want to translate live. Here is the header for LiveTranslator:
#ifndef LIVETRANSLATOR_HPP_
#define LIVETRANSLATOR_HPP_

#include

using namespace bb::cascades;

class LiveTranslator: public QObject {
    Q_OBJECT

    QString _key;
    QString _context;

    static LocaleHandler* _localeHandler;

public:
    LiveTranslator( const QString& context, const QString& key, QObject* target, const char* slot );
    static void setLocaleHandler( LocaleHandler* localeHandler );

private slots:
    void localeOrLanguageChangedHandler();

signals:
    void translate( const QString& string );
};

#endif /* LIVETRANSLATOR_HPP_ */
.. .and the body...
#include "LiveTranslator.hpp"

// ---Initialize the locale handler pointer on app startup so we can tell if it has been set properly later
LocaleHandler* LiveTranslator::_localeHandler = 0;

// ---Note that the target control is also used as the parent so the live translator dies when the control does
LiveTranslator::LiveTranslator( const QString& context, const QString& key, QObject* target, const char* slot ) :
        QObject( target ) {

    bool success;
    Q_UNUSED( success );

    // ---Save the context and key string
    this->_key = key;
    this->_context = context;

    // ---Die (during debug) if the locale handler hasn't been set properly before use
    Q_ASSERT( LiveTranslator::_localeHandler );

    // ---Watch for locale or language changes
    success = QObject::connect( LiveTranslator::_localeHandler, SIGNAL( localeOrLanguageChanged() ), SLOT( localeOrLanguageChangedHandler() ) );
    Q_ASSERT( success );

    // ---Trigger specified slot when locale or language changes
    success = QObject::connect( this, SIGNAL( translate( const QString& ) ), target, slot );
    Q_ASSERT( success );
}

void LiveTranslator::localeOrLanguageChangedHandler() {
    // ---Use the specified slot on the target to update the appropriate string attribute with the translated key
    emit translate( QCoreApplication::translate( this->_context.toLocal8Bit().constData(), this->_key.toLocal8Bit().constData() ) );
}

// ---This function MUST be called once with a valid LocaleHandler before any LiveTranslator classes are instantiated
void LiveTranslator::setLocaleHandler( LocaleHandler* localeHandler ) {
    LiveTranslator::_localeHandler = localeHandler;
}
LiveTranslator encapsulates all the ugly stuff, including remembering the key to the translation, the intermediate signal/slot, and all signal/slot connections necessary for direct translation. Use is as simple as creating an instance of LiveTranslator, passing the constructor the translation for the attribute key (and the context, but more on that later), the Visual control of the target and the location on the control that accepts the update of translation. Note that tr() only works with static keys chains...
// ---This is valid
QString str1 = tr("string one");

// ---This is not!
Qstring str1 = "string one";
QString str2 = tr(str1);
.. .so instead tr(), LiveTranslator must use QCoreApplication translate() internally.
An example of use of LiveTranslator :
MyClass::MyClass() {
    Label* label = Label::create().text( tr("Label one") );
    new LiveTranslator( "MyClass", "Label one", label, SLOT(setText(const QString&)));

    Option* option = Option::create().text( tr("Option one") ).description( tr("Option one description") );
    new LiveTranslator( "MyClass", "Option one", option, SLOT(setText(const QString&)));
    new LiveTranslator( "MyClass", "Option one description", option, SLOT(setDescription(const QString&)));

    ActionItem* actionItem = Option::create().title( tr("Action one") );
    new LiveTranslator( "MyClass", "Action one", actionItem, SLOT(setTitle(const QString&)));
}
Note that there is no need to save a reference to the new instance LiveTranslator since the constructor sets the 'target' as a parent control. When the control is destroyed by your app the LiveTranslator will go with him. The first parameter to the constructor LiveTranslator is the 'context' where the translation key. When you use the macro tr() (or function qsTr() QML) the code parser mentions of where he found the key and stores it in the translation file. This way you can use the same key for translation on different pages, and if the context is different, you could have them translated differently. The parser doesn't know anything about the LiveTranslator class but it must indicate the context explicitly. For C++, the context is always the name of the class containing the code that you are translating. In addition, in case it is not obvious, the "key" parameter must be the same value used with tr() on the input line.
There is one thing that you must do before using LiveTranslator in your C++ code and that is to give it a LocaleHandler to work with. Rather than force you to spend a LocaleHandler for each instance of LiveTranslator, you tell LiveTranslator that one to use only once with a static function call. If you created your application from one of the Momentics models then you already have a Manager, you can use:
ApplicationUI::ApplicationUI() : QObject() {
    // prepare the localization
    m_pTranslator = new QTranslator( this );
    m_pLocaleHandler = new LocaleHandler( this );

    // Use this locale handler for all the live translations too
    LiveTranslator::setLocaleHandler( m_pLocaleHandler );

    ...
    ...
    ...
}
I enclose the source for LiveTranslator so all you need to do to get the direct translation working in your BB10 native C++ code is extract the zip in your src directory, add a call to LiveTranslator::setLocaleHandler() in your main application class constructor, and then call new LiveTranslator (...) with the appropriate settings for each attribute of the control you want to be living translated. I hope that is useful to the native BlackBerry 10 development community wonderful (and long-suffering).
IMPORTANT!
The instructions posted above have been extended and improved to work with some additional user interface controls such as SystemDialog and SystemUiButton. It was published with a link to a sample application on GitHub as an guest article on the Blog of Dev of BlackBerry. Additional functionality has been added to the original code shown above, then the blog article and GitHub example now consider the definitive description of this technique.
See you soon.
-
[HELP] Call library function node...
I have a DLL that has a function as follows:
int GetMessageNameNumber (char * messageName [], const int MessageNumber);
The function is used thus:
char * MessageName = NULL;
int MessageNumber = 0;
...error = HL1553API_GetMessageNumberName (& MessageName, MessageNumber);
MessageName will contain the name of the message as a string.
I saw the Devils own job trying to wrap this in a Labview module. I have a knot of library function to call the above function, but I'm not sure what to set the parameter "MessageName" also! I tried array of integers 8 signed bits, adapted to the Type of pointer to data in the table and then passed in an array of strings. Whatever I do translates into LabView crash. I know HL1553API_GetMessageNumberName works, because if I call it directly in TestStand it works fine. I need LabView well!
Any ideas?
C a pointer to a string or an array of strings are completely ambiguous.
char * something = char * something [].
You can't tell the two apart from the syntax, but only from the documentation or an example of how the function is called. A C compiler treats the equal in terms of access (but a C++ compiler will do a syntactic differentiation when code syntax checking, with the possible result compile warnings when you are prompted to use a sufficiently high level of warning).
The example shows that it is not a string array gets allocated by the caller and passed to the function, but a string pointer that is passed by reference. So the function will allocate a pointer and return it (a very atypical C practice at least for strings). This automatically raises the question when and how this pointer will be released? The documentation for this function should document the call from Manager memory allows to allocate this pointer and also point to the function to call to release. Ideally the library (DLL) provides an exported function for this purpose.
Assume that everything I spoke so far is clear and available you need to cheat a bit LabVIEW. You need to configer a pointer size whole that is passed by reference. Now this whole in the diagram IS actually your channel. If you only need to pass this pointer to other library functions call that you're already doing. Otherwise if you need access to the contents of this string from the diagram LabVIEW, you will need to copy the information from this string to a real string of LabVIEW pointer.
One way to do that is to use the export of the MoveBlock() C function that LabVIEW exports itself. I have explained this several times here on this forum and the MoveBlock research will no doubt find out these positions.
Another slightly better way is to use the LStrPrintf() function which also exports of LabVIEW. To do this, you configure a library function call as follows:
Library name: LabVIEW
Function name: LStrPrintf
Calling Convention: C
Thread: both are possible, but the function is thread safe, so just use environment
return parameter: int32 (there is a possible LabVIEW Manager error code)
1st parameter: handle string of LabVIEW, passed by value
parameter 2: C string pointer
3rd parameter: integer pointer size, passed by valu
Wire an empty string in the first parameter constant.
Wire a constant containing the text '%s' without the quotes on the 2nd.
The pointer to your thread on the 3rd string
The function will return 0 as a return value and the content of the string on the side of the exit of the 1st parameter or a zero value indicating that a mistake to return back.

Maybe you are looking for
-
Firefox don't remember a specific password on Google
Hello! Using Firefox 3.6.3, Vista 32 bit.I use Gmail with 6 accounts. Firefox refuses to register an account and its password. I already have removed three rarely used ones, but still account (my wife) that I have to enter manually each time.I checke
-
Hello I tried to customize the banner doesn't have a sequence. I want that user can see what failure has occurred. That's why I'd build a vi. This vi the information of the Parameters.UUT.CriticalFailureStack (the step name, file name of sequence and
-
Poster printer constantly turn the power off then on again. OfficeJet 4500 wireless on Windows 7
New installation of HP Officejet 4500 Wireless on Dell Inspiron running Windows 7 Professional. I can't past the message on the printer then "shut off". I tried unplugging all the cables on hold and reconnecting repeatedly and in various orders, but
-
For the last few days my e-mail messages stopped update or update intermittently on my computer and are not up-to-date on my android phone. I use Windows 7. I get this message when you access livemail: Can't send or receive messages on behalf of Twcn
-
11.1.2.3 and 11.1.2.3.500 installation patch...
HI gurusI need to install a 11.1.2.3.500 system, which method is the best when I'm building the system from scratch? I have developed the following methods, but note of course that is well or better...(A)-Install the 11.1.2.3 on servers.-Install 11.1