Possible to save "live view on left, right, up, down"?
According to the title. Is it possible to actually save it by default so every time I open a document the live view / code view is set up for my preference?
Personally, I like my code on the left view and live on the right mode. It comes to messing around in the menus whenever I open a file. I'm 40 editing files at once? That's 80 times I need to go to the menu for just to change the way in which the document is presented for me to change. This happens with some frequency and is trying to turn me off wanting to use the product. Lately, I use notepad ++ for a lot of my editing simple because it is easier to change the code in this notebook replacement app (and just assume it'll look all good when I'm actually) it's to do something in Dreamweaver.
Someone please please tell me this is something that can be fixed by messing around in the registry or file settings somewhere.
Hello Hoek,
When you make changes to the workspace and close Dreamweaver, to remember your preferences for window split.
I suspect that your Dreamweaver got corrupted preferences and must be recreated. Please try the steps in the link below to restore preferences for Dreamweaver
Restore preferences | Dreamweaver CS6, Dreamweaver CC
Another solution would be to create a new workspace for you
1. open the drop-down list at the top right of the Workspace > new workspace -click

2. give it a name of your choice.

3. make the changes to the workspace
4. open the dropdown list workspace at the top right > click Save current

5. close Dreamweaver and reopen to check if the same workspace it is kept or not.
If this isn't the case, then restaurant preferences will fix the problem permanently.
Concerning
Vivek
Tags: Dreamweaver
Similar Questions
-
How do I move focus left/right/up/down
Imagine that you have created a customized with 5 place BitmapFields Manager placed like this:
..... [ ]
[ ] [X] [ ]
..... [ ]
where 'X' represents the selected field.
Now normally, if you move the trackball, the focus would go in linear order in which the fields have been added to the Manager. So, they can move from the top to the left, middle, right, and then down.
But, given that if the trackball can move up, down, left, right, I want to be able to concentrate to the up/down/left/right of the fireplace which precede with a trackBall revealing movement?
In the handler, I know I can get the movement of the trackball with navigationMovement(). But I do not understand what to substitute in the My Manager or fields to achieve the desired result.
Patrick
OK, understood the part I didn't understand the framework. The API documentation tells you that you must "return true" to indicate that the movement has been handled with:
protected boolean navigationMovement (int dx, int dy, int, int time status) {}
int d;
Block b (block) = this.getFieldWithFocus ();
If (Math.abs (dx) > Math.abs (dy)) {}
If (dx > 0) {}
d = Board.RIGHT;
} else {}
d = Board.LEFT;
}
} else {}
If (dy > 0) {}
d = Board.DOWN;
} else {}
d = Board.UP;
}
}
newFocus(b,_d).setFocus (); Focus new set
Returns true; True, since we are consuming events and manages the update
}So, basically, it's the only method I should use to control the change in emphasis. This isn't at all obvious in the API, especially given the lack of mention on the return value. Interestingly, some reminders require scythes and other true to indicate the "consumption" or the management of the event.
Anyway, problem solved.
-
Customize scans of left/right for Mail on iPhone?
Is it possible to customize actions for the left/right kick in the iPhone Mail app? Thank you!
Laughing out loud
Note that there are more options when you drag from right to left.
Function of what you're looking for?
Otherwise, you can suggest features to Apple via this link:
-
Why my text won't align right in Live View or browsers?
I created a class called .reviewer if the the name of the reviewer would align right while the the actual examination is aligned to the left. I applied to the class for the name of the reviewer and in design mode, it looks perfect. But using Live view and when I saw in a browser, the text is left-aligned. I put this class in two external style sheets, main.css, and mainReviews.css.
The page in question is: www.jillgrovemezzo.com/reviews.htm
To be more precise, the text I want to align to the right under the first review is ""Lawrence a. Johnson, Chicago Classical Review " "
Regina
Add display: block; to your .reviewer of class css (as shown below).
{.reviewer}
text-align: right;
display: block;
}
-
can't save edits mode live view?
Dreamweaver will not present a "Design" view - and it won't save changes in the view 'Live '.
In addition, if I write in Code view and then try to split the screen to see the Live and code the two - I have to disable Toggle Live View and then turn it back on.Needless to say I'm losing too much time!
Where is Design view.
I'm MacBookPro10.10.5 Yosemite
Any suggestion is welcome.
Found the Solution!
I have to go:
View
Toolbars
and check all three
Document
Standard
Coding-
Now, I have a top toolbar of work that gives me the options you show in your first post.
Problem is - I had no idea they were still there-, nor I saw none on where to look!
Hope this post helps others who have no design view!

So - display - toolbars - check all three options and you get this.
Ann
-
(tag div selector in mode live view in Dreamwear CC2015) is usually a blue box with the selector in a blue box in the upper left corner. Who discovers is no longer present.
Mac OS in Preferences, how can I get these to appear again?
Your screenshot shows affinity CSS file of the project seven is selected in the tabs.
Try clicking on the Source Code tab.
Nancy O.
-
Harassed by "save changes" dialog box in PHP file Live View on DW CC 2014?
Hello
I am being constantly harassed by the dialog "save changes to < document name >' when I'm working in Live view on DW CC 2014. Every time I have changes to the code, especially if I use the properties toolbar, I was immediately prompted to save the changes. I realize the rendering system account must have a recorded document to view from, but this happens after every single little change. If I look at watching the live view and decide to make some changes to the code I can get invited several times while I make these changes and it is not until the changes are finished I want to check live view again (when I save the document), but I have to keep stopping to reject dialogue! This means that I must keep turn off live view to make relatively small changes, and then turn it back on.
I've always been able to work OK in this way on all previous versions using the 'Preview using temporary file' parameter, but this version works the same way. I'm not bothered if I save the file when changes are made in order to update the live view, so just remove the dialog box would be a decent solution.
Thanks for any help
Hello
Turn it off in "View > Live View Options"... automatically uncheck "synchronize remote files.
-
Left/right view Zoom with shortcuts
I'm a newbie and have not found the answer to my question, although it might have been addressed already somewhere.
I want to continue to use the outside of a zone currently with zoom adjustment brush without having to jump out of the pan with the mouse to the next area of the image. (If I change panning by mouse click adjustment brush, I just lost the end of my (painted) area formerly brushed, because it can be "reactivated" only with his pin code, which is outside the new zone where I just moved in pan with the mouse.)
I can move from top to bottom with the roll of scrolling without leaving the adjustment brush, but I did not understand how move sideways and horizontally with a shortcut (for example something like SHIFT + left/right arrow).
I am aware that by using the shift + PgUp/PgDn keys I can pan to the top, and then down in the adjacent band and upward, then again in the third strip, etc. But this "vertical zig - zag" is very time consuming and takes me not necessarily right at the target area.
Is a shortcut for a pan in Zoom?
With the selected AdjBrush, press the space bar on the keyboard. As it is pressed, the AdjBrush will change the symbol of the hand that allows you to drag the image around there where you need paint.
Release the SPACEBAR and the AdjBrush is back.
Works the same way with the Clone / heal tool.
-
Question of Live View EOS 70 d
Hello
I just bought a 70 d EOS. My question relates using Live View under "auto". I understand that touch the display screen directly causes the camera to focus about to contact, and that's exactly what's happening on my camera. However, I also noticed that exposure changes as well. For example, if I touch a subject dark opening or time will change to allow for more light and vice versa if I touch a light object.
I don't see any reference to this in the manual. This is a very good feature, but I'd be curious to know where this feature is described in the manual, if anyone knows.
Thank you
D 70 has an iFCL 63-zone metering system. In other words, the area of the image you see in the viewfinder is divided into 63 different areas which are measured individually, with the collected info better interpreted the system and then used to get to what the camera "think" is a correct exposure.
When in 'Auto', it probably uses so-called evaluative method. This method places more emphasis on the area immediately around the active AF point. It's kind of like one-off measure related to the focus area turns, but evaluative measure also considers the rest of the area of the image in its calculations.
You probably also Simulation exhibition enabled (in fact it is not possible to turn it off using a fully automatic mode).
If you were using a rather 'creatives' (as Canon calls) auto exposure modes, you would have more flexibility in the setting of the camera upwards. For example, you can choose a different method of counting (weighted Central don't react just like evaluative, simply examines the entire image area, with slightly more emphasis on the central part of the image, but without link to special AF point), or you could dial in some more or less using Exposure Compensation adjustment. AV, Tv and P is the automatic exposure modes 'creative '. AV means "Aperture priority" and is where you choose the opening and automation of the camera selects an appropriate shutter speed to match. TV stands for "Shutter priority", where you choose a shutter speed and the camera rule opening automatically. P is "programming mode", where the device regulates the opening and priority. (Note: in three modes, you would have chosen and ISO, first.)
You could also disable Simulation exhibition, if you wish. Then the visible image on the LCD screen of the camera varies in the same way.
However, I really do not pretend that you do not use evaluative measurement or Simulation of exposure. They are both valuable tools at your disposal. I suggest that you learn to use them to your advantage. Also become familiar with the camera's three other methods of counting (Center weighted, partial and Spot).
Evaluative measure doesn't do a good job in a variety of situations. I suggest you learn to use it.
First, try to think about the world in shades of gray, rather than colors. Like all the reflective metering systems, it was designed to produce a "neutral gray" and is influenced by the tone of the subject. For example, if you are shooting a black bear in a coal mine, the camera tries it overexposing. Or, if you are shooting a polar bear in a snow storm, the camera will try to underexpose it. In both cases, the metering system is still trying to be out "neutral grey". He can't think... to do the thinking and to recognize the situations where it will be shifted, skip it and make the appropriate adjustments.
Simulation of exposure can help warn you of the top and bottom of the trends of the exhibition. You can also read your images and inspect the histogram, see if you over or underexposure issues, so that you can always re - draw the image if necessary.
Note: more of what the camera offers there are other types of meters that work differently. For example, measure frequency measures the light falling on the subject, rather than what is reflected off of him (such as reflective metering). Used right, it can make for a more precise dosage. However, there is simply no practical way to build a frequency counter in a camera and use it for automatic exposure control. Frequency counters are for the most part separated, handheld and many of them are also able to measure with precision the flash and strobe lighting.
It seems to me that if your device works just like it should. It's just a matter to become familiar with it and learn to use it.
In addition to the manual that came with the camera, there are guides available that can be very useful and complete the manual. I suggest you to check what guides are out for 70 days. Whenever I have started working with a new model of camera I always buy one or two of the guides, as a shortcut to get up to speed using the camera. From personal experience, I can recommend guides by Charlotte Lowrie, Michael Guncheon and David Busch. If you are looking for 70 "d" on Amazon in the books, I'm sure you will find guides by one or several of these authors and probably a few other very good (some authors a few I know).
If you are really new to photography, I also highly recommend getting a copy of "Understanding Exposure" by Bryan Peterson. It can also be very useful, and is more of a preview of the works the cameras in general. I think it should be mandatory reading for all new photographers, or at least for all those who want to move beyond the skill level of point-n-shoot.
***********
Alan MyersSan Jose, California, USA.
«Market softly and carry a great lens.»
MATERIAL: 5DII, 7D(x2), 50D(x3), some other cameras, various lenses & accessories
FLICKR & REPROGRAPHY -
EOS 6 d zoom in remote mode live view sharper?
Hello
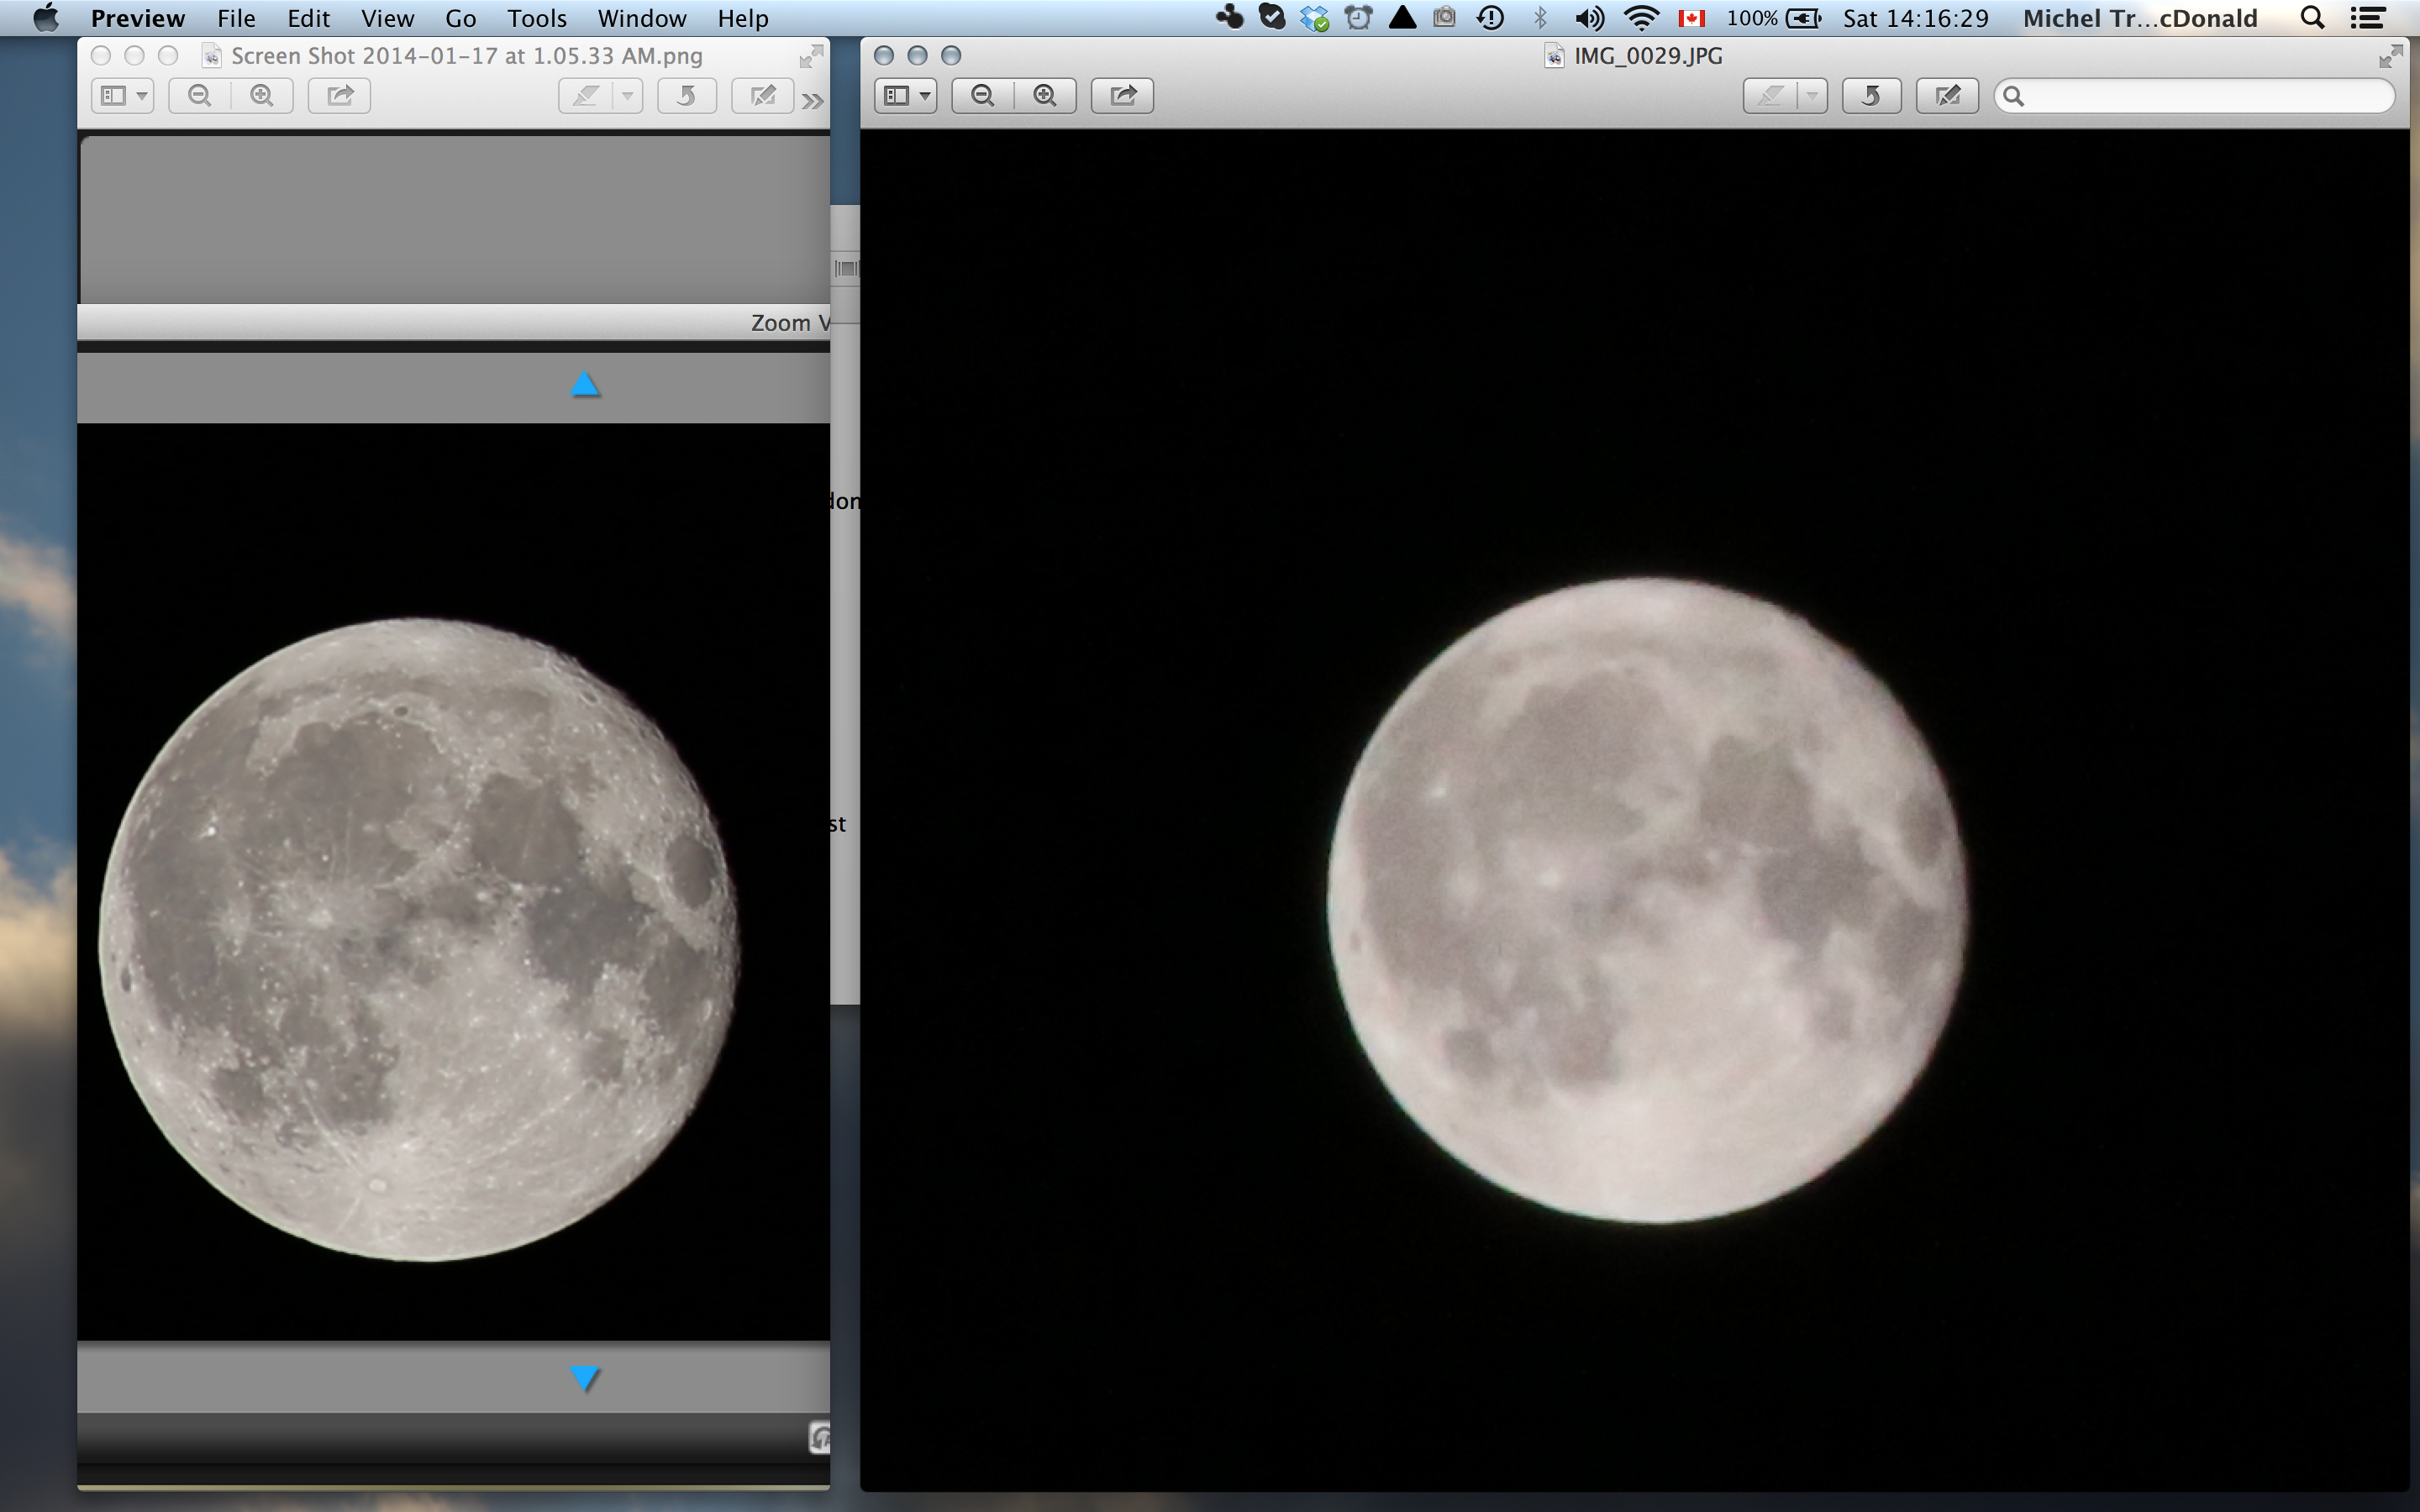
I have this Canon EF 70-300mm Zoom lens on my EOS 6 d, connected via EOS Utility Remote on my Macbook Pro running MacOS 10.9.1. Everything works very well, and I'm really impressed by the level of detail that I can achieve by zooming in on the Moon:
I thought, that looks really amazing! Imagine what the shot will look like when I break the real photo with these settings. And then I get it. This is a comparison of the screenshot of the Live View Zoom View (left) and the actual shooting (right):
I tried to change the quality of the image (I tried RAW) does not. I do not know whence the loss of details, I was wondering if anyone here had any idea about this or that she ran into similar problems.
Thank you
Michel
You can try and turn off High ISO NR? at ISO 12800, you can lose a lot of details with NR. The Moon is clear enough, you don't need an ISO high. And the Moon must be sharp, even at slow shutter speed. Try so the slow shutter speed, lower the ISO, turn off NR. Your shot looks like more on NR off focus or camera shake.
-
How to focus with live view on 70 d
Hello
My girlfriend recently bought the 70 d and while that it "is a neat device, we would hit a problem: how to place your focus using live view in M mode?
I want only to place the point and to focus with half the press as usual. Instead, when I place the focus by pressing the touch screen, it should be immediately shot.And why there is no possibility to move the update using the wheel apperture as on my 6 d?
Thank you much in advance.
N.B: Please excuse my English

When in live view, you can use the rear dial to move the focus "place".
As for the second request, when in mode live view press the info button to bring up the options. Take a look in the lower left corner, there is an icon that allows you to enable or disable the option to instantly take the photo. It will show it OFF or
-
Add left/right arrows on tiles
When sending photos from Live Photo Gallery, the left/right arrows lead to many random add on the slab which appear to be ads. How can I prevent this?
When sending photos from Live Photo Gallery, the left/right arrows lead to many random add on the slab which appear to be ads. How can I prevent this?
=======================================
I suspect the unwanted images are at your
The temporary Internet files folder. When you access
sites on the net that include graphics and images,
they are loaded into this folder, so you can view them.If you want to view the contents of your
The temporary Internet files folder... try the following steps...Reach... Start / Control Panel / Internet Options /.
General tab / historical section of navigation / settings
button / see the files button.Or... a window IE and go to... Tools / Internet
Options / General tab / navigation history section.
Button settings / see the files button...You can also go to... Start / run... and type or copy.
Paste the following command:%USERPROFILE%\Local Settings\Temporary Internet Files
Then press on... Enter... to launch the Temporary Internet Files folder.
To clear it up... try deleting temporary Internet files.
Running Disk Cleanup should take care of it.
(310312) description of the disk cleanup
Tool in Windows XP
http://support.Microsoft.com/?kbid=310312You may also, on an Internet Explorer window...
Reach... Tools / Internet Options / delete files / OK.Do it again and check "delete all Offline Content" / OK.
Remove the Cookies button / OK.
More info...
Delete temporary Internet files
http://MVPs.org/winhelp2002/delcache.htm -
Lost in Live View and overview of formatting
Hello. I'm stuck!
I am new to Dreamweaver CC, but previous experience with CS5.
I worked on a new website that was beautiful appearance until today. Now, I have lost all the formatting in Live view mode and preview. It just shows the test with no formatting at all. With the exception of the background image and the top navigation bar, which makes me think that the document should be link to the CSS file. In the design view all the divs and formatting are there.
I hope someone can help, but I'm still relatively new to web development, feeling frustrated, as it was working fine before today...
Here's the html code:
<! DOCTYPE html >
< html lang = "en" >
< head >
< meta charset = "utf-8" >
< meta http-equiv = "X-UA-Compatible" content = "IE = edge" >
< meta name = "viewport" content = "width = device-width, original scale = 1" >
< title > amazing conferences < /title > Australasia
< link href = "css/ac.css" rel = "stylesheet" type = "text/css" / > "
< link href = "css/1010px.css" rel = "stylesheet" type = "text/css" media ="screen and (max-width: 1010px)" / > "
< link href = "css/469px.css" rel = "stylesheet" type = "text/css" media ="screen and (max-width: 310px)" / > "
< script type = "text/javascript" >
function MM_swapImgRestore() //v3.0 {}
var i, x = offline. MM_sr; for (i = 0; a & & I <.) Length & & (x = a [i]) & & x.oSrc; i ++) x.src = x.oSrc;
}
function MM_preloadImages() {//v3.0
var d = document; If (d.images) {if(!d.MM_p) d.MM_p = new Array();
var i, j is d.MM_p.length, a = MM_preloadImages.arguments; for (i = 0; i <.) Length; i ++)
If (a [i].indexOf("#")! = 0) {d.MM_p [j] = new Image; d.MM_p [j ++] .src = a [i] ;}}
}
function MM_findObj (n, d) {//v4.01
var p, i, x; if(!d) d = document; If ((p = n.IndexOf ("?")) > 0 & & parent.frames.length) {}
d = parent.frames [n.Substring(p+1)] .document; n = n.Substring (0, p) ;}
If (!) () x = d [n]) & & copyrights) x = d.all [n]; for (i = 0;! x & & i < d.forms.length; i ++) x = d.forms [i] [n];
for (i = 0;! x & & d.layers & & I < d.layers.length; i ++) x = MM_findObj (n, d.layers [i] .document);
If (! x & & d.getElementById) x = d.getElementById (n); Return x;
}
function MM_swapImage() {//v3.0
var i, j = 0, x, a = MM_swapImage.arguments; document. MM_sr = new Array; for (i = 0; i <(a.length-2); I += 3).
If ((x = MM_findObj (a [i]))! = null) {document. MM_sr [j ++] = x; if(!x.oSrc) x.oSrc = x.src; x.SRC = a [i + 2] ;}
}
< /script >
< / head >
< body
<! - include all the plugins compiled (see below), or include individual files to the need - >
< script src = "js/bootstrap.js" > < / script > < body onLoad = "MM_preloadImages ('img/pensée-man.png','img/cyclisme-stickman.png','img/stickmen-paddle-boarding.png','img/stickmen-up-rangitoto.png','img/stickman-wine-glass.png')" >
< div id = 'wrapper' >
< nav class = "navigation" >
< ul >
< li > < a href = "#" > < span style = "do-family:" Gill without ', 'Gill without MT', 'Myriad Pro', "DejaVu without Condensed" ", Helvetica, Arial, without serif;" > contact </span > < /a > < /li > "
< li > < a href = "#" > < span > < / span > < /a > < /li >
< /ul >
< / nav >
< nav class = "navigation-Home-Center" >
< ul >
< /li > < li > AUSTRALIA
< li > New Zealand < /li >
< /ul >
< / nav >
< div class = "top-line" > < / div >
"< div class ="lmo-box"> < a href =" # "Mm_swapimgrestore" onMouseOver = "MM_swapImage ('Image8 '", ' img/thought - man.png', 1) "> < img src = ' img/box-ac - green.png" alt = "" width = "40" height = "40" id = "Image8" > < /a > < / div > "
"< div class ="lmo-box"> < a href =" # "Mm_swapimgrestore" onMouseOver = "MM_swapImage ('Image9 '", ' img/cycling - stickman.png', 1) "> < img src = ' img/box-ac - orange.png" alt = "" width = "40" height = "40" id = "Image9" > < /a > < / div > "
"< div class ="lmo-box"> < a href =" # "Mm_swapimgrestore" onMouseOver = "MM_swapImage ('Image10 '", ' img/stickmen-paddle - boarding.png', 1) "> < img src = ' img/box-ac - red.png ' alt =" "width ="40"height ="40"id ="Image10"> < /a > < / div >"
"< div class ="lmo-box"> < a href =" # "Mm_swapimgrestore" onMouseOver = "MM_swapImage ('Image11 '", ' img/stickmen-up - rangitoto.png', 1) "> < img src = ' img/box-ac - purple.png" alt = "" width = "40" height = "40" id = "Image11" > < /a > < / div > "
"< div class ="lmo-box"> < a href =" # "Mm_swapimgrestore" onMouseOver = "MM_swapImage ('Image12 '", ' img/stickman-wine - glass.png', 1) "> < img src = ' img/box-ac - drop.png" alt = "" width = "40" height = "40" id = 'Image12' > < /a > < / div > "
< div class = "top-line2" > < / div >
< div id = "headline" > CONFERENCES & amp; EVENTS < / div >
< div id = "translate" > < / div >
< / div >
< / body >
< / html >
And here's the CSS:
@charset "utf-8";
/ * CSS document * /.
*{
margin: 0;
padding: 0;
}
{body
Width: 1245;
color: #FFFFFF;
do-family: "Gill without ',"Gill Sans MT", 'DejaVu Sans Condensed', 'Myriad Pro', Helvetica, Arial, without serif.
background-image: url (.. /IMG/Pavillion-Sydney-Exterior-Night.png); background-repeat: repeat no.;
background-attachment: fixed;
background-position: center;
}
#australia #navaustralia body #nz #navnz, #contact #navcontact, body body #about {#navabout}
color: #31BBF5;
}
a {}
color: #969494;
text-decoration: none;
}
{#wrapper}
Auto margin: 0;
padding: 0;
Width: 1245px;
height: 775px;
}
.navigation {}
Width: 1245px;
height: 40px;
Auto margin: 0;
padding-top: 7px;
background-color: #FFFFFF;
}
UL {}
list-style-type: none;
margin: 0;
padding: 0;
float: right;
}
Li {}
float: left;
text-align: center;
padding-bottom: 3px;
padding-right: 60px banner;
do-size: 16px;
}
a: {}
display: block;
Width: 120px;
text-decoration: none;
color: #73E908;
}
.navigation a: hover {}
color: #FF00FF;
}
{.navigation-Home-Center
float: left;
Width: 1100px;
padding-right: 0px;
padding-left: 50px;
margin-top: 220px;
}
.navigation-home-center a {}
Width: 120px;
color: #FFFFFF;
}
.navigation-Home-Center li {}
Width: 120px;
color: #FFFFFF;
do-size: 16px;
}
.navigation-home-center a: hover {}
color: #FF00FF;
}
. Top-line {}
Width: 345px;
height: 40px;
float: left;
margin-left: 110px;
background-image: url (.. /IMG/Top-Line-AC-White.png);
}
. Top-line2}
Width: 345px;
height: 40px;
float: left;
margin-left: 15px;
background-image: url (.. /IMG/Top-Line-AC-White.png);
}
{.lmo-box
Width: 40px;
float: left;
margin-left: 10px;
padding-left: 6px;
}
{#big - title
Width: 1000px;
color: #ffffff;
text-align: center;
float: left;
margin-left: 105px;
font-size: 80px;
Display: inline-block;
letter-spacing: 4px;
-webkit - transform:scale (1,1.5). / * Safari and Chrome * /.
-moz - transform:scale (1,1.5). / * Firefox * /.
-ms - transform:scale (1,1.5). / * IT IE 9 * /.
-o - transform: scale(1,1.5; /* Opera */)
Transform:scale (1,2); / * W3C * /.
}
# translate {}
Width: 1015px;
height: 40px;
float: left;
margin-left: 90px;
background-image: url (.. /IMG/Bottom-Line-AC-White.png)
}
{.navigation2}
margin-top: 30px;
}
.navigation2 a {}
color: #ffffff;
text-decoration: none;
}
.navigation2 a: hover {}
color: #FF00FF;
}
.navigation2 ul {}
padding: 0;
margin: 0;
}
.navigation2 ul li {}
Display: block;
position: relative;
}
{.listings}
Width: 1245px;
float: left;
height: 550px;
margin-top: 30px;
}
{#heading-place}
Width: 559px;
height: 33px;
padding-top: 10px;
margin-left: 54px;
margin-right: 10px;
margin-bottom: 3px;
float: left;
background-color:HSLA(0,0%,44%,0.55);
text-align: center;
}
{#heading - activity
Width: 559px;
height: 33px;
padding-top: 10px;
margin-left: 10px;
margin-bottom: 3px;
float: left;
background-color:HSLA(0,0%,44%,0.55);
text-align: center;
}
{#listing-place}
Width: 559px;
height: 600px;
margin-left: 54px;
margin-right: 10px;
float: left;
background-color:HSLA(0,0%,44%,0.55);
overflow: auto;
}
{#listing - activity
Width: 559px;
height: 600px;
margin-left: 10px;
float: left;
background-color:HSLA(0,0%,44%,0.55);
overflow: auto;
}
{#liste-photo}
Width: 259px;
height: 150px;
float: left;
margin-left: 8px;
background-color:HSLA(74,73%,44%,1.00);
margin-top: 6px;
}
{#liste-desc}
Width: 254px;
height: 150px;
float: left;
margin-left: 6px;
padding-left: 5px;
background-color:HSLA(74,73%,44%,0.57);
margin-top: 6px;
}
{#heading - book - now
Width: 1137px;
height: 33px;
padding-top: 10px;
margin-left: 54px;
margin-right: 10px;
margin-top: 3px;
float: left;
background-color:HSLA(0,0%,44%,0.55);
text-align: center;
}
@media (min-width: 1011px) and (max-width: 1245px) {}
}
@media (min-width: 470px) and (max-width: 1010px) {}
}
Yay! solved the problem.
Webkit in css #big lines - title has been upsetting the layout.
-webkit - transform:scale (1,1.5). / * Safari and Chrome * /.
-moz - transform:scale (1,1.5). / * Firefox * /.
-ms - transform:scale (1,1.5). / * IT IE 9 * /.
-o - transform: scale(1,1.5; /* Opera */)
Transform:scale (1,2); / * W3C * /.
Still too much a novice to work out exactly why, but at least the issue is resolved and I can crack on.
-
Live View sensitive div controls have suddenly disappeared?

I worked on a sensitive site Bootstrap in Dreamweaver for a while now. At first, I could resize the DIV in Live View mode with handles on the left and right sides of the blue div outline (see circles) Red photo, and I remember some controls (probably to put the div visibility) in the lower right corner of the div (red see circle photo).
However, as you can see, these controls are now gone? I can still see the Visual media queries above the Live View mode, but it's like Dreamweaver does not recognize this as a sensitive site? Also, some tags div is described by gray rather than blue when I click on them. I tried to restart DW and reopening, that did not help.
Can someone tell me what is happening and how I can return to sensitive editing layouts in Live View mode?
No, this is not the cause. I deliberately put the media ask very low values to test something.
However, I have discovered the solution: for some reason any, while browsing in Live View mode, Dreamweaver showed the http://mydomain.com/siteURL. When I added 'www', the tools back.
-
DW CS5 page not visible in preview or view Live view [subject edited by Moderator]
Hello. I use Dreamweaver CS 5. It is my second site even though it's been a while since I've done the first. I have an index page and a linked css page. In preview and live view, I see nothing at all.
< ! DOCTYPE html PUBLIC "-//W3C//DTD XHTML 1.0 Transitional / / IN" "http://www.w3.org/TR/xhtml1/DTD/xhtml1-transitional.dtd" > ""
" < html xmlns =" http://www.w3.org/1999/xhtml ">
< head >
< meta http-equiv = "Content-Type" content = text/html"; Charset = UTF-8 "/ >"
< title > The Weedhopper greenhouse and florist < /title >
< link href = "weedhopperstyle.css" rel = "stylesheet" type = "text/css" / > "
< style type = "text/css" >
< / style >
< / head >
< body >
< div id = "container" > < div id = "header" >
< div id = "headerplaceholder" > < img src = "images/Weedhopper_logo.gif" width = "250" height = "100" alt = "Weedhopper" / > < / div > "
< / div >
< div id = "centercontainer" >
< div id = "infoandcontent" >
< p > < / p >
< p > < / p >
< p > < / p >
< p > < / p >
< p > 4751 State Road 13 < /p >
Greenwich, Ohio 44837 < /p > < p >
(419)752-1005 < p > < /p >
< p > < / p >
< p > spring early hours: < /p >
< p > Monday to Saturday < /p >
< p > 09:00-17:00 < /p >
< / div >
< div id = "picturecollage" > < img src = "images/homepg.jpg" width = "585" height = "360" / > < / div > "
< / div >
< / div >
< / div >
< / div >
< / body >
< / html >
Thanks for posting your CSS code.
If you remove display: no yoke of your body, your page is displayed.
{body
background-color: #f9f5f0;
float: none;
background-image:;
background-repeat: repeat;
background-position: Center;
display: none;
background-attachment: fixed;
height: auto;
Width: auto;
Clip: rect (auto, auto, auto, auto);
cursor: auto;
position: absolute;
border-top-style: outset;
border-right-style: outset;
border-bottom-style: outset;
border-left-style: outset;
background-image: url(images/lyonnette.png);
}


Maybe you are looking for
-
I installed a full add on my android tablet screen. He won't let me exit full screen by pressing or any other way. How can I uninstall it when I can't go to the settings or the address bar?
-
Hi, looking at Orbi and Note Although ports RJ45/Ethernet router/Satellites. Currently, I used a Devolo Ethernet power for the AP and other devices in other parts of the House. However, it is fairly low speed)
-
stuck FPGA compilation, no errors
Hello I wrote a LabVIEW FPGA 8.6.1 program (I have written several, this is my most recent). When I run it on the development computer it seems to work fine without any errors. When I try to compile, however, it still stalls on this part: 'Analysis o
-
Why time keep changing on my computer
whenever I turn on the date and time of comp has changed... free Wi - Fi now must be done manually
-
I want to make Windows historic Silver specialist
Hello I get to specialist silver level Windows When I click on the specialist money Windows entry course it gives me the message File not found The requested page is not found. Please select or move to another page. File not found The request