Purpose of deployment - abandonment - "bad configure my modules as the target of WH / Source OWB11gR2.
Hello
I'm having difficulties to configure my modules as target of the warehouse or the Data Source. I CAN NOT see the radio button 'Identifying the type of module' in the first page of my Design Center creation module for giving me the chance to put.
https://www.dropbox.com/s/0d4n8ueujmhe2uf/create.jpg
That's why I get this obvious error at the time of the deployment in the Control Center:
Impossible to use the schema DP_TGT (my target schema Module) by a location target DP_TGT_LOCATION because it is already used as a target by OWB. MY_Worksapce. (My name in the repository). You want to register DP_TGT_LOCATION as a single source? (and give me OK and cancel the choices that are unnecessary)
https://www.dropbox.com/s/nf4rp8p5ycztmku/TTT.jpg
https://www.dropbox.com/s/exh2hqf6p8l0c78/TGT.jpg
MY QUESTION:
-> Why I can't find the setting for Source/target module in the page Wizard? It suppose to be in the first module by Wizard creation page, just before the Description? !!! and it's gone!
-> Is there anywhere else I can fix this?
I even tried to reinstall my Warehouse Builder, still no luck!
I followed the written since ETL here exercise:
My machine: win7 64 bit, DB11g r2, r2 stand-alone, BI 1.1.1.7, of WHB11g.
Appreciate your help guys.
Hami
He is the author of the question:
This weird issue has finally been resolved.
Couple notes:
-in 11 GR 2 you do not select a module as Source/target in the page Wizard. (not sure where is it defined yet)
-do not follow the old tutorial, instead that follow for the new version:
OWB 11 GR 2 OBEs.
And I guess you have to give permission to your schema specified target to select your source.
I will not remove the post in case where someone else face same issue.
Have fun guys.
Tags: Business Intelligence
Similar Questions
-
Problem in configuring IP address in the target of RT PC desktop
Hello
I use PC industrial (IMB Q670 R21) than my goal of RT. It has two ethernet ports, which is compatible with LabVIEW RT. I created the USB Utility with LabVIEW 2012 and formatted HARD disk drive. The PC boots into safe mode, but the IP settings are not reset to 0.0.0.0. The same HARD drive previously used on another target PC RT with LabVIEW RT programs worked very well. I need two RS232 ports on target RT so I changed my target computer and try to use as target RT.
The problem now I face, is that the IP address is not set to host PC MAX. Even if I use a USB drive utility to reset the IP address, it is not 0.0.0.0 that's rather 169.254.25.246. This address is also not even identical to the previous target of RT. The error I get in MAX "a problem in the recording of your settings. I tried with ethernet hub as well as crossover cable with different addresses.
Need help.
Rashmi
Hi RashmiM,
Connect your PC to the PC RT using crossover cable and change the settings via NI MAX in your PC. Before doing all this, have you tried disabling your firewall (not your RT PC) PC? If you do not, please disable the firewall before you continue. This is possibly due to your firewall or antivirus or both.
Some additional notes:
http://digital.NI.com/public.nsf/allkb/72AE8CADA1AF075686256A16005D55B1?OpenDocument
http://www.NI.com/white-paper/4480/en/
Warm greetings,
Lennard.C
-
Thermocouple configured in module module-9221
Hi all!
Nice day!
I try to configure thermocouples type K 6 through the NOR-9221 analog input module and chassis cDAQ-9174. I'll be able to get the direct temperature readings outside this module not being a thermocouple module? Otherwise? Please suggest me how to get the temperature for this add-on module-9221 directly! Quick help will be very appreciated!
Best regards!
Tajim
To build on what the broken arrow, the 9221 is really not at all optimal for measurement by thermocouple. Most of the measures by thermocouple are between 0 to 80 mV. The module 9221 is a 12-bit with a range of ±60V module. The width of the code for this module is about 15 mV and your accuracy is 156 mV. All your thermocouple readings will be lost in the noise for this add-on. I would recommend the 9211 or the 9213 for measurement by thermocouple, because each has CYC and is specially designed for thermocouples. If you want to try an external amplifier, which can run, but you will probably need something that can amplify from 0 to 80 mV to 0 - 60V.
Kind regards
-
cRIO, FPGA, portability to different configuration of module e/s
Hello people!
For my research project, I need support.
I have to implement the NO-tutorial: "CompactRIO Control Design and Simulation Tutorial" on different hardware.
My cRIO-9004 is no problem and the NI9104 chassis is the same.
Occure in problems with the config of the i/O-Modules:
Tutorial-config: Slot5 = NI9505, Slot8 = NI9221
MyDevice-config: Slot1 = NIcRIO-9215, Slot2 = NI9263, Slot3 = NI9217, Slot4 = NI9474, Slot5 = NIcRIO-9423
I think that there should be a smart way to port this programm for a different config and change the I/O-link with another module without neckshoot the programm. do not know how, because I am a newbie of LabView.
your ff
Hi ffelix,
The tutorial works with a 9505 (H-Bridge for Servos) movement Module and a Module of the 9221.
In your configuration, you HAVE some, a zone of OCCUPATION, an RTD, a DI and a Module, but none Module movement to control a Servo.
So if you plan to do a similar Assembly, you must use the AO Module or a Module (PWM) with an external driver circuit to control a motor. And rather than use the software NOR Motion, which I think is used in the tutorial, you will need to program the motor by yourself from scratch part on.
Christian
-
The issue of deployment of secure Inizializzation platform module.
Hello
I have a large network with 200 laptops with the 32-bit version of Windows 7 installed.
Now I want to deploy bitlocker with TPM, all security this laptop have the TPM but does not turn on.
I read that I can deploy bitlocker, but how can I initialize the TPM secure on all laptop without intervention of the user physically?
I read that it is possible in Windows Vista. What about Windows 7? All the laptops have the same brand.
I hope someone can answer because I can't initialize the TMP module physically on all laptops.
I'm really stuck on this.
Thank you very much in advance!
It is a forum for specific consumers. Try posting in the forum Pro-specifique in Win7 THERE appropriate: http://social.technet.microsoft.com/Forums/windows/en-US/home#category=w7itpro
-
Hello
I'm trying to deploy an application that has been deployed many times before and I encounter the following error:
[January 5, 2012 14:22:14]: the analysis of the properties of the Application...
[January 5, 2012 14:22:14]: properties of Configuration of Application...
[January 5, 2012 14:22:14]: analysis of Dimensions info...
[January 5, 2012 14:22:14]: the SSP request record...
[January 5, 2012 14:22:15]: verification of prices of properties...
[January 5, 2012 14:22:16]: loading of bulleted lists...
[January 5, 2012 14:22:16]: Alias of Tables loading...
[January 5, 2012 14:22:17]: updated the default user preferences
[January 5, 2012 14:22:17]: loading of Dimensions...
[January 5, 2012 14:22:17]: loading of the dimension attribute.
[January 5, 2012 14:22:18]: attribute of loading members...
[January 5, 2012 14:22:18]: loading members...
[January 5, 2012 14:22:19]: loading of the members for the Dimension account
[January 5, 2012 14:23:34]: error rejecting Member GMEMtrng_val.
[January 5, 2012 14:23:35]: loading the generic Dimension members
[January 5, 2012 14:23:37]: error Exception occurred in the Application deployment.com.hyperion.planning.HspRuntimeException: an Exception occurred during application deployment.
at com.hyperion.planning.appdeploy.HspSaxParsedAppDefinition.deployAppFromXML (unknown Source)
to com.hyperion.planning.appdeploy.HspAppDefinition$ 1.run (unknown Source)
The application validates OK but don't be not with regard to the restructuring of Essbase (I brought changes to a dense dimension). Is there a log I can see somewhere to identify what could be the cause of this error?
Thanks for any help!Try D:\Oracle\Middleware\user_projects\epmsystem1\diagnostics\logs\services HyS9Planning - sysout.log and HyS9Planning - syserr.log
See you soon
John
http://John-Goodwin.blogspot.com/ -
ADF BC: named datasource in the module of the application
We have a module application configured to use a data source named. The data source has been created in the weblogic server were deploy us our application.
The problem is that when we wan to make changes on our model project, JDev tries to connect to the database, but it can not find the data source.
What I have to, so we can continue to develop without having to change the configuration of the app module?Tiznit,
Once u go for DataSource u cant run your model project
This is incorrect. JDev 11 g will implicitly create a data source for you for each connection defined in your application with the name "java: comp/env/jdbc /
DS" so if you name your data source in your other servers WLS in the same way, you can have a single configuration that works for the test via the tester AM, running in the integrated WLS and running on outside WLS. Documentation of reference [url http://download.oracle.com/docs/cd/E14571_01/web.1111/b31974/bcservices.htm#CHDJDBJB] here
John
-
A deployed Application OK; my application still gets the "404 Not Found" error...
I'm trying to deploy my application from in JDeveloper 10.1.3.4 to the oc4j standalone on the local host, before you deploy to an application server. I am a beginner and I do this by following a tutorial. The tutorial application is deployed very well, but my application still gets the "404 Not Found" error after deployment.
The standalone oc4j is installed on my PC under Windows XP by running the \jdev\bin\start_oc4j.bat file < jdev_home > and works very well because the tutorial application is deployed and works very well.
For the purposes of the tutorial, the deployment is the last chapter (Chapter 10). I started from the application of the tutorial almost completed at the end of Chapter 9 and went throug all the steps in Chapter 10 and the application is deployed and invoke it with success.
My application starts with the login.jspx page. The application works perfectly when it is called directly in JDeveloper by right click on login.jspx and then selecting run. But in case to go through the same steps as for the application of the tutorial, my request still get "404 Not Found" in the browser.
The deployment steps are:
1. right click on the ViewController project, select new, then on profiles/WAR deployment file, to create the deployment profile. During the creation of this profile, I entered 'ZBV' according to the root context custom.
2 right-click on the deployment profile (ZBV.deploy) and "deploy to...» "the standalone oc4j on localhost and accept the default configuration. Messages in the log in JDeveloper window are clean without error.
3. open a browser, enter the url "http://localhost:8888/ZBV/faces/staff/login.jspx and get"404 Not Found". I cancelled and went through the same steps several times and always got the same error. I use /staff/login.jspx after ZBV/faces because in the navigation of the Application, the login.jspx file is located in the staff-ViewController-Web content folder.
I wonder what could be wrong with my request. In the tutorial, it is said that a .war and .ear file will be created, but only the .war file must be created because of the dependence of the ViewController project on the DataModel project defined in the application. My request is this defined addiction so I went throug the same steps as for the deployment of the application of the tutorial.
I hope that the experienced and experts and gurus will shine on me with their experience and wisdom.
Thank you very much!
NewmanCheck your OC4J logs to see if the deployment worked and if you receive error messages.
You can go in the OC4J administration console to verify that the deployment is in place. -
How can I detect dynamically new modules of the cFP-2200?
Hello
I'm working on a project that monitors the voltage using the cFP-2200 with any number of PSC-HAVE-102 installed modules. Each analogue channel PSC-HAVE-102 will correspond to its own state machine which tells you a central database.
I want to create something that does not need to know how the PSC-HAVE-102 s settled in advance. At startup, my software must be able to detect all PSC-HAVE-102 s and dynamically create the State machines for each channel, if I have 1 I-102 (8 analog monitor channels), or the maximum of 8 installed (64 channels to watch).
Right now, I can only understand how to the program for channels that are currently available by connecting to the module in its current condition and click/drag the analog channels in the project window. Is it possible to program for strings that are not there, but could be later? The application of this is to deploy the module on the ground and have the ability to add or remove I-102 s without changing the installed software.
kgolden,
Do you mean that the ini file will be correctly created only if I have the number I-102 s max? Yes, you must have 8 I-102 in your project as part of the goal of the PSC. Forcing him to be included in the. The IAK file and in turn to be defined in the .ini causes. I think you can use the Project Explorer to add modules to the CFP, even if they do not exist physically.
Is it possible to manually edit the file instead? I think that it is possible to manually edit the .ini. I don't know that NEITHER does not bear this manual change. The question would be is there other on the CFP .ini files that contain references to the i/o modules installed?
-
Disabling update the configuration file without stopping the VI
I would like to perform a function that when the new modules are added in the existing system of the public Service or hot swapping modules autour, the VI can update its configuration file. I don't want the VI to stop we will collect data 24/7.
I use cFP2220 and two or three modules of different types. I have my work VI and it is fairly straightforward FP read.vi in a time loop. All data are stored in the database using the Labview database tool. My screws are hosted on the local PC, not on the controller. I'm using Labview 8.6.
I guess I have to get the file configuration (iak), whenever new modules are added, the iak file can be changed (without MAX aperture). In any case, I would have the flexibility to run the VI continuous. I know there is a similar code here: http://zone.ni.com/devzone/cda/epd/p/id/3221and they get the configuration file in the ini file. But I don't know how it's done as I can save only the configuration file as a file iak for FP system.
Another potential problem associated with that, I guess, is the database format. For now, I use a three column structure, i.e., DateStamp, value and ChannelID. In this case, if I want to add/remove/swap channels, I can just change the ID of the corresponding channel. What happens if I have a horizontal arrangement of the database, namely 10 columns corresponding to 10 sensors, would he be in trouble if I change channels modules?
Thank you very much.
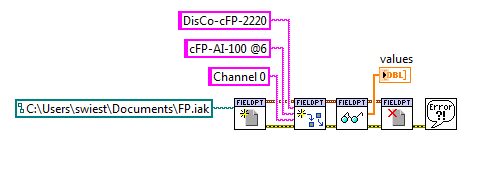
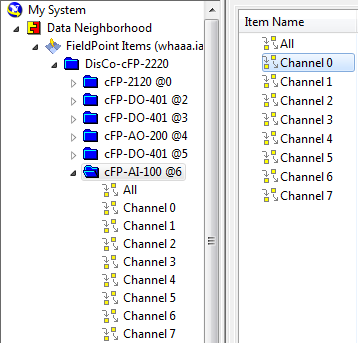
There is a way to change the module and programmatically updated the IAK file without stopping the VI. You will need to change the FP read.vi front right by with the constant e/s FieldPoint. You will need to use the Open FP, FP create Tag, read FP, and close to the public Service. The trick to this is that you must pre-create files IAK in MAX first. The way to do is to set up your cart in a configuration and then find devices to MAX. Then save the iak. Then reorganize your bottom of basket to the next setting would have desired, then have MAX find devices and who save in a file different iak. You will need to do this for each configuration you have. Then, you need to place the code below when you want to Ministry the configuration file. I have also included a screenshot of MAX that you can see what the strings are correlated with.
-
A VI deployed on RT can be opened in the IDE?
A VI that has been deployed on a target RT .vi format can be retrieved and somehow open LabVIEW?
Or the code source is lost forever, just as when you deploy to .exe format?
I don't want him back, but make sure that it cannot be done by others...
Hi Snamprogetti,
I assumed that when you say 'A VI that has been deployed on a target RT .vi format' you are referring to the available in the LabVIEW project deployment process: If so, the code VI is not copied "such what" (with a .vi file saved on the target RT) but only the generated code is transferred to the target and managed by LV RT.
Anyway, all of the code (i.e. screw) you deploy to a target RT can be configured to have no pattern-block or even the façade. You can do this when configuring the build specification in the LabVIEW project RTEXE.
Let me know if I understood your question,
Best regards
Fabio
-
Find RT module in the list of installation for LV2009
8.6.1 to LabVIEW 2009, release August update. LabVIEW 9.0 and most modules installed well. I can't find cRIO RT module in the list of installation. MAX indicates that I have NEITHER-RIO 3.0.0 w/SE support installed on the target, but the option of time real LV 9.0 is missing LV 1.0.0.3, VxW 6.0 RT, RT LV, LV RT VxW 9.0 9.0 and Base System 9.0. When I take the LV RT Deployment Option, it does not install.
Yes, but just to be clear, that the RT module don't settle, while I was looking for a separate RTW for the cRIO module, because the installation instructions are referring to one under an integrated case.
The real problem solved now, is that the RT module don't settle not until I manually uninstalled the serial number OR old and then installed the new using LabVIEW 2009. During the first attempt to install LabVIEW 2009, the package wizard detected the old NI Serial and told me that he was unable to install the new NI Serial until I uninstalled the old, but it gave me the opportunity to defer this step, I did.
Thank you for your help.
-
How to use the modules of the series and two different bitrates in FPGA mode on cRIO 9075
Hello
I have a project with modules namely NI 9227 (module 1) and NI 9234 (2 Modules)
The project is running and I use the file writing PDM and found that two channels is in the TDMS file while I download the file using FTP the cRIO.
1 - my quesition is the addition of a second rate in the FPGA?
2 - Why is it TDMS connect 6 channels and 4 channels?
Thank you
Attached to the project with two screws
Hello Ihab,
Sorry for the late response here; just saw this message! If you want to keep synchronized modules then definitely stick with the master configuration and slave for your two modules. Note also that you can taste a little faster with the NI 9234 as your master module (since its time base main internal is 13,1072 MHz instead of the time base of the 9227 12.8 MHz).
Also, see the tips and information in our troubleshooting guide for the synchronization of the series C with LabVIEW FPGA modules:
http://zone.NI.com/reference/en-XX/help/373197D-01/target6devicehelp/sync_acq_multiple_modules/
I hope this helps!
-
How to activate the TPM (Trusted Platform Module) in the BIOS?
Original title: activate the TPM in vista.
Hello team MS,
I use Win Vista Ultimate 32-bit operating system. I want to activate the TPM (Trusted Platform Module) for use bit locker drive E:\. How to enable the TPM in the BIOS. I use Intel 915 gigabytes - motherboard with 1.5 GB of RAM and a 512 MB graphics card. Please, I beg you. suggest me.
Thank you
Rahul
Hello Rahul,
What is the brand and model of your computer?
I recommend you to consult the manual that came with your computer to activate the TPM (Trusted Platform Module) in the BIOS (Basic Input Output System) as the BIOS settings vary for each computer & it depends on the manufacturer of the computer. If you are not comfortable to run, you can contact the manufacturer of your computer for help.
Note: change BIOS / chipset can cause serious problems that may prevent your computer from starting properly. Microsoft cannot guarantee that problems resulting from the configuration of the BIOS/chipset can be solved. Changes to settings are at your own risk.
Reference: Overview of BitLocker Drive EncryptionHope the helps of information.
-
How to configure a port as the port of the server
I'm new to UCSM,
What are the steps for configuring a port in the ports of the server.
Step 1 in the Navigation pane, click the Hardware tab.
Step 2 tab in the equipment, develop interconnections > Fabric_Interconnect_Name > Module fixed >
Unconfigured ports.
Step 3, click on one or more ports under the Unconfigured Ports node.
Step 4 slide the selected ports and drop them in the Ports of the server node.
The ports are configured as server ports, removed from the list of ports configured and added to
the Ports of the server node.
Maybe you are looking for
-
M553: Good print on back when used in M553
We have audits of good for use in a range of 5if HP printers. They are loaded in tray 2, face down.We had to upgrade Windows Server 2003 to Windows 2012 and 5if is not compatible. So we moved the printer to HP LJ company color M553.Now, the new print
-
I just installed ISA server 2006 and ISA ISA server client not found what I need to do?
I just installed ISA server 2006 and ISA ISA server client not found what I need to do?
-
BlackBerry smartphone how to recover lost data from blackberry phone?
Hello, I deleted some photos on my Blackberry phone, how do I get back them? I have no backup!
-
Ho windows 7 64 bit, non riesco ad installare I do driver a find I pilot dello su even epson scanner
-
alter system switch logfile crashes
Hi Experts,Please help me determine the above error.Recently, I was told to take one of our EBS environment in archivelog mode. While doing this activity, I coped 'ORA-16014.The steps that I follow are listed below:SQL > alter system set log_archive_