Remove the black borders on the EP 9
Hello!
First and foremost, I would like to say that I am very new to change the items first (or at all).
Now, I'm having a problem with a video. I capture my videos off my screen using a program called Fraps. Once I finished editing the video, the preview looks perfect, so I click on the sharing option and transfer it to my YouTube account about PAL HD for YouTube 1920 x 1080.
Then, when I load the video on YouTube, the video off a boring black border surrounding it.
I have no idea how to solve this problem. I tried it get but I have not found anything very useful.
If you need a more details please say so and I'll post them a response.
Dealing with only the black bars and using pre, the best you can do is to choose a predefined project, with a size of image, close your FRAPS material, as is possible, and then use the fixed effect > Motion > scale to enlarge the images, to fill the size of the video image. Scaling UP slightly degrades the image, but there is no way around it.
As your 1366 x 768 has an Aspect Ratio (1.78 vs. 1,777 - essence), very, very close to that of 1920 x 1080, which would be my choice. Your PAR (Pixel Aspect Ratio) will be NOMINAL = 1.0, or Pixels square, so it will be what you want too. You might lose a few pixels on a side, but not such that would never notice.
PrE is designed to work with standard video frame sizes and offers no way to create a custom size, as does PrPro, so you are limited to only standard sizes.
For some tips on FRAPS and other programs video screen-cap, this older article may have some useful info. Note: much of the discussion IS for PrPro and not before, so there are some limitations in mind: http://forums.adobe.com/message/4461642#4461642
Good luck
Hunt
Tags: Premiere
Similar Questions
-
Remove the black bars on the sides of the clip?
Hello
I am changing a clip in Prime Minister 11 elements. It is a file of 25 frames per second. I haven't shot the clip, but I was told that it was a normal life (not widescreen) video PAL. The clip looks like this when I'm editing (screenshot).
What concerns me are the two thick black bars on both sides of the clip. What are the causes, please? What is the clip was really wide and I am editing in normal mode and the best way to remove because I imagine they will be visible when the final product is show on a DVD or TV.

Thank you very much.
Steve
Steve
Summary
Thanks for the great information that points to how you create your video source.
You seem to have no correspondence between the video properties and pre-defined description of the project and still have black borders.
Solution: To scale the video in the box monitor Edit just at the point where the black borders have disappeared.
Details
If you have a PAL DV Standard or PAL hard drive Flash memory/Standard 48 kHz project screening and have
an import of video files with properties, then you should not see black borders on the video screen, in the
Change the monitor in the region.
The only explanation I think is likely is that the person that you gave the video intentionally or not
exported without the right scale, in the edit box, before exporting it.
At this stage, then you the intensification of the video to remove black borders is the answer. Click on one of the handles
the bounding box and make hanging them just to the point where the black borders have disappeared. Depending on the export destination
more attention needs to be addressed with the dealer of securities video creation with regard to the safety limits for
text.
Please see the bulletin and review, and then let us know if what I suspect is likely.
Thank you.
RTA
-
Remove the cover of my MacBook Pro, I saw a black residue under places of my Fans. What is it?
I just removed the cover of my 17 "mid 2010 MacBook Pro to replace the hard drive! I see that black dust has settled under the two locations of cooling fans, on the cover.
It seems to be a micro-fine DUST, color dark Siver.
- Is it debri met fans?
- Can I use a Microfiber cloth to remove safely? and
- How it is there?
Please check, as I don't know if it's to worry about.
Is it debri met fans?
Yes
Can I use a Microfiber cloth to remove safely?
For text detailed and video instructions on how to clean the fans, visit You Tube and iFixit tutorial.
How it is there?
Dirt can also get inside a computer because it has vents. Fans can also attract the dust bunnies inside the computer where most settle on fans. To answer your question - air and the environment around your computer.

-
When I try to play in full screen, it shows the game as a window in the middle with black borders around it, please help. THX. It's like pic

Beash19,
The first thing to do, if you have not already, is to update your video card driver. Once this is done, if the problem persists, contact the manufacturer of game for a possible fix or the update of the game. If this is the only program that he comes up with seems so they need provide a type of update. Mike - Engineer Support Microsoft Answers
Visit our Microsoft answers feedback Forum and let us know what you think. -
I have black borders on the top and the bottom of my desktop screen andonline screen. How can I get rid of this?
Hi Harry,.
Thanks for posting in the Microsoft community.
I understand that the screen on your computer displays a dark border on the top and the bottom of the screen.
There is an article in the knowledge base that provides methods to solve this kind of issue. Check out the link and follow the steps.
Troubleshoot monitor and video card
http://Windows.Microsoft.com/en-us/Windows-Vista/troubleshoot-monitor-and-video-card-problems
Let us know if you need more assistance.
-
Leak - new black cartridge 564xl leak and doused in ink to remove the tape. (ruined my new Dockers)
Leak - new black cartridge 564xl leak and doused in ink to remove the tape. (ruined my new Dockers - $39.95)
No problem with cyan, magenta or yellow. purchased at the same time Best Buy XL cartridges.
Hello
The best solution and only recommended for you is to contact Hp Support on this issue, they will surely help.
* Say thank you by clicking on the "Bravo!" Star"located on the left *.
* Make it easier for others to find solutions, marking my answer to "Accept as Solution" if it solves your issue.*
-
How can I remove the streak 1/4 inch black in the center of each copy
I have a model of C4750 using Windows 7 and can not remove the black streak through each copy/scanning etc.. It is not on the glass and reset by unplugging the power cord does not help. Suggestions?
If none of the suggestions for the product of cleaning and resetting the product solved the problems with the scanner/copier I would replace the product
-
How to remove the unwanted parts of drawing black and white line
I scanned in a flower art simple black and white lines. I would like to remove some of the petals in Photoshop. How can I do?
Thank you

I would like to remove the petals from the background.
1 method: with the select magic wand the white bg, select-> invert the selection and create a layer mask.

The layer mask is a monochrome picture, transparent black, white is opaque and anything in between is more or less transparent.
You can now select the layer mask, use the brush and black paint, where you want to have something white, removed where you want to have something added. It is non-destructive and works very well on your photo.

You can use shift click to 'draw' the small lines to attach to the top. According to the clarification, it will take more or less time. As I said are non-destructive.
Second method: you use the pen to draw the lines around your flower vectors. With little exercise, you'll very quickly and you can always adjust the curvature of your curve, by pulling on the handles of the curve. Here you can see how it works: drawing with the pen in Photoshop tools .
When done with the pen tool, you can add the vector line as a vector mask. You can even refine your mask after finishing. I suggest, since a mask of course work at a refined mask.
The flower should not be on a layer, a background layer. Basemap layers have no transparency. The two methods are non-destructive, so you can return to the original image or parts of it, whenever you want.
-
I was editing a video with premiere elements 13 and everything seems as it should be in the in the software overview screen, but whenever I have the export, apparently regardless of the format, he adds black borders to the video on all four sides. The only solution that I could find online was of course project settings correspond to properties of video file imported, they do what I know. Any ideas on how to fix? Any help would be appreciated. Thank you!


Output parameters you use have the appearance of the DV/big screen value.
Don't know how much difference it will make, but try to 1.0 square Pixels.
Or better yet, try to publish & share/computer/AVCHD with the preset for YouTube HD.
-
How can I remove the black of an image?
How can I remove the black of an image?
Al
Hi albertreeder,
Greetings!
It will be helpful if you could post the image and let us know if you try to remove blacks or black background of the image. You can try the following steps.
- Select your layer.
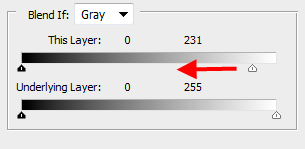
- Choose layer > layer Style > blending Options. (from the menu bar)
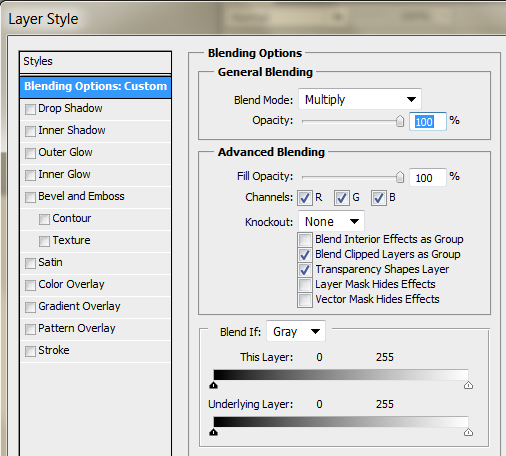
- . If you want to hide a black background, drag the slider to highest point.
There are other methods too.
- Select > color range. Use the eyedropper tool to select the black of your image, bring the Blur slider to zero - which allows to select only the black pixels. Then, you can fill these pixels with a different color. Refer to select ranges of colors in Photoshop
Kind regards
Assani
-
Black borders even after having filled the exact dimensions
Hi guys,.
This is so the problem I have face. I need to edit a youtube video, as you can see in this video of mine test: sss - YouTube there ugly black borders. But in Adobe premiere (CS 5.5), it filled all space (except the black borders aside) op, the original file has a resolution of 1280 x 720. What I did in the settings is:
1. I select DV NTSC widescreen 48 khz, select custom and check original size
2. to export, I use H264, HDTV 720 p format high quality
Does anyone have a solution for this?
Thank you!
What CAN help is to create a sequence to modify using the process of NEW ELEMENT
The process of a NEW ELEMENT will ensure that your sequence of Assembly corresponds to your video file
CS5-thru-CC body/Encore tutorial list http://forums.adobe.com/thread/1448923 has a link to learn more about the process of a NEW ELEMENT, including a photo to show you what to do
-
Half rest black screen after removing the update
Hi, I'm very inexperienced that I just took in video editing so bear with me when I don't know what to do.
On a recent thread, the cause of the upper part of the screen is black has been on a Microsoft update, I had removed the other day and correctly solved the problem.
However, after opening the program (Adobe Premiere Pro 2.0) today I imported a file into a new project that resulted in half top in black again. Yes, my files are in WMV, because I am just a YouTuber and the format fits to my basic editing and shooting very well (I've seen a lot of arguments about how "dumb", it is to use this format) and this is what format my camera braces on. I made sure the update does not occur, but the question is back. Help?
-Katie
the 1st forum for Agency 2 http://forums.adobe.com/community/premiere/premierepro_previous?view=all
2nd, search for Microsoft http://search.microsoft.com/search.aspx?mkt=en-US&setlang=en-US
-
How to remove the black bars after image rotation
I am very new to the use of first pro. I took a video with my smartphone like the contents of a project. The original size is 1280 wide and 720high. I imported the video and needed to rotate 90 degrees. Instead of the scale I need tall. I imported and then under effects control - motion - rotation to rotate how I wanted.
But now on the screen has black bars on the sides from the turn, and when I export the video basic settings is grayed out so I can't change it. It is game/set at 1280 x 720 with black bars.
How can I remove the black side bars in first pro to fit the dimensions of the video shot recently?
Great! I'm glad to hear it. Thank you for the presentation of reports. If you don't mind, please mark my answer as "Correct".
The reason for which the clips were 56% was so that they would hold the frame of landscape size. Once they were they belonged, they were happy to 100%.
-
remove the borders mx:TextInput (focus)
Hi all
I have this TextInput element that I want to use without its borders. I can remove the borders, but when I click in the textfield it gets orange borders.
So the question is how to remove these borders when the TextInput element has focus?
Here is the code that I currently have:
< mx:TextInput " text = ' My default text'x ='97"y ="10 "" ".
"" borderStyle = "none"
"" borderColor = "#FFFFFF"
borderSkin="{null}"
"" dropShadowColor = "0xFFFFFF"
"" dropShadowEnabled = "false"
borderThickness="0"
" fontFamily ="Arial"fontSize ="15"/ >
thnx
Luca
Hello
Please check the code below
private function setBorderThickness (): void {}
this.tIn.styleName = "textInput";
}
]]>
.textInput {}
Focus-thickness: 0.
}
borderStyle = "none" borderColor = "#FFFFFF" = "{null}" borderSkin
dropShadowColor = "0xFFFFFF" dropShadowEnabled = "false" borderThickness = "0".
fontFamily = "Arial" fontSize = "15" focusIn = "setBorderThickness ()" / > "
Setting the focusThickness 0 on focusIn event will meet your expectations.
Kind regards
Anitha
-
can I choose the photo of the start and end positions to get rid of black borders?
I tried to use the trial version of first elements 8 before buy you to see if it's able to do what I need to.
I want to create a dvd photo, which is simple. I would like to use the scale feature to get rid of black borders and choose the start or end point of the photo. the resolution of the photos are also terrible on screen, and when I import out in an uncompressed avi file. The photos are really high resolution and are very well in other programs. Some of the photos sparkle even with anti flicker option enabled up to 100%.
Adobe first elements may be able to make a dvd photo, or should I look at another adobe program?
As Steve, pre can get you a DVD-video or a BD (for HD projects), but these will be on video and will be limited to the resolution of these two broadcast formats. If this is what you want, then the pre will do just fine.
Regarding the images, I would NOT use all (or many) on the scale. Instead, I want to resize the images to match the size of the frame of the video project in Photoshop. This ARTICLE will give you some information and some advice.
Good luck
Hunt
-
Export video on DVD MPeg-2 HD adds black borders on the sides
Hello
I had a few problems when exporting an HD project (1440 * 1080).
The source path seems perfect, but in the preview of the export (and the exported file), I have black borders on the side of the screen.
I was trying to make a Mpeg - 2 DVDs (16:9) not a Blue Ray Disc.
Of course, I know that the 16:9 format usually creates black borders on the bottom and the top of the screen, but I was wondering weather its possible to get rid of these borders on the sides.
Thank you
Juju-berlin
Yes, you can, using Crop of SOUL...

You have to cut 12 pixels/lines up and down; Make sure that the tab out, harvest is set to "scale to fit". The reason why you have to do is because of differences in proportions of pixels.


Maybe you are looking for
-
The question of security between FF and Java were solved (19 FF & Java U17)?
I get the following message when I connect to an interactive Web site that I use frequently. It began with Java Update 10 or almost and continues. Is still this issue resoved? "The version of Java you are in courses run has been known to cause proble
-
My Google map does not load. It displays an empty blue square instead of the map. I disabled all extensions of pluginsand started in safe mode, cleared cache and cookies, but nothing is done. WOT to do!It works in Chrome, but also have the same probl
-
He had to draw iPhone that is already locked
MY father lost his phone 3 days ago I think I need to trace it the phone is locked
-
Tecra R10 - TPM is locked after the wrong password
Hello I already turned on TPM on my Toshiba Tecra R10. Problem is that I entered wrong password so the secure TPM is locked, it is possible to unlock the TPM without waiting several hours (automatick unlock the TPM)? Thanks for any response. Dalibor
-
Icons on the bar menu jumping intermittently
Some icons in the menu bar recently (from El Capitan, I believe) have begun to jump left intermittently, as if making room for something new. They immediately put it back. The icons that move are 3rd party (Dropbox and Avira). Either uninstall does n