Share FXPX on USB
I'm filming a diploma of a school and in the last DVD provided. I want to offer some USB flash drives this year so families can connect the player to their TV, bring with them when visiting friends and also download the file on their computer or backup hard drive. It will also offer them a HD file. The program runs more than an hour. I guess I'll use the sharing option in FCPX and compress to H264 MP4.
A salesperson told me that their readers have an average of 15MB download and other providers cannot. He mentioned that the USB flash drives vary greatly in quality. The truth about it?
I have to use the compressor to "customize settings.
Should I customize these settings in the compressor?
Based on the size of the file (my MPEG-4, 1 hour below) estimates piece would be less 200 MB? that don't; t seem right.


Thanks for the help.
I just see this option in the compressor for H.264. What is the way forward for the USB flash drives

Tags: Professional Applications
Similar Questions
-
How to share an external USB disk on a network?
I added a Western DIgital 2 to USB drive on my Windows Vista computer. I also have a Windows 7 computer, I want to have full access to retrieve and store files. I think I have all sharing and permissions set properly but I still get the error 'permission denied' anything.
Hello
Were there any changes (hardware or software) to the computer before the show?
Check the links below and see if the problem persists.
http://Windows.Microsoft.com/en-us/Windows-Vista/share-files-with-someone
http://Windows.Microsoft.com/en-us/Windows-Vista/networking-and-sharing-recommended-links
http://Windows.Microsoft.com/en-us/Windows-Vista/view-computers-and-devices-on-a-network
http://Windows.Microsoft.com/en-us/Windows-Vista/working-with-the-network-folder
Hope this information helps.
-
Fusion 5 - USB 3.0 supported - really?
I'm playing with the v5 update, but fail to get my VM Win7 to one or the other of my volumes external exFAT (WD Passport). Complaining the host controller; No new drivers don't seem to be available. I checked compatibility USB 3.0 in Fusion Option. I can connect using a USB 2.0 cable.
Fusion 5 I can SHARE the disk USB 3.0 as a volume mounted on mac and map it as a network drive in the virtual machine.
'X' = \\vmwarehost\shared folders\exFAT
I can open files (i.e., XLS) to exFAT, but can save them. I checked the permissions and confim read/write. Note that I CAN write TXT files without complaining - ODD!
What I am doing wrong? Is it a problem of WD or VMWare/Config problem. Frustrated, majorly
Thank you!
Unfortunately... Windows 7 guests are not compatible with USB 3.0.
This page: http://www.vmware.com/products/fusion/features.html
Mentions:
USB 3 connectivity
Extend connectivity from your Mac to your Windows environment and enjoy the USB 3 support for file transfers 1, drive Super-fast of SDXC card to import and view your photos directly in Windows and view them on an external monitor or TV using the Thunderbolt port or your Mac HDMI port.
BUT he's also a reference at the bottom...
1 Microsoft Windows 8 required for USB 3 support.
-
Serious problems repair infected by a genuine version of Windows XP Professional
Hello
I'm running a genuine copy of Windows XP Professional Service Pack 3, which took over a virus that has caused all sorts of problems.
System startup and internet works OK, but do not work:
- system tools have been removed, have now been restored from the internet but does not properly;
- help and support center does not at all;
- File Manager does not properly;
- can copy text, but cannot paste then;
- cannot minimize programs, they just close.
- Microsoft difficulty it Center will not work, keeps giving error messages.
- CSP according to me is no use however cannot depend on tools system;
- some files are missing, although the use of disc has not diminished, so assume that the files are hidden;
- have removed the do not show hidden files, not yet theer.
- WORD, EXCELL etc. have all disappeared however open 1 documents will then close again.
- system all left of the restore points and cannot be reinstated deleted files;
- can't find the XP installation cd bought a CD of repair;
- repair CD won't recognize my authentic product key;
- tried to check my product key, which will now activate correctly so continued warnings;
- downloaded Microsoft programs in the past without error, henec product key was OK...
- have installed Jelly Bean to check the product key codes, agrees with the fixed COE to the machine;
- new programs will install and uninstall ok, however veterans such as defender will not;
- Install/Uninstall godmother doesn't work does not correctly;
- I could go on as have spent the last 2 days trying to get this machine works again with no joy and I'm about to put my fist through the screen...
I have information on the hard drive that I need to get out and it is not saved (yes I know, don't bother remember for back up...) so any help anyone can be will be greatly received before the computer gets in a big way...
Thank you all in advance for any help... Please...
The answers will be focus just autour down your stuff... Because I think that it better to rebuild this machine to try and repair all the damage.
Never used a Disk Imaging application (Symantec/Norton Ghost and Acronis True Image are the two most people have heard of)?
You may be a time when something like that - as well as their usually provided utility that allows you to read in the image file - might be a good choice. This way, you get a snapshot in time backup of the system at the moment, the permissions mean NOTHING when direct playback of files image and you can browse it on another computer.
Another option is a Windows UBCD - boot with it, connect to a network share or a USB drive and copy things you MUST CERTAINLY off the system before rebuild. Not to mention - Windows UBCD has commercial imagery that are free to use on that. ;-)
-
I have a Photosmart C4280, which I am connected to a network but I can't see it as a scanner just like a printer, and I can't find a way to see it as a scanner. I only need to use it as a scanner. Thanks in advance

'Sharing' in windows is to the print driver. Share a scanner usb on the network, it's possible, but not easy to set up, probably not worth it. I just do the analysis on the computer, the usb scanner is connected and share scanned files - after all, you would need to walk to the scanner to watch the original to be scanned in any case.
-
Licenses for the software HP Smartscan for mulitple devices
Dear Forum,
I have an old 7800 scanner that I want to share (with a USB switch), will it take additional licenses for the Smartscan software for other devices? - and if so please could provide you a room code I can order.
Thank you very much.
No, you will not have a license for the software SmartScan. You may not be able to share scanners, however. You can try to see, but you will not have an additional license or nothing.
-
Microsoft Wireless 5000 mouse not recognized by Windows 7, after Vista update
2 days ago I upgraded my Dell Dimension e521 from Vista to Windows 7 - it was the upgrade, not own full installation.
Everything is apparently very well, except the mouse I had used throughout the process, was now does not. The mouse is a Microsoft Wireless 5000, part of the Microsoft Wireless Desktop 3000 BlueTrack-keyboard mouse, USB packet. The keyboard, which share the same USB wireless receiver is entirely sensible.
I tried the following to resolve the problem, without success;
-Uninstall and reinstall the software for the keyboard and mouse
-Purchase of a new set office (indicated on the packaging as "compatible with Windows 7") and through the complete installation.
-Going to Device Manager and check/update the driver EVERY. They are all now current.
-J' I followed all the advice on the page of Microsofts "Troubleshooting a wireless mouse that does not correctly.
+ I changes the batteries on the two devoces
+ I have tried different ports
+ I have tested the device on another computer
+ I tried to use the mousinfo tool
+ I tried to use the appwiz.cpl application, to find the incompatible software, but but no program appears when I type appwiz.cpl in the start search box.
+ Reset after every time I changed something.
None of these steps resulted in no changes - the keyboard is still sensitive, but the mouse is dead. I do not receive the error messages, the cursor just dead center in the middle of the screen.
Needless to say, I am more and more frustrated. As I'm not particularly computer warned - I am not a root of the others - USB hub I'm out of options...
Help, please!
Hello
1 make a Restore Point to use if need to return to the place where you are (should not be necessary
However better to do).How to create a System Restore Point in Windows 7
http://www.SevenForums.com/tutorials/697-system-restore-point-create.htmlHow to do a system restore in Windows 7
http://www.SevenForums.com/tutorials/700-system-restore.html-------------------------------------------------------------------------
2 do these to erase corruption and missing/damaged file system repair or replacement.
Start - type in the search box - find command top - RIGHT CLICK – RUN AS ADMIN
sfc/scannow
How to fix the system files of Windows 7 with the System File Checker
http://www.SevenForums.com/tutorials/1538-SFC-SCANNOW-Command-System-File-Checker.htmlThen run checkdisk (chkdsk).
How to run check disk in Windows 7
http://www.SevenForums.com/tutorials/433-disk-check.html-------------------------------------------------------------------------
3. in Device Manager, right click on EVERYTHING, it is a mouse and the uninstall.
The right click on everything that is under USB controllers - after this RESTART.
Who will update the driver stacks and help clear of corruption.
I hope this helps.
Rob Brown - MS MVP - Windows Desktop Experience: Bike - Mark Twain said it right.
-
Cannot find host group on one of my laptops.
Laptop computer A and B are on the same wireless network. which means that they are on a home network, called Adam, which allows each of them to connect to the interwebs.
Now A laptop has created a group of home and allows all files to share but notebook b cannot see this laptop even if the PORTABLE A and b have both run windows 7, both are on the same home network and both clocks are synchronized with each other until the last second.
both machines are on discovrable, BUT b PC cannot join the mobile home A group instead, they "create a group" even if we should have the join...
How can I fix it? Adrien... What?
Hi Adrien_,
Thanks for visiting the site of the community of Microsoft Windows!You can try temporarily disabling the Firewall
Follow the steps below and check if that helps:
Homegroup
Homegroup in Windows 7 will simplify the tasks related to the sharing of music, images and documents within your home network and Windows 7 PCs. homegroup allows also to share your printers USB connected, if you have a printer in the living room that is shared by the homegroup, it will be automatically installed on your other homegroup active computers joined to a domain PCs. can be part of a homegroup too.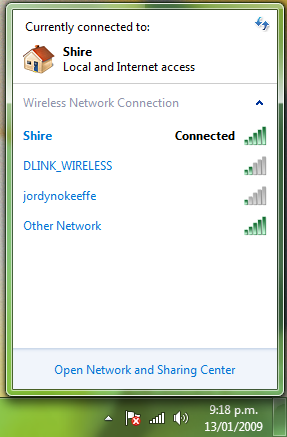
Create your homegroup
As soon as you set up your network, Windows 7 invites you to select the type of location. Once you select Home Network, Windows 7 will start to apply the necessary settings for your new network.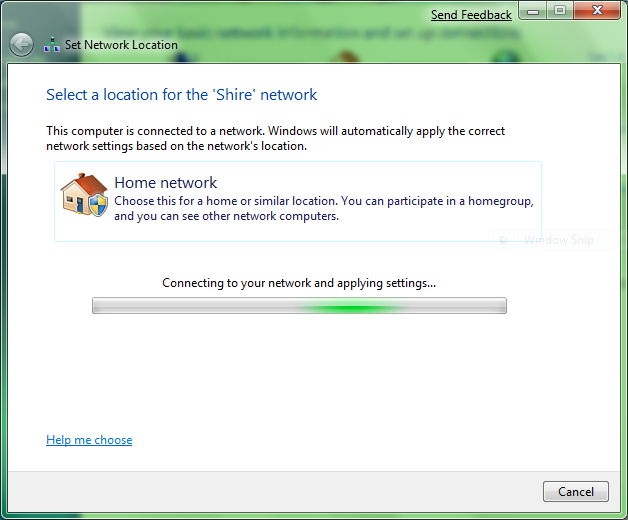
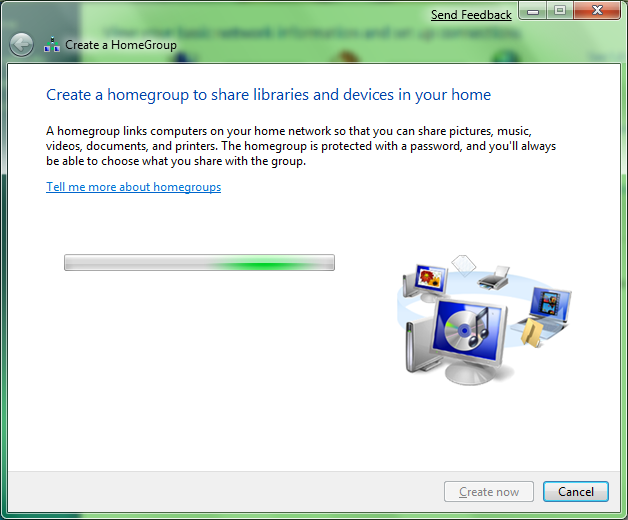
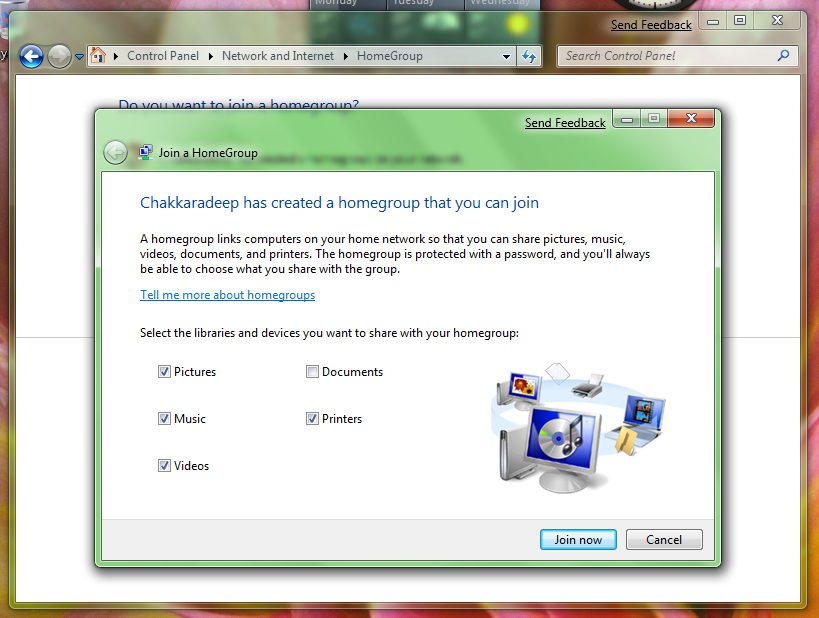
The wizard of home group then you will invite to create your homegroup and choose what to share in your homegroup.

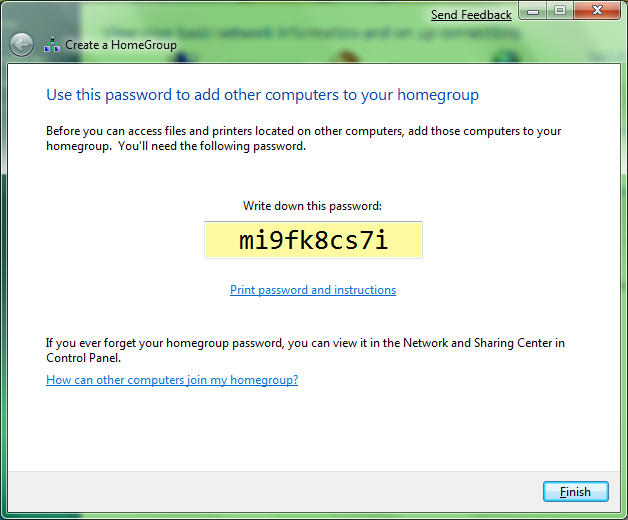
The wizard then generates a password that can be used to add other computers to your homegroup.
Your new homegroup is now created and your photos, music, videos, printers folders are ready to be shared with other computers when they join the homegroup. Are these files - music, videos, printers, photo - call your libraries in Windows 7. Don't forget, we have not yet shared any files as such. Only network shares have been created so far.
Join the homegroup
When your other computer is connected to the same network where you created the homegroup (above), Windows 7 prompts you to you that there is a homegroup available to join.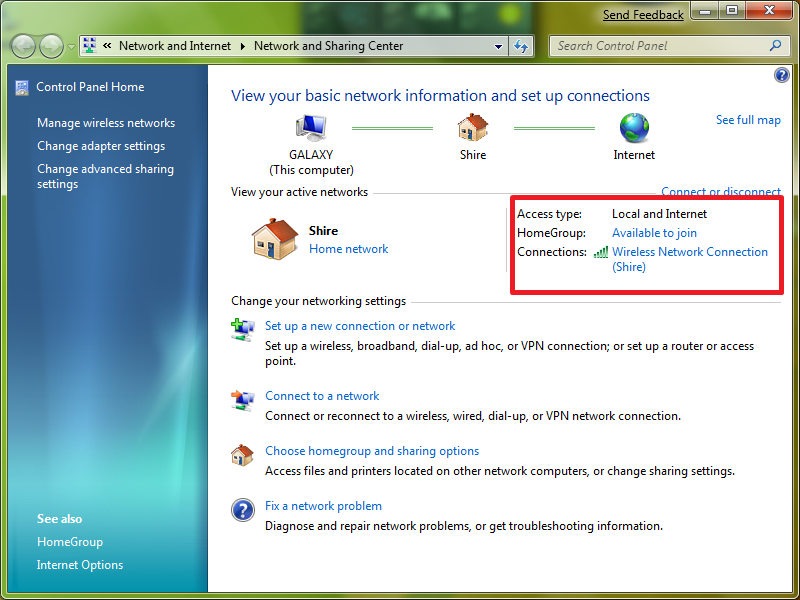
Once you choose to join, Windows 7 will provide you with information about the residential group on your network

Click Join now to join your homegroup. You will be asked to enter the homegroup password that was generated during the creation of this homegroup

Enter the password will allow you to join the homegroup and choose what you want to share
Welcome to your homegroup!

Display in your homegroup
You can find your homegroup in the Explorer Navigation pane (left side of the Explorer). Just click on the Windows Explorer icon in the superbar and it will open your libraries.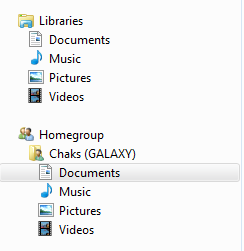
You can put all the files in the libraries and share with your homegroup. Its as simple as that!
Media Player will automatically search your homegroup for music and will add the files to the Media Player library. You can also search in the libraries of your homegroup by using the Explorer search feature.
What happens if I forget my password of created homegroup?
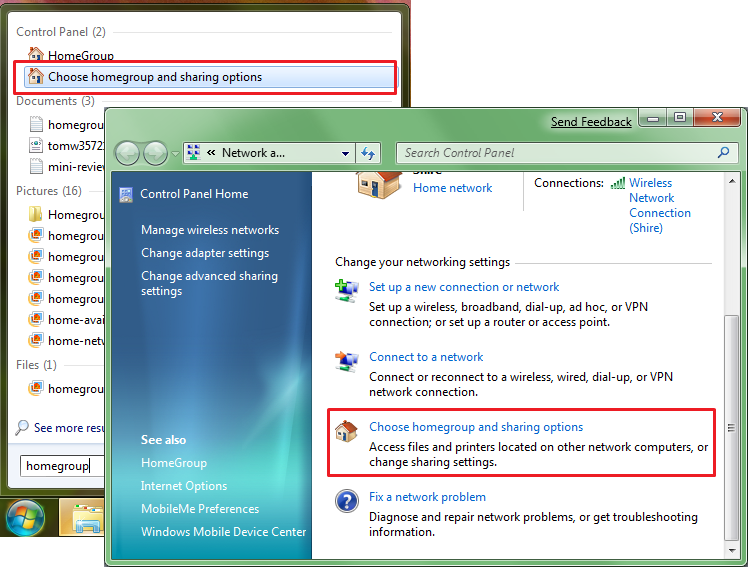
Yes, the password generated by the wizard is difficult to remember (being complex and safe) and you would like to see your password whenever you forgot. Windows 7 allows you to display or print your password even after the creation of the homegroup in the residential group options.
You can find your home group options in the network and sharing Center, or just type "homegroup" (without the quotes) in your Start menu.
Residential group was certainly designed to be easy and he remains faithful to his promise - an approach of end to end easy to share in your home!
Please keep in mind that the homegroup only works with Windows 7 machines and it does not support Vista or XP.
Follow this link for more information: http://windows.microsoft.com/en-us/windows7/products/features/homegroup
Hope this information helped!Thank you, and in what concerns:
Aziz Nadeem - Microsoft technical support.
Visit our http://social.answers.microsoft.com/Forums/en-US/answersfeedback/threads/ Microsoft answers feedback Forum and let us know what you think. -
How to install a printer in XP Mode?
I installed the virtual machine and the xp mode on my professional machine of windows 7. I can't get a specific load printer. It runs parallel, and I have a usb adaptor to installed parallel. I cam print from Windows 7 programs to it but can not access in xp mode. What I am doing wrong?
Hi Seaavee,
-You receive an error message during the installation of printer?
However, there are several methods that you can use to make a printer available to a virtual machine. You can use the methods are affected by the question of whether a printer driver is available for Windows 7 and the printer is a local USB printer or a network printer. You can also use the XPS format when your computer is configured to support this method of printing. This scenario describes all of these methods.
To share a local USB printer:
Note: this method is appropriate when the printer driver is available for the Windows 7 host operating system and the guest operating system. Just do these steps once per virtual machine. This procedure assumes that you have checked that the printer works in the host operating system.
- Make sure that the printer is turned on and that the printer driver is available for installation. For example, you can install the driver on the internet or on a CD.
- Connect the printer to the virtual machine. In the virtual machine window, click USB and then click Attach-device name.
- Install the printer driver in the guest operating system. You can install the driver on the internet or on a CD.
- Release the printer of the virtual machine. In the virtual machine window, click USB and then click publication-name of the device.
- Restart the virtual machine. In the virtual machine window, click Action , and then click restart.
- Navigate to the desktop of the virtual machine and log in if necessary. (You will be connected automatically if you have saved the credentials.)
- The printer will be available for use at the time the host operating system and the guest operating system.
To set up a printer for a virtual machine network:
- Navigate to the desktop of the virtual machine and log in if necessary. (You will be connected automatically if you have saved the credentials.)
- Open Control Panel, and then open Printers.
- Click Add a printer. The Add Printer Wizard opens.
- In the local page or network printer, select the network printer option and complete the wizard.
If you run Windows XP as a guest operating system, you must manually install the printer driver for each printer you want to use. The following steps describe this process.
To install a printer driver in Windows XP:
- Click Startand then click Printers and faxes.
- Under printing tasks, click Add a printer. The Add Printer Wizard opens.
- In the local page or printer network, select local printer attached to this computer and clear automatically detect and install my Plug and Play printer.
- On the select a Printer Port page, click the drop-down list control and select one of the TS number ports, and click Next.
- Install printer software page, select Windows Update or the disk and complete the wizard.
To print from a virtual machine:
1. go in the desktop of the virtual machine and log in if necessary. (You will be connected automatically if you have saved the credentials.)
2. do one of the following:
· From the desktop of the virtual machine, right-click on a file, and then click print.
· Open any application that includes a print option, and then use the print command.
3. all printers available on the virtual machine are listed. Select a printer, and then click OK.
Also, you can access the link below to find more information on the use of the Windows XP mode:
http://TechNet.Microsoft.com/en-us/library/dd744684 (WS.10) .aspx
I hope this helps. Let us know the results.
Thank you and best regards,
Srinivas R
Microsoft technical support.
Visit our Microsoft answers feedback Forum and let us know what you think.
-
PSC 2210 adjustable upward as a network to a Windows & XP PC printer?
HP psc 2210 all-in-one
C8658A
1 PC running Windows 7 and 1 PC running XP can be found on the network
[Personal information]
Hi QuiltyKathy,
The printer does support the USB connection to the computer. In order to print from another computer, you can use the sharing of printing to share the printer. See the following link to view you must share a connected USB printer from XP to Win 7.
http://helpdeskgeek.com/Windows-7/XP-to-Windows-7-printer-sharing/
-
Will be the XP of Windows 7 Pro mode. Let me use a printer which worked perfectly under XP, but for which no driver is available for Win 7?
Windows XP mode supports virtual printing as long as the printer driver supports Windows XP.
Print from a virtual machine
There are several methods that you can use to make a printer available to a virtual machine. You can use the methods are affected by the question of whether a printer driver is available for Windows 7 and the printer is a local USB printer or a network printer. To share a local USB printer
1 note
This method is appropriate when the printer driver is available for the Windows 7 host operating system and the guest operating system. Just do these steps once per virtual machine. This procedure assumes that you have checked that the printer works in the host operating system.
Make sure that the printer is turned on and that the printer driver is available for installation. For example, you can install the driver on the internet or on a CD.Redirect the printer to the virtual machine. In the virtual machine window, click USB and then click on the name of Connecternom.
2. install the printer driver in the guest operating system. You can install the driver on the internet or on a CD.
3. release the printer of the virtual machine. In the virtual machine window, click USB and then click on the name to release.
4 restart the virtual machine. In the virtual machine window, click Action, and then click on restart.
5. go in the desktop of the virtual machine and log in if necessary. (You will be connected automatically if you have saved the credentials.)
6. the printer will be available for use at both the host operating system and the guest operating system. To set up a printer for a virtual machine network
1. go in the desktop of the virtual machine and log in if necessary. (You will be connected automatically if you have saved the credentials.)
Note
The following steps are General, as well as the names of the buttons may differ from what is shown.2. open the control panel and then open Printers.
3. click on add a printer. The Add Printer Wizard opens.
4. on the local page or network printer, select the network printer option and complete the wizard.
If you run Windows XP as a guest operating system, you must manually install the printer driver for each printer you want to use. The following steps describe this process. To install a printer driver in Windows XP
1. click on start and then click Printers and faxes.
2. under print jobs, click Add a printer. The Add Printer Wizard opens.
3. on the page local or network printer, select local printer connected to this computer and clear automatically detect and install my Plug and Play printer.
4. on the select a Printer Port page, click the drop-down list control and select one of the TS number ports, and click Next.
5. on the install printer software, select Windows Update or the disk and complete the wizard. To print from a virtual machine
1. go in the desktop of the virtual machine and log in if necessary. (You will be connected automatically if you have saved the credentials.)
2. do one of the following:
* Since the desktop virtual, right-click on a file, then click on print.
Open him any application that includes a print option and then use the command print.3. all printers available on the virtual machine are listed. Select a printer, and then click OK.
-
Windows 7 does not connect to an old printer
I bought a new laptop which has windows 7. My old printer installs since its game upward for older versions of windows. What can I do to solve my problem?
Could you identify the printer name and model?
Have you checked the Web site of the manufacturer for updated drivers?
As suggested, if the printer does not have a native driver for Windows Vista or Windows 7, your next best option would upgrade to Windows 7 Professional and use it through the free Windows Virtual PC with Windows XP Mode.
Or you might consider buying a new printer that works in Windows 7.
Run in Windows XP Mode requires:
(1) Windows 7 Professional, Ultimate or Enterprise (not supported in Home Premium).
Windows XP Mode and Windows Virtual PC
http://www.Microsoft.com/Windows/Virtual-PC/default.aspx
Windows XP Mode now accessible to more than PC
Get started with Windows Virtual PC
http://www.Microsoft.com/Windows/Virtual-PC/get-started.aspx
http://www.notebooks.com/2009/11/23/using-Windows-Virtual-PC-with-Windows-XP-mode/
Windows 7 - upgrade Express features:
http://Windows.Microsoft.com/en-us/Windows7/products/features/Windows-Anytime-Upgrade
Print from a virtual machine
There are several methods that you can use to make a printer available to a virtual machine. You can use the methods are affected by the question of whether a printer driver is available for Windows 7 and the printer is a local USB printer or a network printer. To share a local USB printer
1 note
This method is appropriate when the printer driver is available for the Windows 7 host operating system and the guest operating system. Just do these steps once per virtual machine. This procedure assumes that you have checked that the printer works in the host operating system.
Make sure that the printer is turned on and that the printer driver is available for installation. For example, you can install the driver on the internet or on a CD.Redirect the printer to the virtual machine. In the virtual machine window, click USB and then click on the name of Connecternom.
2. install the printer driver in the guest operating system. You can install the driver on the internet or on a CD.
3. release the printer of the virtual machine. In the virtual machine window, click USB and then click on the name to release.
4 restart the virtual machine. In the virtual machine window, click Action, and then click on restart.
5. go in the desktop of the virtual machine and log in if necessary. (You will be connected automatically if you have saved the credentials.)
6. the printer will be available for use at both the host operating system and the guest operating system. To set up a printer for a virtual machine network
1. go in the desktop of the virtual machine and log in if necessary. (You will be connected automatically if you have saved the credentials.)
Note
The following steps are General, as well as the names of the buttons may differ from what is shown.2. open the control panel and then open Printers.
3. click on add a printer. The Add Printer Wizard opens.
4. on the local page or network printer, select the network printer option and complete the wizard.
If you run Windows XP as a guest operating system, you must manually install the printer driver for each printer you want to use. The following steps describe this process. To install a printer driver in Windows XP
1. click on start and then click Printers and faxes.
2. under print jobs, click Add a printer. The Add Printer Wizard opens.
3. on the page local or network printer, select local printer connected to this computer and clear automatically detect and install my Plug and Play printer.
4. on the select a Printer Port page, click the drop-down list control and select one of the TS number ports, and click Next.
5. on the install printer software, select Windows Update or the disk and complete the wizard. To print from a virtual machine
1. go in the desktop of the virtual machine and log in if necessary. (You will be connected automatically if you have saved the credentials.)
2. do one of the following:
* Since the desktop virtual, right-click on a file, then click on print.
Open him any application that includes a print option and then use the command print.3. all printers available on the virtual machine are listed. Select a printer, and then click OK.
-
Cannot share the SD as usb drive
I'm under 1.1 on a fire of Alcatel filed. I enabled two options to share the sd card (which works fine) as a usb drive, but it does not recognize my computer (Debian). When I connect the phone, it creates an sdb entry in / dev, but without partition (sdb1).
So far, the only way to achieve this is by issuing the command described here (http://yorik.uncreated.net/guestblog.php?2014=15), "Adding access usb to SD card" > step 5. I do whenever I plug in the phone, of course.
Additional information:
-The sd card works fine. I can use it on the computer with a microsd card.
-The sd card works fine on the phone too.
-J' have enabled usb drive and shared the sd card in the phone.
-The page I linked indicates the partition should appear when I unlock the home screen, I have tried that but it still does not work.This has been resolved for me in rev version 1.1.0.0 01020.
-
Hi all
I'm running a 104 ReadyNAS to 6.4.1 RC1 level.
- I plugged my external drive of Taurus with rear USB connector upper
- I have to run a backup ReadyNAS for the external drive of the Taurus
- I got a share named USB_HDD_1
- I ejected the disk of Taurus and disconnected from the USB
- at this stage the ReadyNAS don't show any connected USB drive or I saw a USB share
- I plugged the same external drive to the eSATA to the rear connector
- The ReadyNAS showed eSATA-2_ExternalRAID volume on the overview screen and the part of USB_HDD_1 was displayed again
- I again formatted the eSATA drive connected with EXT4
- I see now 2 actions: ESATA_HDD_1 and USB_HDD_1
How can I get rid of USB_HDD_1 from which no longer exists? There is no delete option.
Should I "reset" known on the ReadyNAS USB devices? If Yes: How can I do this?
Thank you very much
Holger
Hi HolgerGT86,
It is a cache of the external hard drive USB connected before and probably it has not have been disconnected properly. If you restart the device, you will see always the directory or the share of USB_HDD_1?
Kind regards
BrianL
NETGEAR community team -
Using pictures of Yosemite 1.0.1 I created a 400 photo album. I custom sort them. When I copy a USB to share with friends my custom sort is lost. Is it possible to maintain the current order of photo on a USB?
Of course, not as the sorting, the viewer sees is defined by them not by you - given the same USB you can use the finder to display in alphabetical order, last updated order etc. size - files have no command - the viewer defines the order
You can select Photos and export using a file for sequential access to export name so if the Viewer uses an alpha sort they correspond to your order desired - you can facilitate this, but they must define their queue viewer correctly for them to see it as you wish
LN
Maybe you are looking for
-
Graduated BIOS on a laptop g70-460us and now a window opening in the lower right of the screen that says, "attention!" For maximum output to connect an adapter of capacity sector higher' ideas of what to check or do?
-
HP Pavilion HPE H8 1234: HP Pavilion HPE H8 1234 corrupted BIo 8 beeps and the led lights
I was updating my BIOS and I got an error. Now, the coomputer starts with 8 beeps and 8 power botton blinking LED. IV tried WIndows update Bios USB, key and B. Im running outta ideals. Someone help me please.
-
Having difficulty to remove the Windows Recovery Console
I followed the instructions on how to do it, but the cmdcons folder could not be deleted. Some files are in use? I installed the recovery yesterday with "Combo Fix" console after having a suspected virus. I wish to remove the console now but could no
-
Re-activate without a certification key.
Like me, Dad uses his PC for everything although it is in a retirement home. However, it is not its Vista when it bought the PC, is then locked, PC wants key certification and Certification key is not found. We can re - turn on his PC, or is now the
-
LaserJet Pro 400 printer M401: Lato font TTF print does not correctly on M400 M401
Explicit enough. When we use a printer M401 police FTT Lato , we see corruption at the bottom of each letter. See the image below. When we use other printers, such as a series of printers Laserjet P3015, it comes through the fine: Both printers are