Webcam 32 bit to lower the image scales
I want my webcam to capture images at a framerate of 60 Hz and to manipulate those outgoing pictures then.
So, I want to be able to view what my Webcam captures in real-time 32-bit, but also to be able to see in 8 bits and 1 bit. The resolution to which I want to see these is 1024 x 768.
I did not come to the part of the ladder yet, but that's a bridge I'll cross when I come to it.
My current VI can capture images and I can watch in real time with my webcam, but when I try to convert these 8-bit, it does not work.
Can someone tell me what I am doing wrong and how it should be? And if possible also tell me how I can convert the images in 1-bit images?
Kind regards
Choisai
Now you startede two sessions with the same device. You can't do that.
If you have only a camera, remove the second opening of the session (you can have a session / camera).
Copy the data from the image of the trees in the second image in the loop.
You're almost here :.)
Best regards
Dan
Tags: NI Software
Similar Questions
-
Behaviour of the size of the image scale will not turn off
First 8.0.1 (21) CC 2014 10.9.5 Mac.
I worked with clips on a corresponding sequence so far. Clips are Full HD.
Now, I want to change in a smaller sequence (1280 x 720).
I uncheck scale to the image size option.
Unfortunately, when I put them in the sequence of small clips they are still scaling to the image size. The movement is 100 and the clip tops out at the frame. I tried several sequences and several clips.
I have 2 types of sequences (sequences AVCHD and GoPro) that do. My graphics (Lower 3rds and others) are NOT updated with the scale to the size of the image.
Am I missing something? I use wrong image size scale? Is scale of the image size a property defined on the individual item at time of importation if so, that seems like a terrible idea. I would like the possibility to activate the scale of image size, enable or disable depending on the when I want.
I just found a way to disable the behavior of scale to the size of frame on individual clips after importation. If you right-click on the item in the timeline panel, you can turn off the scale to frame size.
This action solved the problem! I can even apply this option to multiple clips at once.

-
Satellite C660D-14W - Webcam application: Impossible to adjust the Image Preview size
I recently bought a Satellite C660D-14W, and then activation of the application of the webcam, I can't increase the size of the image of 160 * 120.
The size of the image (i.e. the image of myself I see when the webcam is activated) used to be much larger, but when I select the drop-down list menu resolution to see that I can enlarge the preview image, the only option I gave is 160 * 120.
A couple of times before this problem started, when I started the laptop I got an error message saying that the application of the webcam could not be enabled; I've uninstalled and reinstalled the driver for the webcam, but no luck.
Any help would be appreciated.
Best wishes
Andy
Hello
Even if reinstalling driver webcam didn t help you, I would recommend when even that check once more.
You must uninstall the first webcam software!Then you must clean the registry because the registry still contains entries.
You can use the CCleaner it s clean good software keep the register and the OS.After that, restart the device several times and then download the software of the webcam from the Toshiba page then install it and restart the device.
Now check the features of webcam!Note: to install 3 software (Skype, etc.) that may affect the webcam feature to verify the webcam before install you the software.
-
Cannot change the bit depth of the image
New to PSE (old version 4, old I know), and I can't change the mode > in anything else.
File and gives me no info on the texture (free online) and 8-bit and the layer of color in image > mode are grayed out and no option to change to any other depth.
Is this normal for this version of the PS?
THX
Different answer OK, its 8-bit not at all, it is 16 bits, click function right Windows 10 properties, which means clearly PES just leave you not to change the bit in any depth, sad I needed so that it comes to game development, and I should be using 8-bit textures. Well
I have "mark as resolved he's.
See you soon
-
Black border around all the images from my video.
I'm new to the forum here and am struggling to find an answer to my problem and I was wondering if someone could help me. I use elements adobe first 9 create a photo slideshow. I have about 90 photos, with several of them and audio text throughout all this. I don't know very well this program, I used it once to make a video. When it's over, I burn it to a dvd. The problem I have is that when I burn it to a dvd and play in my dvd player, the photos are of size reduced and there is a black border around them (all 4 sides). Do you know what I can do to make it go away? The last video I had not so I'm not sure what I did with this one. And I tried to compress images and it changed nothing.
Thank you very much!
Alisha
Lish8,
If some of the stills are smaller than the size of the frame of the project, you will want to either their scale exactly, if required for the extensions to match, or you want to use the default size of the image scale, but take note: scale to the size of the picture by default dimensionnera only the size of fist to the rider, so if the Ratio of Aspect is off say that Images are in 16:9 and image of the project size is 4:3, you'll still have a few black bars.
If the Images are close, I would say that you are using the fixed effect > Motion > scale, to increase the scale, so that the scope of the draft framework is filled on all sides. It will be actually reframe the view of the stills to the Aspect Ratio of the size of the image of the project. If you don't harvest like that effective, simply adjust the fixed effect > Motion > Position, to get a better harvest.
The holds of same for still Images, which are a bit larger - I would manually scaling those to match the project frame size.
That's why Steve recommends a slightly larger Image, that the size of the frame of the project - it gives you a bit of room for manoeuvre, in the final scale and Position.
Good luck
Hunt
-
Satellite M40-265 LCD displays the image complete but crushed
Satellite M40-265 LCD displays the image complete but crushed on two-thirds of the screen
When my Satellite M40 - 265 ATIMobility Radeon X 700 and omega 3.8442, Windows Xp drivers, Sp3 boots by setting the LCD + analog RGB, initially only displays on the external screen after startup can be switched with Fn + F5 on LCD. Then appears on the LCD, the complete picture but only two thirds of the screen, third, the right is black. It works so well when the external monitor is not connected during the boot.
When defini set to auto, select the display to the computer starts only when an external monitor is connected, then after that, I spent in the LCD screen.
Damage to the inverter is excluded as already checked. Inspect visually the cable of the LCD displays nothing. Beside the left speaker, a ground wire (black) to screwed, but it is s t connected anywhere.Starting in safe mode is possible to use a display fullscreen on external
Hello
The M40 is a not sure oldie about the available settings in the BIOS and in the graphics options, but I think you should check the settings of the graphics card ATI Catalyst.
I remember that ATI catalyst supports certain options such as resizing the Image. Here you can select the image scale Panel option full size
In addition, you must set the resolution on the internal screen at native resolution of 1280 x 800
I think that the external monitor supports the resolution, which is not the same thing as the screen internal. -
the image fit more into the window.
Hi all
I tried to display an image and adjustment in the window but the image is displayed in the window of the half
 .
.Can someone give me a hand please?
Here is my code.
stage.scaleMode = StageScaleMode.SHOW_ALL;
internship. Align = StageAlign.TOP_LEFT;
var myImageLocation:URLRequest = new URLRequest("..) ("/ image/iconWithTextDT.png");
myImageLoader.contentLoaderInfo.addEventListener (Event.COMPLETE, onImageLoaded);
myImageLoader.load (myImageLocation);
addChild (myImageLoader);
private void onImageLoaded(e:Event):void {}
var scale: Number = stage.stageWidth / myImageLoader.width;
If (myImageLoader.height * scale > stage.stageHeight) {}
Scale = stage.stageHeight / myImageLoader.height;
}
apply the image scale
myImageLoader.scaleX = myImageLoader.scaleY = scale;
}
You can try this code
var myImageLocation:URLRequest = new URLRequest("..) ("/ image/iconWithTextDT.png");
myImageLoader.contentLoaderInfo.addEventListener (Event.COMPLETE, onImageLoaded);
myImageLoader.load (myImageLocation);
private void onImageLoaded(e:Event):void {}
var bm:Bimtap = myImageLoader.contenet
var appwidth:Number = stage.stageWidth;
var appheight:Number = stage.stageHeight;
var imageWidth:Number = bm.width
var imageHeight:Number = bm.height
if(ImageWidth>ImageHeight)
{
BM. Width = appwidth
BM. Height = appwidth * (imageHeighr / imageWidth)
}
on the other
{
BM. Height = appheight
BM. Width = appheight * (imageWidth/imageHeight)
}
addChild (bm);
}
-
Pixelation when scaled to "scale to the size of the image?
Hey all,.
When I put a clip from 4 k to 'adapt to the size of the image' on a timeline of 1080 p and then it swings a bit, are there any negative pixelation/aliasing occurring as opposed to simply scaling the 4 k clip to the timeline 1080?
In my view, that it is impossible to discern, but I was wondering if I do something wrong in my workflow.
Thank you!
Yes, "Scale to frame size" is destructive. If you open the effect controls panel and look at the scale parameter that you choose this option, you will see that the setting remains at "100" means that your newly reduced film is now 100% and everything above that will cause the loss of resolution.
What you want is the much better "to the image size" option just below (in the context menu), which will scale your footage to 50%, in order to preserve your goodness in 4 K.
-
Scale to the size of the image
So I see that if I set the scale to the size of the image it dimensionnera my clips on import and I lose the high resolution... Sucks a bit
Is in any way at all to the scale of the element when importing to the timeline? Final assembly used to do this, and it was awesome...
I work with mixed 1080 p and 4 K images... So we are mastering 1080 p and whenever I shoot a clip of 4K I have to manually resize 50%
Is it possible to automate this scale to 50%? The main reason I want to do with scale is some of the 4K clips that we have planned for crop... If default scale to the size of the frame that will mess up...
Really surprised there is no easy way to do... I must be missing something...
There is a way easier to do, but still not as easy as it should be.
You can do a right click on the elements in the sequence and choose SETTING to the size of the image. This will allow full resolution cropping.
Be nice, if we didn't have that as a general preference, along the scale of intelligence.
-
How to put a video Clip on the scale and avoid the deterioration of the Image?
Hi, I'm trying to determine the best way to put across a number of videos in my sequence, so that I can ' digitally zoom "on the action and again, we hope to avoid degradation of the focus/sharpness of the image.
My concern is that using the Scale-up effect, is to distort the images, that is stretching the pixels.
(one of the clips that I tried to use the scale effect appears blurry and distorted, but it could have been a problem of automatic update, I'm not sure).
Here are the details of my installation.
I'm under PP CS5.5 on Windows 7, and I have a card Nvidia CUDA.
I shot the video on a Canon Vixia HF/S21 in 1920 x 1080 p at 24 Mbps (Canon calls this MXP and the 'p' is not native, is "drop-down" menu inside the camera).
My output will be h.264 for the web. I'm fine with the dimensions of the output at 1280 x 720. The output doesn't have to be 1920 x 1080, BUT it would be nice IF I could the 1920 x 1080 output while keeping the image sharp and vivid. If 1280 x 720 gives better results then I'll do it.
So my questions are the following:
(1) using the scale effect PPCS5.5 result in a distortion of the image
-It causes the image to get blurry, less sharp/crisp?
-(I'm scaling the clips of 50-70%)
(2) is it interesting to define the parameters of the sequence at 1280 x 720 (instead of match clips at 1920 x 1080)?
-My thought is to set the parameter sequence to these Dimensions of lower resolution and I can get a 50% scale upwards by simply * not * using 'Ladder to the chassis' on the clips I want 50% furred.
If you shot 1080 and 720 is finished, allowing some flexibility to scale. PR calculates scale in two ways, which is very confusing. If you set your sequence on 720 and preferences to the default scale to the size of the image, all the clips in 1080 you will add later will show 100% in control of the effects > tab, movement, even if the Pr has put across your footage in 1080 at about 45% to frame 720.
I suggest you uncheck default scale to the size of the image. Then, when you add your 1080 videos to your 720 sequence, it will be scaling to 100% (for real) and it will be bigger than your raster 720. Only by doing so you know if you climbed your film beyond 100% when you are panoramic and analysis later.
Your first clip to meet the sequence, copy and use attributes to paste on the rest of your clips in 1080 to bring to the 720 frame scale to the bottom of the scale. Then you can make adjustments from there.
BTW, there is an article on the Adobe site how the CUDA scaling is greater than Ps and Ae scaling. Maybe someone can find the link or you can search the site from her.
-
As stated, whenever I have download an image with the command "save image under" he recorded in a useless file of 168 bits. This does not happen everytime I have save an image, but more often the not, and I don't have a lot of useless files hang out because of this. Is it possible to re - download each image 168 bits that he should have been downloaded in the first place? Is it possible to ensure that this does not happen?
Here's what it looks like:
http://i.imgur.com/yzgwwgC.gif?1This means that you are not allowed to do this action.
The site could use a transparent overlay image to protect the actual image or otherwise has put in place a protection.
You can check if see you the image in "tools > Page Info > Media ' and save it. -
Satellite L300-2 - How to improve the image of the webcam?
Hi all
I have the Satellite L300-2This with built-in Chicony WebCam. I installed the driver on Windows Vista, the camera work well, but the situation is not clear. I see my picture and a little with and black pixels with it.
I asked if some can help me to improve the quality of my web cam. I installed the latest driver.
Please sometimes
Thank you very much
LHOSTHello
I have the Satellite L300 but I m pretty happy with the quality of the image of the webcam.
In any case, you must change the parameters of the webcam. If you move the mouse on the side of the life of the screen that the webcam menu should appear. Then click Properties and there you can change all settings, brightness, contrast, profiles, etc..
Just a little more play these settings to find the best for you. ;) -
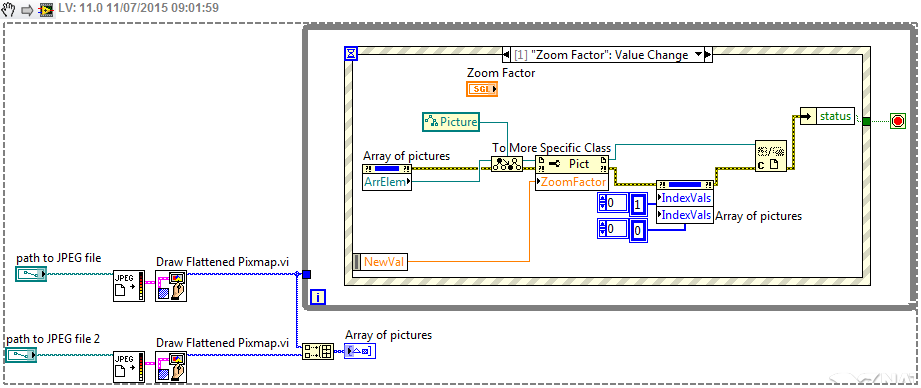
Set the scale of all the images in a table
Hi all
I have a chart 2D photos (say 4 x 4). I want to scale/zoom (all together) by a factor. So I use the zoomfactor property node wired to a digital slider, for any element 1 photo. During execution, only the image element for which I extracted the property node can be seen dynamically scaling, the rest stay where they are.
Only if I hover over them, or use the increment/decrement button, then the rest of them move to the value on the scale suddenly. Is that how it is supposed to happen? I guess that there must be a way out. I would like to see all visible on the façade to the scale of the whole.
I don't understand the VI because they have the pictures stored on the path to my computer to load whenever it works.
Hoping to get a solution by advanced users.
Thank you.
Quick and dirty, but it works

-
How to change the Image the Image (8 bit) (32 bit)?
Dear all,
I have a question about VISION.
An Image from IMAQ USB Grab Acquire.vi is 32-bit, even if the IMAQ Creat.vi has the type U8 value.
But the more IMAQ vi (for example IMAQ get LCD ROI.vi) can only deal with 8-bit Image.
How to change the Image from 32-bit to 8-bit Image?
Thank you!Hugo
Hi Hugo,.
You use a color camera? coz usually 32 bit for a color image.
If so, you can try the unique color Pane.vi extract to extract its Luminance component. It then becomes an 8-bit grayscale image.
Zheng OR AE
-
How to create an image in 16-bit grayscale of the matrix of values
Hi all
I'm having a problem of conversion of a series of measures in a specific image. I have a matrix of size nxm (variable n and m), which contains the measurement data. My intention is to transform this matrix into an image to be analyzed later by external software. The trick, however, is that the image must be in the format 16-bit grayscale: grayscale for image processing and 16 bits to ensure that the resolution is not hindered.
I search the Web and still have not found a way of mapping somehow measured values I have in this matrix in pixels (16-bit grayscale ones, that is). I have access to the LabView Full Development System version, but not other toolboxes.
Does anyone have any suggestions?
Hello world
I managed to make it work with the help of people on other forums. The key is to use the IMAQ driver, which gives the screws required to create pictures on 16-bit grayscale (only supported nicely by PNG format apparently).
The discussion on the other forum can be found here: http://stackoverflow.com/questions/11101420/structure-of-16-bit-grayscale-image-to-be-generated-in-c...
The IMAQ driver can be found here: http://search.ni.com/nisearch/app/main/p/bot/no/ap/tech/lang/en/pg/1/sn/catnav%3adu, n13% 3ahardwareDr...


Maybe you are looking for
-
Impossible to establish a TLS connection to the POP3 server
I tried to reset my server outbound STARTTLS as suggested in one of your help pages so I can send on behalf of my 3 accounts with the appropriate server outgoing SMPT But now I can't retrieve messages and even when I put back to its initial position,
-
Need help, as I have tried everything I can think of! I have a printer HP DeskJet 3050 a (J611a, SMP1FN1115AR firmware version), which is connected to my router wireless Netgear WNR200 (firmware V1.2.3.7). I have three computers connected Windows (2
-
What are the versions supported for active directory?
AD is still supported on Windows Server 2003, Windows Server 2003 R2, Windows Server 2008 and Windows Server 2008 R2?
-
How can I get my IP from sony google tv?
Broke my remote and iam trying to use an app on my iphone
-
71e135b2bb0504844a60-cannot delete file in windows 7
Please suggest a solution for the above.