How to implement a simple workflow of InDesign/InCopy
We have 10 chapters different Indesign (collectively organized under book .indb format) documents. I want to set up a workflow of editing so that my two remote Publishers to edit the copy and Insert Notes. The main body of the text in each chapter is contained in one story for each chapter, but there are also about 20 boxes and panels note in each of the chapters), so that when I export documents in the Edit-> drop-down InCopy, I get basically 21 different files instead of one. Is there a way I can set up so that a Publisher is to open a single file and publishes all the stories in a place and do not see the proliferation of incopy files? Or should I do something differently to get all that separate them unified stories?
This is how it works. Each story is exported to an individual file.
The reason is quite simple. It is not always desirable to have all the editable content.
It's pretty simple export all stories, and if you save them in an assignment, the editor can simply check the assignment that will check all stories at a time.
Using a workflow remotely packaging assignments?
Bob
Tags: InDesign
Similar Questions
-
Dropbox workflow between indesign, incopy 2014 2015
I have a workflow between 2015 to indesign and incopy 2014, as the proofreader, I work with that cannot be updated until 2015?
Thanks in advance
Then, you should stick to 2014.
-
How to make a simple slideshow DVD of a group of .jpg images? No music, no fancy transition. iDVD > magic DVD comes close, but the quality is poor and I want the images in a specific order. I also have iLIFE ' 09, which includes iPHOTO
1. put the image files you want in the slide show in an album and genre as you want. Follow the Apple document to prepare images for iDVD: iDVD ' 09 (7.x): preparing images for iDVD slideshows
2 - Launch iDVD and select an older theme, not animated. You can change the background of the theme by dragging the image file of your choice, black or other, in the display pane for the menu.
3 - Click on the button '+' and add a slideshow from the menu.

4. double click on the sideshow button to enter the mode of construction of the slide show.
5. in the media pane click the Photos button.
6 - click on iPhoto and find the album you created with selected images.

7. Select all images in the album and drag to the left in the slide show window.
8 - Select the transition for the slideshow and the time for each slide on screen
9 - follow this workflow to help ensure the best DVD video qualty:
Once the project you want it save it as an image disk via the menu file → save as Disk Image . It will separate from the process of encoding of the burning process.
To check coding mount the disk image, launch a DVD player and read it. If it plays OK with DVD, encoding is good.
Burn burn to disc with utility disk or toasts to the slowest speed (2 x - 4 x) in order to ensure the best quality. Always use higher quality media: Verbatim, Maxell or Taiyo Yuden DVD-R are recommended in these forums.

-
How to make a simple video with my computer ' s web cam?
I recently (10 minutes ago) asked a simple question on how to make a video. For five of the most wonderful years of my life, I have designed critical systems of path for launch Pads 39A & B, the vehicle Assembly building and the robot that went out the candle to the pad. On paper, a critical path system explained how the engineer, design and build a structure. In this case, it was activities separate from about 3400 and when, how and how long these activities were to each other. At the time where the Commander. I worked and which had been granted to these contracts, had developed the method of the path critical following the guidance system of the Polaris Missile, which was incredibly hard to get a handle. At the time where manned Apollo lunar Mission has been in place, I was one of only ten people in the world, who knew the process. We needed honest, some answers to our questions or it would take years to accomplish what Stephen Hawking characterized as "the unique accomplishment largest in human history" you gave me answers to my questions by these 'engineers' for Microsoft on the use of a webcam and had implemented them, would not be there was a second launch of Apollo because the first three astronauts would be dead. How to make a simple video with my computer ' s web cam? Al wood
http://www.WikiHow.com/use-webcam-on-Windows-Movie-Maker
Movie Maker: http://windows.microsoft.com/en-us/windows-live/movie-maker
Not tested. Instructions could be for the old version of Movie Maker, but they probably give you the basics.
(It's a way of many - that the answer does not depend on your OS, but on the software you use to interface with your webcam. Camtasia? Skype? etc and so on...)
In addition, to find this information is quite simple. Once I decided on what software to go with in my response to you (I chose Windows Movie Maker 12 because it's easy to get, free, Microsoft, similar to products that were previously found with Windows) I did a simple search on Google:
use Windows Movie Maker 12 with webcam
https://www.Google.com/#q=Use+Windows+Movie+Maker+12+with+webcam
or more demonstratively:
http://lmgtfy.com/?q=Use+Windows+Movie+Maker+12+with+webcam
The first hit seems to be a video market even helps you to download and install the Windows Movie Maker 12 application...
-
How to implement backup-lamw script (ghettoVCBni.sh)?
Who can help me (to understand how) to implement the (page ghettoVCBni.sh) lamw backup script? Even after a lot of Googl'ing I don't know how to do this (.. newbie...). I'm currently under ESXi with 2 data warehouses the and would like to backup computer virtual from the first to the second. I guess I ran the script on the ESXi host computer but can not find a way to the place to go. I would really appreciate if someone will write a howto (small).
Thanks in advance, Edmond
1) you must enable access to the ESXi console.
Follow these instructions to do so: http://www.vm-help.com/esx/esx3i/ESXi_enable_SSH.php
2) option: if you mainly in Windows (if no, go to 3 ), open ghettoVCBni.sh in Notepad (it is asuming you have already downloaded the script of http://communities.vmware.com/docs/DOC-8760) and change:
VM_BACKUP_VOLUME = / vmfs/volumes/kevin-test-nfs-storage
in order to take into account any data store that you want to store your backups in. In your case, it would be the name of your second local data store. The data MUST have store a vmfs/volumes/above IT. Another option, you should look at is the previous backups how you want to keep for each virtual machine. This can be changed on the line:
VM_BACKUP_ROTATION_COUNT = 3
WARNING: DO NOT PRESS RETURN AFTER ALL AS notebook of LINES to the INTERIOR THAT IT CAN break INTO THE SCRIPT.
3) SCP the file ghettoVCBni.sh on the ESXi server. You can use WinSCP (user name is root, password is any password you gave ESXi) to do if you are running Windows, use something else, the *nix scp command. (for example from the source running: scp ghettoVCBni.sh [email protected]: )
4) SSH into the ESXi server using "putty" or something physically go (or use Digital KVM or other) to the ESXi console itself and log in as root.
5) make a file on the ESXi server that lists the virtual machines that you want to back up.
There are two simple ways to do so:
Has) create the file backup_vms inside the ESXi console
If you know how to use a * nix like vi text editing tool, then use it to create a text file that has all the display names for the virtual machines that you want to back up. Don't forget that there is a new line for the display name for each virtual machine.
If you don't know how to use a * nix text editing tools, the easiest (though tedious ) to do this inside the ESXi console is:
VM1 echo > backup_vms
VM2 echo > > backup_vms
VM3 echo > > backup_vms
To check your work, run: cat backup_vms
the output should look like:
~ # cat backup_vms
VM1
VM2
VM3
~ #
If it doesn't, run: rm backup_vms and start over (so note the tedious ). Someone chime if there is a way to do this without rm'ing or edit with vi.
B) create the backup_vms file it on a separate system and the SCP in the ESXi server. You must be careful, however, not use not Notepad because after each return, he will add in ^ M (where the warning at the top). It's bad. Again, you can check your work by using the cat backup_vms inside the ESXi console (after you scp it exceeds of course) to make sure there are not the weird characters.
Don't forget, the virtual machines inside the backup_vms of the file MUST be saved on the host of ESXi (i.e. existing in the inventory of the ESXi host in vi-client). In addition, it would be easier to have the ghettoVCBni.sh and backup_vms file to be in the same directory. For this document, this is assuming that you are in /. To make sure you're there, use pwd. To get there use: cd /
5) if you follow the optional step 2 then edit the ghettoVCBni.sh script using a text inside the ESXi console editor and change:
VM_BACKUP_VOLUME = / vmfs/volumes/kevin-test-nfs-storage
in order to take into account any data store that you want to store your backups in. In your case, it would be the name of your second local data store. The data MUST have store a vmfs/volumes/above IT. Another option, you should look at is the previous backups how you want to keep for each virtual machine.
This can be changed on the line:
VM_BACKUP_ROTATION_COUNT = 3
6) change permissions on script to allow execution: chmod + x ghettoVCBni.sh
7) run the script. In the case of this document: ghettoVCBni.sh backup_vms
8) sit and wait or go do something else.
These instructions also apply to the ESX ( under step 1 ). Oh yes, this script can be run on virtual machines (power) live and you don't need any additional trick to run it.
Nice day
Tuan
-
How can implement you not with Tim Capsule and AirPort their simulation on the iMac?
Hello
How can implement you not with Time Capsule and AirPort their simulation on the iMac?
I don't know what you're asking.
AirPort Extreme is a wireless router.
A Time Capsule airport is an AirPort Extreme with a built-in hard drive for data storage.
An iMac is a Mac computer.
An iMac is not a wireless router, so he is unable to perform the functions of a wireless router.
-
How we implemented personal signatures in Thunderbird?
How we implemented personal signatures in Thunderbird?
-
How to implement point filters fixed for FPGA
Hello!
I am applying the bandpass filter Butterworth for FPGA.
I managed to develop filters of fixed point that suits my needs, but I don't know how to implement on a table in a project after the FPGA code generation. I tried to understand it in the examples, but I was not very successful.
My time to finish what runs, any help would be really appreciated...
Any suggestions?... some examples?
Thanks in advance
I've already done that and solved the problem.
In any case thank you and have a nice day
Ljubica
-
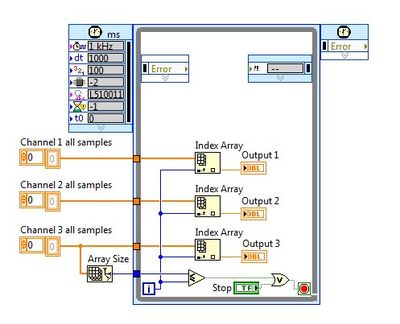
How to implement the reading of data from a matte file on a cRIO?
Hi all!
I'm still not sure, it is plausible, but I'll ask rather before you begin complicating. So far, I found no useful information on reading in the data to a device of RT from a file (type of a simulation test - data is simulated).
I have the MatLab plugin that allows the storage of data read a MAT file, which has a number of columns that represent the different signals and lines representing the samples at a time (depending on the time of the sample - sample every time has its own line of signal data).
I have no idea how to implement this at cRIO.
The idea is:
I have some algorithms running on the controller of RIO in a timed loop. As the entries of these algorithms I need to access each of the values of columns in the row, which is the time of the sample (sort of a time series - without written actual times).
I am fairly new to RT and LV development, so any help would be appreciated.
Thank you
Luka
Dear Luka!
I think the reading of all the samples in a single channel is exactly what you need here, because reading the files may take some time and is not deterministic, so it is best to read all the data in memory (or if this is not feasible due to problems of size, fairly large pieces may be sufficient). The table read can be provided and then in the loop simulating outings, something like this:
I used here separate channels so it's more graphic, but you can build all the channels in a 2D array and array index corresponding to the samples fom 1 who. You can also use for loops with indexing as tunnels are setup and then you won't need the index functions and the number of iterations is also set automatically, but you have to take care of synchronization settings.
Best regards:
Andrew Valko
National Instruments
-
How to implement the wafer map using LabVIEW?
Hello LabVIEW Masters!
I have a project which includes control and searching for information on a PROBER. One of the difficulties I have now is how to implement a WAFER card using LabVIEW. According to the requirements of my client, the element of pads varies between 6 k and 23 k. I guess that do everything (a = a ctl/indicator led) will be a hell of a task, especially on how to effectively manipulate each elements. Does anyone have a better idea on the way whose that?
Please, I seriously need your help...

Thank you and best regards,
Dennis DG
Hi Dennis,
This wafer GerdW post card appears to me as a sort of histogram (for example http://www.ni.com/white-paper/4158/en#toc3);
Altenbach post well this example that shows how to use a plot of intensity to create a 2d histogram:
http://forums.NI.com/T5/LabVIEW/overlay-plots-as-intensity-graph/m-p/211222#M119248
Learn how it works and try to adapt it to your specific task.
Alex
-
How to implement Canopen on FPGA to run the engine using NOR-9881?
Dear,
Your support will be highly appreciated,
There is only one available for NOR-9881 example.
Please note that the following materials were properly connected:
cRIO-9024, cRIO-9113, OR-9881 and motor Nanotec (SMCI36 against L2818L0604-T5X5), the following
sites Web shows the engine Nanotec in details:
http://us.Nanotec.com/products/660-L28-linear-actuators-with-trapezoid-spindle/
http://us.Nanotec.com/products/1041-SMCI36-stepper-motor-and-BLDC-motor-position ing-control /
The main problem is how to configure the inputs and outputs, where, in most examples, the entry and exit have been automatically
configured.
the following three examples and I wonder how to start:1 - example Nanotec: dependent VISA controls for data transfer
http://us.Nanotec.com/support/application-notes/LabVIEW-example/
2 - reference example CANopen for series C OR - 9853 Module CAN:
the NOR-9853 has default Can0 which was used in the codehttp://zone.NI.com/DevZone/CDA/EPD/p/ID/6093
3 - from finder labView example: search for 9881 then choose
NOR - CANopen_cRIO.lvproj, which depended on SDO orders for transfer orders
The attached picture shows that NEITHER-9881 can be seen, after compilation and
loading the bitfile FPGA.
Please, please advice me:
1. how to start?
2. how to create variables of entry for NI9881?
3. how to implement CANopen mode FPGA? where there is no CANopen palette.Thanks in advance and
Hello!
From my understanding, the 9881 can be treated from the FPGA, but only from the application of the RT. I think that the point 3 of your post examples of the use of the module fine.
Kind regards
Georg
-
How to program a simple relay ON / OFF manually?
Hi all
Can someone tell me please how to program a simple relay ON / OFF using DAQ assistant? The user must be able to select
which relay it wants ON / OFF...
In fact, I want to turn on / off a MOTOR using the relay...
I think he should be using outputs digital, but I'm sure about the hands-on...
Can someone please suggest.
-
9211 question; and also how to create a simple IP check?
Hello
First of all, with the 4 9211 module channels for thermocouple input, I assume that it's OK to connect different types of thermocouple to different channels at the same time? (for example channel 1 - T type, 2 - E-channel type etc). Also why is the sampling rate for that ' sample/s 14' - seems low - but I can apparently run at much higher rates and labview complain?
Secondly, I would like to implement a simple temperature controller 14 channel FT. I had a quick glance at a few examples, but "PID Control-Multi Channel.vi" (for example) seems only a proportional controller, no full term. Maybe I should just write my own? Can someone point me in the right direction?
Dave
Hi Dave,.
I hope you are well today!
Yes, you can use different types of thermocouples connected to multichannel 9211 in one job. You can simply create a virtual task for a group of channels to the MAX to be aware of this. 9211 is measured from the channels one after the other by scanning through them (time division multiplexing), rather than take all measures at the same time. This is due to 9211 a single ADC, the cold junction compensation circuit and zero circuit automatic.
Now, depending on whether you use CJC and/or the zero function automatic or not, the maximum sampling frequency varies slightly. A comparative table can be seen on page 20 in the datasheet of the 9211.
I suggest the reason why 9211 does not support the higher sampling has been done its designed applications. 9211 is designed for the measurement of the overall temperature of the ground, and it is useless to the temperature of the sample from a point say 20,000 times per second, because in many scenarios the temperature does not change that quickly. Also, following the sampling frequency, noise immunity performance can be increased to the ADC.
Say if I apply for temperature monitoring, I would normally update my temperature every second reading or every half a second and who should provide an accurate indication of my environment. However, if you are looking to make measurements in extreme environments, alternative DAQ devices/sensor should be considered.
Hope this helps,
-
How to implement interfaces or inheritance in LabVIEW?
Hi all
I try to implement oriented OBJECT in my LabVIEW code and require heritage or just an interface (such as might be required in java). I have a good knowledge of OOP is just how do me in LabVIEW, I'm curious.
I'll try to stick with my own example for now, so that someone is able to tell me exactly how to implement this.
in any case, I have two different DMM and each come with their own GPIB commands to get the measures and set the measurement configurations. This seems to be a perfect example to learn how to use inheritance. I figured out how to make a class for each DMM but was curious as to how I might be able to create a parent class for each of them because they both require the same fields in their configuration (AC/DC, Measurment Type, rank, address VISA). I think that I could create a parent class with these fields, then the methods of use of these fields and have then child classes inherit fields and override the methods of the parent class so that depending on what the user selected DMM, it would be able to use the correct class to issue the right GPIB commands.
If anyone can point me to a good example or explain how this could be implemented in labview that would be super. I'm also browsing the forums LVOOP to LavaG trying to figure this out, thanks!
Brent
Brent,
LabVIEW help contains a lot of detailed information on the use of classes. I recommend reading through it, before we begin with OOP in LabVIEW. In the content of the Help window tab, search for "Fundamentals > LabVIEW Object - Oriented Programming > How - to's» There is an article entitled 'change the legacy of a LabVIEW class' that should be what you're looking for.
Chris M
-
How to implement the ScreenUiEngineAttachedListener Interface?
How to implement the ScreenUiEngineAttachedListener Interface? It is somewhat a mystery reading through the API.
I have a class that implements ScreenUiEngineAttachedListener:
public class UiListener implements ScreenUiEngineAttachedListener {
  public void onScreenUiEngineAttached(Screen screen, boolean attached) {
  }
}
Then I have a class MyScreen which extends from screen and has two methods:
public void addScreenUiEngineAttachedListener(ScreenUiEngineAttachedListener listener) { super.addScreenUiEngineAttachedListener(listener); } private void removeScreenUiEngineAttachedListener() { }- What is the correct positioning of everything?
- Can I define an instance of UiListener and pass in the addScreenUiEngineAttachedListener?
- How to remove UiListener in removeScreenUiEngineAttachedListener?
You will need:
- an instance of your UiListener - probably a static member inside your UiApplication;
- a method that allows to retrieve the reference to this instance of UiListener;
- a call in your constructor for the screen at addScreenUiEngineAttachedListener (yourApplication.getUiListener ()) or similar;
- potentially a call within your onScreenUiEngineAttached (attached screen, boolean) routine, the branch (attachment is false) : screen.removeScreenUiEngineAttachedListener (this);
However, all this is too much work for no gain. Just override protected void onUiEngineAttached (boolean attached) in your screen class and make your logic there - all members of your class are accessible and all the code is placed where it belongs.


Maybe you are looking for
-
I have my music in a folder on the desktop. I have to go to the folder that each song time ends and choose another. How can I get the music played continuously and randomly?
-
HP ENVY printer 4512: unable to scan to the chromebook using hp ENVY 4512?
I use a Chromebook and I have a printer hp ENVY 4512 and I tried to use the scanner on it but it is not picking up my Chromebook. I can print but not scan. Is there anything I can do to get the scanner my printer to pick up and scan part to my book o
-
Update for Windows Vista can not stuck at 0% and keeps restarting
I have a Dell laptop running Windows Vista. It keeps up-to-date and then restart. The screen is stuck at 1 of 1 update but says 0% completed. It restarts often but once it restarts, it goes back to the screen saying 1 1 0% complete. I was able retrie
-
My hard drive crashed, I have my key of win 7 but no disc how to recover the software?
Hello, my hard drive crashed and can't access my pc so I bought another one, but I don't know how I can install win7 to my new hard drive, I tried to retrieve the windows product key with software, but it did not work, what should I do?
-
How to get the phone's public IP address?
I need to recover the public phone IP address, how do I do this?