I need a screw...
The itty bitty live few that holds the antenna in place on a Treo 700 p to be exact. It is located in the little countersunk hole below the antenna. Palm and Verizon seem to if interested in making it simple to get the thing, and to spend $200 to get this bit replaced screws, well that would be the opposite of a "small"
Thank you! P2
Thank you, Damien. At least now I can say something good happened today!
Tags: HP Tablets
Similar Questions
-
need screws for hard drive for HP Envy Phoenix 800-060
Where can I order some of these guide of cylinder head screws that you screw on the sides of a new drive, so it will slide along the rails and lock in place in the internal slots 3.5 "? No extra charges not supplied with my computer. I need to install 2 drives more then need 8 screws (4 screws by the reader).
I called the computer of our local Mom & Pop shop and they offered to sell me a dozen screws for $1. I guess that's the only way. HP does not have.
-
Need a second drive hard "holder" for a Qosmio F30-141
I bought the second hard drive (Toshiba 160 GB sata) for my Qosmio F30-141. There is no 'holder' (metal platform for mounting of hard disk) in the second slot. There is no "springs" protection too. How - he called and where I can buy things?
Hello
The hard drive carrier is available in your Toshiba dealer in your country
Reference No.. P000457790 ASSEMBLY OF THE HARD DRIVE SUPPORT
and you need 4 screws to fix the HARD disk and 1 screw to fix the door--:--.
Reference No.. P000417800 TSCREW M3X4CR 4 live
Reference No.. P000318000 M2.5X4BN 1 screwNote: You can Type the part number in Google and you will find many online dealers
Kind regardsReaver
-
Dimensions screw rail SCXI-1001
I don't know if this is the best place for this, but...
I have some PCB custom this escape several SCXI-1130 modules in SCXI-1001 chassis connections. Since I don't want the PCBS come A) loose, or B) cause of excessive fatigue on the module connector, I made a support to climb. I want to connect on the rails of the SCXI chassis through the openings in the panels before modules. To do this, I need appropriate screws.
I think that the rails are M2.5, but I don't know (and I don't want to order and wait for the hardware, only to discover that I guessed wrong). Can anyone confirm that the mounting on the SCXI-1001 chassis rails require screws m 2.5?
Thank you
Sean
Sean,
If you are referring to the screws that go on the front of the chassis and connect a card to the chassis don't SCREW M2.5X8MM, PHIL, PNHD, SS.
-
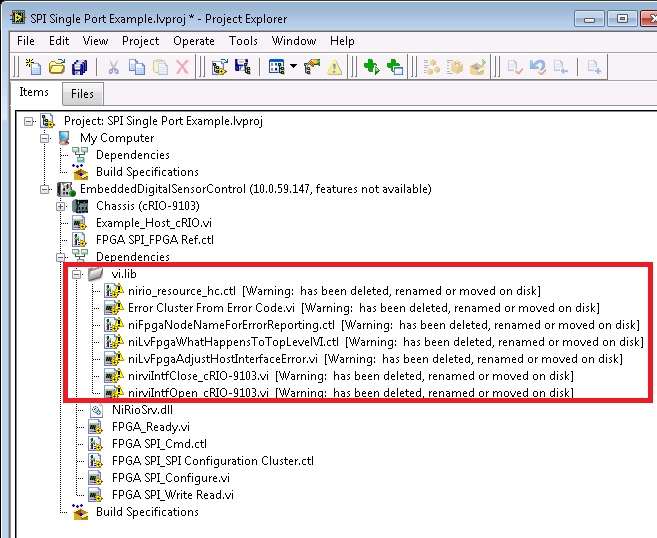
Missing screws of vi.lib project
I intend to use the FPGA to the SPI communication via a module for the cRIO. I downloaded the package SPI found here ("spi_single_port_example.zip").
However as part of the project, I seem to be missing some dependencies that must be located in vi.lib:
Does anyone know how can I fix? Initially, I thought I might be missing, a library, or something, but looking around the screw named in the red box above turned up no obvious result. Any suggestion would be greatly appreciated!
Thanks in advance for any help!

If you have developed the code in the host environment and moved straight into the target. RT target doesn't allow all the features that you were able to do in the Windows environment, and so RIO will be very little option.
Your palette will be empty when you create a VI out of your target. Do you really need these screws in your target?
-
Use screws of no class within the class
I guess that it is a theory of the question of the OBJECT-oriented programming.
Say that I have 2 classes, 1 is used to adjust the tension on a diet and another is used to update a user interface. They are not really related to all that there is no common parent class and there is essentially no relationship between them.
Now I write a Subvi, which is a kind of random number generator specialist. What happens if I want to use this VI in a method of each of the two classes above, I created. Where this Subvi belongs?
I see the following options, but I don't know who should be. I'd really like to hear your suggestions because it was bugs me for some time:
(1) create a method in each class that has the functionality of random number generator. I don't like this idea because I'll be duplicating code.
(2) simply choose store the VI as part of my project and does not include it in classes. I don't like this, it's that if I decide to reuse my code/class in another project, I need copy screws that are not part of my class with her.
(3) create a kind of "utility" class which should contain all these various screws and then use the methods of this class. I could pass an object of that class of utilities in each class so I would have access to methods. But this seems to be quite complicated.
So that is the dilemma. I wonder how you chose to resolve this problem. Thank you!
Create a library for reuse. I recommend looking in the VI package manager. You can create "packages" of code reuse and 'install' in each version of LabVIEW. Then everyone can use them since they are in a nice place.
-
VXIplug & play driver need VISA
Dear all
our need for screws to find "ke24xx.dll". I searched the internet and I got I need to install this driver: "Keithley 24xx VXIplug & play driver VISA." This diver is related to labview 7.1.
can any body give me this driver?
Thank you.
Best regards.
I found something
Thank you
-
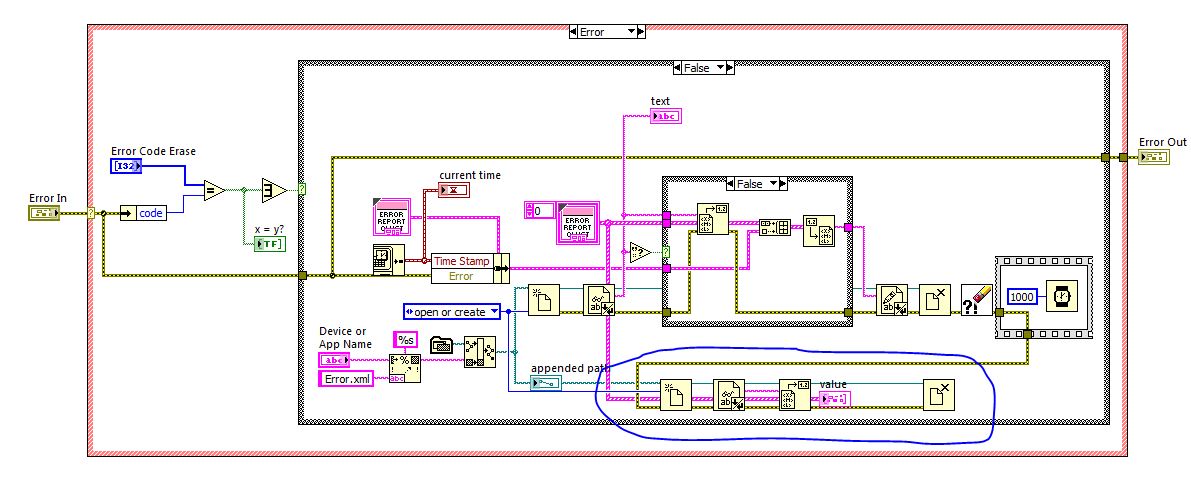
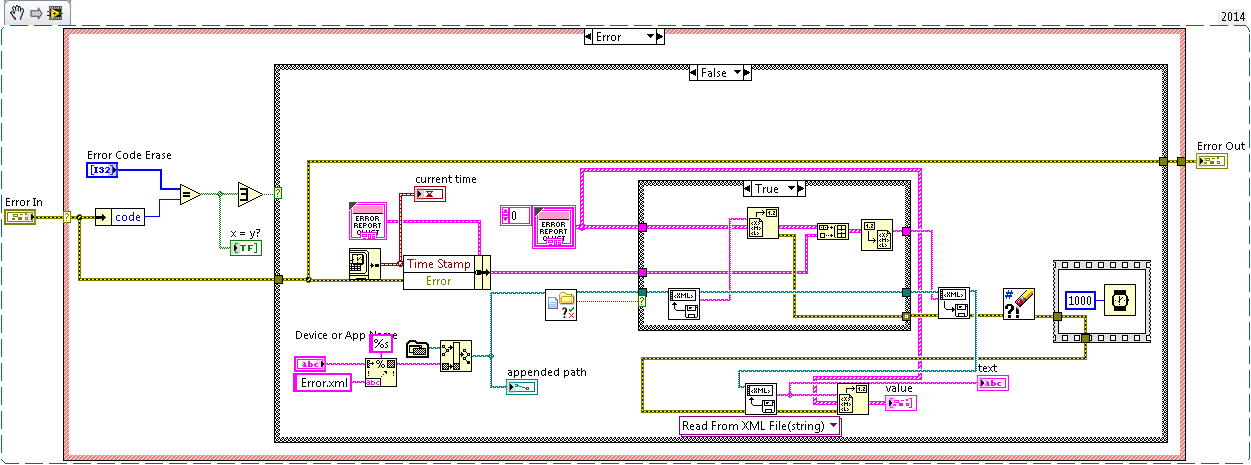
Hello, I've attached all the images needed and screw/chopsticks.
Question: I'm checking my text of reading/writing (what is written errors in an XML format, but also a corresponding timestamp) right after that I wrote the error in the XML file. The code does is to make sure that the error is not a mistake I am allowing, then goes to write the error in the XML. There is a box structure which then manages a first time entry. The idea is to review the data from the XML, then insert the new error in the table and then write back in the xml doc after flattening. I understand the issues in the long term this 'solution '. Now, please don't comment on it. What bothers me, is that when I try to re - open and read the document, I can't seem to ever display element of the array, even if the read/write function (which is essentially the exact same thing) can do it very well. I circled the items. The code is in 2011. Be sure to insert text in the name of the document. Run it a couple of times and I think you'll see what I'm driving at. Anyone have an explanation for it?
Open your base to replace file read and ends with reading XML file and Write functions, and I think it will work in the desired manner.
You must use XML reading and writing files functions to serialize the data in a way that LabVIEW can reconstruct the table clusters and timestamps.
http://zone.NI.com/reference/en-XX/help/371361H-01/Glang/read_from_xml_file/
-
State machine with analog output
I have a vi designed to generate an analogue signal to an actuator and now I just want to add in some calendar items. My intention with the attached vi was to provide signal 1 for a certain period of time, then switch to report 2. I'll add a little time to wait between the two afterwards.
What's not here? I have not changed the DAQ assistant or any material. I watched this while loop, shift register, structure combo deal on another thread. Signal graph displays correctly the signal, but no signal comes out of data acquisition. I'm sure its something simple, I'm not the best to use labview with elegance.
Thank you
I'm not even sure you need calendar screws in there. You are generating a data value of 1 second and then say data acquisition for output data. Who takes a second to do. Therefore, the DAQ Assistant takes over your second time. Therefore, simply switch your boolean.

-
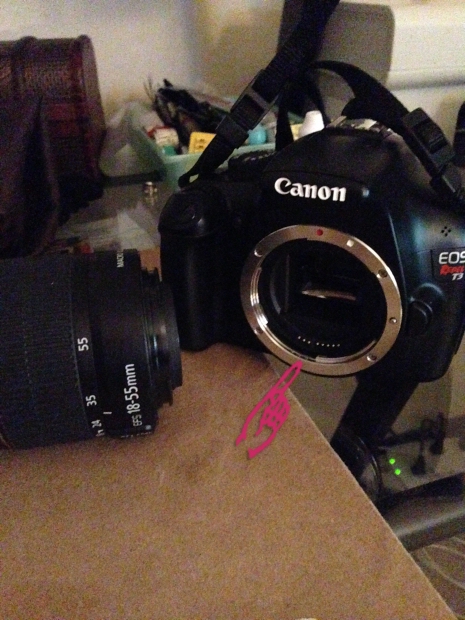
I have a Canon EOS Rebel T3 camera. I have lost my inner cover to the lens. is there any place I can buy one. I refer to the screw on the one covering the lens inside after the withdrawal of the largest lens. It's hard to explain in typing so I hope you understand that I do not speak of. I inserted a photo of what part I mean. If you see where hand TI score, well there is a CAP that screws on to protect the lens inside. I need this screw on the lid.
I pray that you can tell me where I can find a. I need it as soon as possible. I'm going on vacation Dec. 19th and need a recovery. Thank you
http://www.Amazon.com/Canon-RF-3-body-Cap-cameras/DP/B00007E7K1
-
Installation of Predator G3-605 case fan
Hello new here 1st post.
How can I install a back box to my PC fan. Ive pushed into a GTX970 in lieu of the GTX745 and its loads all good but very hot, hot air coming out of the back. Want to install a case at the rear fan. The case has a place for a fan, but how can I power. There is no header with the exception of the CPU that is used. So can I use the connection SATA spare part for power a constant fan. Hope you know what I mean.
Hello
Ok. I just forgot one small detail. You will need 4 screws to fix the fan like these. They don't are not shipped with the fan said because it is part of the OEM. You should find them in a computer or a local electronic store.
Now, you have all the information, so good luck!
-
Pavilion DV6t - 6100 LM342AV: camera does not work after installing Win 8.1
Hello
I have read a lot and looked for drivers every where my hand reaching up to.
Since I reinstalled Windows 8.1 I can't use my camera. I downloaded all the drivers from HP Web site, including the Cyberlink YouCam software nesecery, and nothing works.
Maybe a driver that is specific for the camera might work, but I can't find one so hopefully my saver, one of you.
If you have an idea of what might help, please help
Nitzan
Good so that's what I learned:
The problem with the unknown device is needed me a driver that is not in the list of drivers for my computer. I found the one missing looking into details of the driver properties in Device Manager and search on google, I came with ACPI\HPQ0004\2 & DABA3FF & 2 and found the solution here: download of HP 3D drive guard solution , sp61037.exe.
About the camera and the large sum of money. There is a common problem with this model of HP as the connector of the camera and the microphone is looking down and with behind the scenes just gravity and overtime. The solution that I found here: solution . Thanks to Surgeons of the screen and the video I put in place the connector and now, without any installation, the camera works perfectly. In the video, it shows how to take the whole screen, but you don't need all this, in fact everything you need is open the top without the need of screws from the bottom.
I hope that this other post will help get their computer and fixed camera in less time that it took me

That's how I found the connector:
And that's how it should be (the difference is very small):
-
Envy 17 t-j000 caddy tray support SSD hard drive
So, I have an ENVY 17 t-j000 Quad Edition on order. Only ordered with 1 HDD that I intend who move to the secondary place and put an SSD to the main square.
According to the manual online, it seems that readers of screw in a shopping cart / tray / support any and in need of an adapter for the connector.
Because I bought it with only 1 car. Does this mean he won't the tray with the adapter to install a 2nd drive?
And if so, where can I get this caddy and connector adapter? I really hope that it comes with it as I made it very clear on the phone I buy with 1 only drive and add a 2nd drive on my own.
http://PartSurfer.HP.com/search.aspx?type=prod&SearchText=E0K82UA
I spend 1 hour on the phone and bounced between 3 people, each had to wait on hold for as a new call. No one could help me. They finally told me to call the HP parts store, which of course is now closed. And is only open MF 7 a - 7 p CST. 1-800-227-8164
The link above is for the model J000 Quad Edition.
I think that I need the Kit material of HARD drive and possibly the screws indicated in the same section. Although I do not know why the screws would not be included in the "Kit".
720237-001 HDD HARDWARE KIT $30,40
720260-001 SCREW $14.16Wow, if I really need the screws too, it's a crazy price for screws. $30 is also a crazy price for a cable and rubber.
What makes me more upset that I'm going to make a huge deal is that I explicitly said their phone order when the laptop custom configured, that I was going to add a SSD drive myself.
They should have told me that the system is in need of these parts. For so much money, I would spend the $60 (less the discount coupon) to upgrade to dual hard drives. Which would give me these pieces with two pre-installed drives. And then I would have just replaced one with a SSD and sold new HARD drive on ebay or on site. Easily covering the cost of the upgrade of the disk. And I wouldn't have to wait to get parts or went through all that effort to source a part that must be included with the laptop. What is the point of the laptop having 2-Bay disk for the upgrade if it does not come with the owners parts be used?
Yet once, very upset that this issue has not been addressed when I talked to 2 different people when ordering my custom laptop. I spent a lot of effort in pre-sales questions to ensure he had 2 bays for hard drives to add an SSD.
And why in the world these pieces about 10 times more than they should? This is a new laptop. It's not as if these parts are for cell old abandoned.
-
Cleaning the MICR band (loud bang of the carriage of the printer)
Clean the MICR band
More information 
Notice: That you perform the following steps, be careful when handling the coding Strip as it can break easily. It is possible that dust can gather on the coding Strip which will make it very difficult for the printer determine where transportation is on his trail. To clean the MICR band, perform the following steps:
- Turn off the printer and disconnect the power supply.
- Lift the cover of the printer.
- Using a dry, not fluffy, pinch the MICR band on the right side of the cartridge carriage and pull your fingers on the right side of the printer (Figure 1).

Figure 1: The band of coding to the right of the door-cartridges
Note: The coding Strip is a narrow band of clear plastic and can be difficult to see without direct lighting. - Plug in the printer and the power.
- Open the lid to allow the transport of the cartridge to center itself.
- Using a dry, not fluffy, pinch the MICR band on the left side of the cartridge carriage and pull your fingers on the left side of the printer. (Figure 2).

Figure 2: The band of coding to the left of the door-cartridges
Someone tried for hours link my band of coding and finally found the way to do it after reading several postings on the web and my own trial and error. The key is to use a "dental mirror" that you can pick up at a pharmacy or store of material for about $5. (Maybe a small compact mirror may also work.) And you need based on the discussion there. (I used a head lamp). The problem is that you can't see the small located slot through which the coding Strip should go through the front of the printer. He is sitting behind the ink cartridges. This thin slot "tunnel" is fine a piece of rectangular plastic. You can feel the rectangular piece of plastic behind the ink cartridges, and looking through the dental mirror, you can see how small slots are on the left and right side through which the coding Strip must be threaded. After "seeing" these small slots using the dental mirror, you can feel them with the tip of your nail and then know exactly what you are aiming for as you then feed the MICR band by. (It made no difference to feed you the Strip from the left or the right, but the end of arrow to the bottom of the encoder stip must lead right when you later attach it to the wire tab). I fed the 'blind' to the band after I had formed a mental image of exacly what I was doing and now to be able to feel the small slot located I was aiming for with the tip of a fingernail. (It is difficult to work in a small space behind the ink cartridges, and if you have fingers and very big hands, it may be impossible. I didn't use tongs or tweezers because of fear of harming the MICR band.) The coding Strip should then be set at the end of the arrow towards the bottom to the right attaching to a flimsy looking wire on the right side of the printer. The left end of the coding Strip must be attached to a metal tab on the left side of the printer. You will need to retain traction on the coding Strip and manually push the ink cartridge sliding back from the road as you attatch both ends. (It's probably a good idea to carefully clean the stip encoder of all your fingerprints and ink dirty with a handkerchief once you get it back in place.) Be sure also to clean the metal bar the ink cartridges slide back, if you receive error message 0502) Be prepared for this be a very frustrating experience! You will be panicked by how many times it will take to put on the good coding Strip slot, it will be difficult to catch the end of the encoding on the wire tabs and metal band, and how you have to find a way to keep the tension on the band of coding up to one end falls that you attach the other end. But once you use the mirror to see where you need to screw the Strip encoding, and once you see the tabs of wire and metal that must be attached to the ends of the strip of coding, then YOU CAN DO! It takes just the persistence.
-
(I recently bought a tower XPS 8700). The player arrived yesterday. I started to install it today, then realized that when I put the disc into the cage, I need 4 screws to fix it. It has no screws provided with the hard drive. How can I get the appropriate screws?
Hi ColinM_Campbell,
The part # for the screws to secure the hard drive with the system chassis is M297N. For screws, you can contact the local Dell support.
If you live in the United States, you can contact dell spare parts. Please see the link: http://dell.to/11GOIPD
I hope this helps. Please do not hesitate to answer for any further assistance.


Maybe you are looking for
-
Incompatible modules with firefox 10.0.
Why the new update of Firefox (10.0) did half my incompatible modules!
-
I have an Iphone 6, IOS 9.0.1 and not backup to icloud
I tried to back up my phone to ICloud, but get the same message over and over again "the last backup could not be completed. Deleted old backup and now that's gone and still can not save. Does anyone else have this problem? Can you help me?
-
Hello I went by the number of posts, but couldn't find a clear answer. I have X 1 3rd gen (20BT-S0WX0P) with 256 GB SSD. Can I just all 2280 m2 SDS to replace? In particular, I have the choice of: MX200 essential 500 GB m2 Type 2280SS SSDCT500MX200SS
-
I have the HDR-XR150. When I download the files on my computer, the only program I have that will recognize them is the software to play the memories. I want to share my videos, but I can't seem to download to play memories via the software. It just
-
Pavilion s3714uk failed to start
Have a HP Pavilion s3714uk who entered what seemed a normal hibernation, this hibernation could not be interrupted except via the power switch. Now the unit now does not restart correctly, sometimes gives no keyboard or screen power and gives a beep