Mask colors
I want to make a color choice and then make a mask of this color. How the hell can I do?
Al
As Christopher written highest menu Select > color range. However who will select also the areas that color some areas that are that you can't wear color because they were the color that you have changed other color so that the color of the color. Thus, you can first select the color you want to change. To save the selection and selection, change the color of the selection. The addition of the selection as a layer mask. Displays only the changed areas. Then ask the layer will be hidden.
Tags: Photoshop
Similar Questions
-
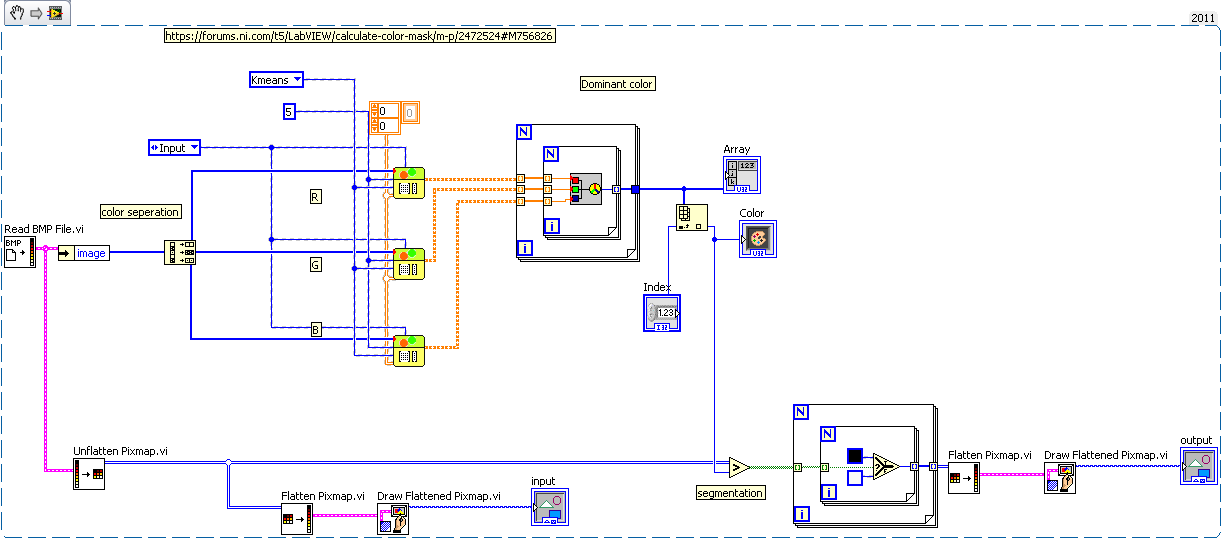
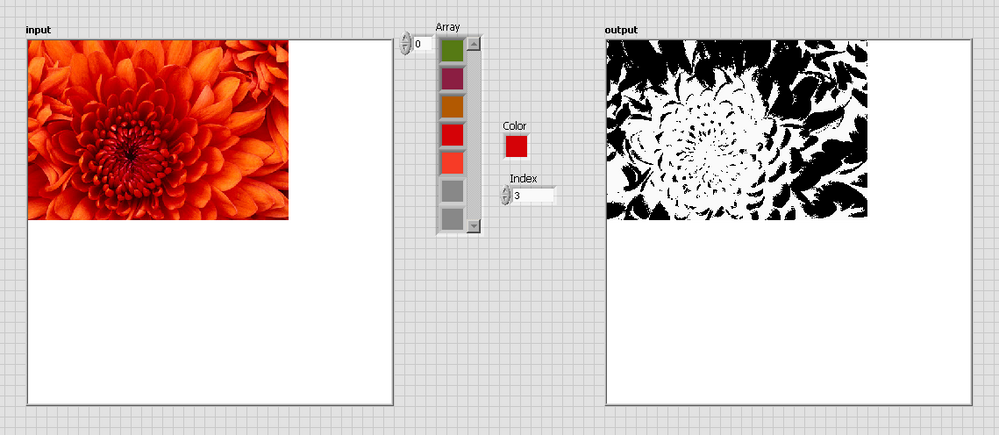
Hello
How to calculate the color mask image with the dominant color of the input image?
Thank you
So, you use the "dominant" colour as a threshold for segmentation.
-
Photoshop actions: mask color claw Cup + 99 :/
I have a black image with a layer of just clipping mask above. I created a sample with a set of 99 colors that I use over and over again. I created an action that will be the color mask, prompt me to name them and save again the image layer mask active & ready for me to pick the next color in the swatch Panel.
Two questions:
(1) is it possible to automate this action to plow right through all the colors of 99 on my sample (the names of: Swatch1-99) without being invited by me?
(2) is it possible for the action name in order the image before the record within the action? I know I can do this in batch mode, but it is possible in the action itself?
Basically, I want the action to run 99 times on an image without interaction from me. Is this possible? Or I have to build 99 series of my action?
Thanks a lot for your help!
xoxox
omgsharon
Ok.. I slept on it and sometimes during the night, I woke up and found the solution.
CREATING THE ACTION
I had to create the action of the hard...
(1) open PSD with layer mask
(2) create a duplicate file and remove all the layers and add a blank layer 1
(3) set the focus to the original image.
(4), select the layer MASK
(5) SELECT ALL to select the entire image
(6) open the Actions tab, named my new action & hit record
(7) set to color chart color
(8) color the layer mask
(9) copy merged
(10) select double image
(11) block of
(12) set the focus to the original image
(13) repeat steps 7-12, 98 times (get cramp in the hand about half way, get coffee, answering the phone, lose my place 17 times, but keep plowing on...)
(14) to save the image with 99 layers PSD file
(15) to stop recording
(16) under action 99 COLORS
WITH THE HELP OF THE ACTION
(1) make sure you have correctly loaded custom color chart.
(2) open PSD with layer mask
(3) create a duplicate file and remove all the layers and add a blank layer 1
(4) set the focus to the original image.
(5), select the layer MASK
(6) SELECT ALL to select the entire image
(7) open the Actions tab, choose 99 COLORS & press PLAY
EXTRACTION OF 99 LAYERS INDIVIDUAL PNG FILES
I have an old version of Photoshop, CS3, so the ability to save PNG using a built-in script was not an option. I looked around the interwebs a bit and found a script to save each layer as a PNG. I'm new here and don't know the rules for the display of external links, so if someone wants information on the use of this script, send me a message.
(1) open the PSD file with 99 layers.
(2) choose FILE > SCRIPTS > BROWSE and load the SaveLayers.jsx script
(3) you are prompted with a message that makes me think to have a back-up, things can go wrong, the destruction of the Earth is possible but if you are connected to the Earth in your own folly, click OK.
(4) 60 seconds later, I have 99 different PNG files in my folder color.
(5) LIKE the world. Fill the coffee.
BY THE WAY
So after I found this clever script, I tested it on 6 different files with mask layers. Some were just 2 images of layer (layer image & original mask) and 2 images with 3 layers (image layer, layer, layer mask). The top layer is a layer of black of the entire image. This script worked on one of the 3 layers images but not the other. I kept getting an error during creation of layer 45 that there was nothing in the area of selection on the POPULATION of the original process. I do not know what has increased with this particular image, but he has worked a lot on the other image of the 3 layer and all the images of two layers with no problems.
-
I'm new to Ps CC 2015 so please forgive the stupid question. I created the joint by adding a filled oval in black below the flower image and create a clipping on the flower image mask. When the image was crushed, it was created with a white background which, to the best of my knowledge, I did not choose myself. What should I do if I want a different color around the flower 'window' in the final image?

Assuming that, before flattening - your layers panel looked like this:

... Choose the background (Background) layer and edit > fill... Color - with a choice of background color.
The layers panel will look like this:

and the area surrounding the oval will be this color

-
I often have people mask images to put them in an architectural setting. I so everything first open the image with a person, to convert the bottom of layer 0, add a layer mask and paint around the person with the black.
When I drag this layer to another then (enlargement), the mask around the person is black only as much as the original image size image of this person. around him he is white. When the scaling this image + mask, a thin frame appears sometimes, while the outer edge of pixel is interpolated and not completely black more. This must be retouched every time.
now, by chance, I did it 'right', in the sense that when you drag the image of the little person, the mask was completely black around the person. so there must be a way to make things right from the beginning. I tried to find what I have done in history, but the last 20 acts were brushing.
Anyone know how I can put the entire area of a layer beyond the borders of the image mask to black? I tried, but did not work:
activate the layer mask, select all, reverse, fill it with black (cmd + backspace when bg color is black).
I found a solution that works, but it's more complicated than the contours of the new layout of the image-editing.
Thank you.
Wim
I know exactly what you talk about and very glad you posted this.
What works is if you start with a new layer with no mask. Then draw a rough selection lasso around your object, then click adding a layer mask icon.
What also works is hold the option key before clicking on the Add layer mask button. Your mask is filled with black, then paint to keep the areas with a white brush.
What causes the problem is if you click on add a layer mask button and then start to use the brush to paint the areas.
It has to do with, if you helped photoshop know what color the mask is filled beyond your exisitng Web.
-
Masking color theme group when the color theme tool
How do hide you Palette of color theme?
You're talking about the Adobe color theme Panel (window > colors > Adobe color themes)? If this is the case, just close it.
Or do you mean the floating palette that appears when you use the color theme tool. If the latter, press ESC to remove and forget what it selected last.
-
How do you change the default mask rubylith color?
Anyone know how to change the default mask color permanently? I have never want this bright red default "rubylith" and am so tired of having to change color every time I do a new mask! (This process takes 6 clicks!) I just want it to be automatically my default color.
Double-click the button quick mask (button down in the toolbar)
-
Hello
I checked the mask.vi example provided by labview. As we create mask has 4 entries
image data
mask color
data of 1-bit mask
combine masks
I have a picture that I can connect to the image data. If I want to circle mask off rectangle then where should I connect this strapping data?
I have
Hi arrowminds,
I think that for a circle in your image, you can use the 'Pixmap Unflatten draw'. Here you can connect an array of information from the mask.
It will be useful.
Mike -
I scanned a few color negatives. As you know, these have an orange image overlay.
What is the best way to convert a positive image of color scanning?
I have CS6. The analyses were performed using my camera with macro lens illuminated by the rear via an opaque white screen by a TTL flash gun. The scans are recorded as of Nikon Raw files. The negatives are square 2.25 "and in most cases are on Kodacolor Film from years of the 1960s.
I have used this technique with great success to copy monochrome negatives and colour slides.
I know that the reverse does not work. The closest I can get is ' reverse ' and then apply the 'automatic' tone, but colors just garish and not right.
I also have a Nikon Coolscan V that can scan color negatives and produce a correct color but only with a 35 mm film.
Can someone help me?
Yes, this mask color is bad, and the white point in ACR does not come close to get rid of him. I'll take a photo of just the base of the film. Put this in PS, get the color and make a document filled just as the color, then reverse. Use it to illuminate your negs for the copy. Set the negs on a few drinks a little more away from the screen, so you do not get the monitor pixels in your image. Then fix them in ACR.
-
Hello
I use the following method to change the color of some of my JPG image: click on the quick mask, color in the image, click "Edit in Standard Mode", go to select, reverse Image, then adjustments, click on color Balance.
-nothing happens!
What I am doing wrong, please?
Thank you.
Steve
Ah, my apologies, I have perhaps not been very clear - I'll try harder this time! The reason why the color balance does not in my view is that black and white RGB values 0,0,0 and 255,255,255. If you change these values 127, 127 127 using brightness in Hue Saturation adjustment, or another tool, you will find that you can manipulate the color using the color Balance once again.
What I wrote above about the selection is a bit redundant - although it will allow you to make a quick selection, which you will then have to reverse. Don't forget that on a mask or a channel, white reveals, in order to select the control/apple white pixels by clicking on the thumbnail of the channel.
Best wishes
Dave
-
Change the layer mask: Alt + Shift + click does not work?
I have PES 9 w/Mac OS X. According to Adobe using for layer masks, "to display the mask in a mask color red, hold down the Alt + Shift and click on the thumbnail of the layer mask". It is also stated by Missing Manual for elements. I can't get this to work and can display the mask only in itself (in black and white). I have uninstalled/reinstalled without success. In other words, when I change the mask, I don't see where I'm editing. Can someone help me?
Exit the editor, then go in your username > library > Preferences and delete:
com.adobe.PhotoshopElements.plist
Adobe Photoshop Elements 9 paths
Adobe Photoshop Elements 9 parameters
Repair permissions, and then try again.
-
I'm trying to add a filling of solid color, for then reverse, then painting on the skin of the subjects. It's a step, I followed another photographer, however my photoshop isn't allowing me to do the same thing.
I add a solid color fill, selecting multiply and at 30% opacity, then trying to invert-, but it is not allowing me to reverse! I'm getting shortcut command - I also tried to manually no reverse, no chance.
Is there something I could have disabled in my settings to allow the color fill is not to reverse? I'm certainly of the selected layer mask. Any help would be appreciated! Thank you

I think that the photographer had this in mind.
1. open an image
2. Add a layer of white
3 Edition > fill with color, the photographer suggested (I guess a color similar to the one I used)
4. change the blending Mode to multiply and the opacity to 30%
-Now comes the part that you have misunderstood:
5 hold down the Option (Alt) key and click on the symbol of the mask in the layers panel. He will place a black mask - rather than the usual white mask - in the layer above the image. (The Option key 'inverse' mask color)
6. with the selected mask, use the soft brush-lined to paint on the face in white in the image. White appears in the mask.
As I said at the beginning, I think that's what was in the mind of the photographer.
-
Help! PROBLEM OF SELECTION/CUT!
Why am I not able to cut a rectangle to select a shape layer, that I created? For example, I open a new document. I have create a rectangle shape. This creates a new shape layer. So far, so good. I use the marquee selection tool and choose a section of the rectangle shape layer. I try to cut the selection by going in Edition > cut. My selection is not cut. Instead the entire document is filled with the foreground color. I know that there must be something I am or am not done that creates this very annoying problem. Please help with all of your advanced knowledge of photoshop
I cut the selections with regular layers, but not shape layers. I have to use another layer of form but "escape of the form" in order to make my choice? Very frustrated.
When you create a shape layer, you create a new layer filled with the foreground with a vector mask color. If you want to give the impression that the selection rectangle is subtracted from the form, you can add a mask and with this new mask selected, fill the selection with black.

You can use the Edit - control of cut if you select the option 'fill Pixels"when you create your shape with the shape tool rather than creating a shape layer.
-
Wobbly edges after keying greenscreen footage
Using a digital camcorder, I recorded myself against a Greenscreen, but I still end up with wobbly, moving the edges after seizure of things.
Any suggestions on how to avoid this problem? (I tried to apply choker and reducing the size and the softening of the keylight inside edge - but I have yet to find something that gets things right-facing)
I posted a short excerpt of the video on http://Drupal.yourgods.com/greenscreentest
(I added a solid yellow background to make the problem of edge stand)
Thanks for your suggestions.
This looks at the result of the use of extremely poor source for color inlay work footage. The compression used in entry-level camcorders (especially DV compression) throws huge amounts exactly the information that-masking color software needs to work.
This section of After Effects help for more information:
"Shooting and image overlay to acquisition.
The section just below this ("tips for the seizure... ") has suggestions to make the most of these sequences - especially the fuzzy spikes selectively a canal front of overlay to reduce some noise and artifacts.
-
Creation of adjustment layer Q
Hello. I'm new to CS5 as the last version I've owned was PS 5, lol
in any case, I'm having a bit of an adjustment because I could have sworn, that relying on the key option or something and choosing a layer of control to low down the palette layers, it would open this settings dialog window as if you had and he selected in the menu itself... not the version of range of adjustment. Know what I mean?
IOW, when you create an adjustment layer, I want to be open, say, the brightness/contrast dialog box that I would get if I went to the image > mode > settings > brightness/contrast and the brightness/contrast in the adjustment range.
I swear that I saw people do in various videos, but no matter what button I press and click the set menu at the bottom of the layers palette, the only thing I get by pressing 'option', I get this 'name', use the layer previous to create a clipping mask ", color" mode "opacity" dialog box.
Dag nab it, it's driving me crazy. I was hallucinated this feature?
Thank you
The default behavior is now modeless settings panel.
You might be better to get used to it.
But the dialog box modal setting can still be collected through workaround; 23 in this thread post to meet one.


Maybe you are looking for
-
The latest update of Firefox now automatically my uid/pw in the boxes. Previously, I had discretion because they do not display unless I clicked on the box. Now anyone who uses my pc (same family), are they 'just' to go to my bank or other personal s
-
Satellite P70 - Has: noise sometimes whirring very fast is displayed
My P70 - A Satellite, which is less a year since purchase sometimes emits a very fast whirring noise from the right side of the laptop that you are looking at him. It does not always happen, but it is becoming more common - it is more important to st
-
What wifi router works best with an iMac
Please be nice to me I don't really know what I'm talking about, but really really need help. We have an iMac with wifi connections and currently run a cisco linksys e1000, who is five years old at least, and I'm sure is very tired, either completel
-
CPU problem. The CPU usage is erratic and the RAM is regularly high
CPU question I can't navigate with my huge memory and laptop good performance because the CPU usage is erratic and the Ram memory is regularly high. For now, 1.7Gigs is my memory on my 3 GB of ram. How can I solve this problem? My computer problems a
-
(Redirected) Serious problems with computer Inspiron 15, 7000 series
I bought an Inspiron 15, 7548 end of may 2015. I bought to use for work and college classes and bought Adobe PhotoShop Elements and CorelDraw x 7 software (after PhotoShop has not worked) for photo editing. The screen resolution is so high that I see