Scott Kelby thing to sweep the entire area of the image
I've seen this done before but forgot how it's done. Scot Kelby he showed in one of his tutorials: it's zoom in a part of the image, and then with a combination of keys, it. by "fly over" the whole picture, area by area, from top to bottom and left to right.
Does anyone know how to do this? It can be on LR or PS...
When you have zoomed to 1:1 magnifying glass or keys develop, PageUp and PageDown move through a series of vertical bands of top-left to bottom-right. Beginning and end take you to these corners respectively.
Now shift, PageUp and PageDown do the same thing but in horizontal bands.
Tags: Photoshop Lightroom
Similar Questions
-
Adobe's Scott Kelby's correct about the feature updates to LR 6?
Just bought my LR 6 update of the Adobe site the other day. Works very well and is more responsive and faster. Very happy with it. I went from LR 5. I do not cloud of Adobe creative use.
I watch podcasts Kelby and his last (#11 I think) he said the subject of Lightroom 6 for people who bought (like me) that Adobe won't ever feature updates of LR 6 for people who bought. These updates to date WON'T be not for those who subscribe to the creative cloud and use LR 6. Kelley said that adobe would release camera profile updates and corrections of bugs - but never to new features.
Adobe or anyone is true. Tell if Adobe adds a brush stroke to LR 6 - only the CC people get it?
Dear Mozart11,
What that told Scott Kelby and what is in fact true sometimes differ or are misinterpreted. Mr. Kelby, I think, tried to tell people that purchase Adobe Photoshop Lightroom 6 as a product independent and may prevent you from using other programs that are part of the Adobe Creative cloud subscription program evolving. Lightroom Mobile, for example, is a feature that never ceases to evolve, but it is not available for those who like you who run only 6 of Lightroom.
What won't you miss not however as a customer of Lightroom 6 are all updates free .dot which become available for your software. New features are rarely introduced free .dot updates even if it happened. (Example: extended files tif support and smoothing of color noise reduction slider.) If you have nothing to fear in terms of functionality of Adobe Photoshop Lightroom. The warning is that Adobe is a big company and that there are people of talent at work in many departments. Limit your purchase to Lightroom 6 only can prevent you from making use of other tools in the arsenal of creative cloud. But of course, you can become a subscriber of creative cloud, at a later date must come something you really want to use.
I hope this helps to clarify this common confusion.
--
David Marx
-
It's all in the title. Thank you in advance, I need Photoshop for project and I can't use it like this

Have you activated inadvertently view is rotation tool nested with the hand tool?
If you did, click Reset view in the Options bar, and then select the hand tool.
-
How I can levitate/Float of the images of cards to play
Hello
Some kind soul spirit which informed me as to how I can produce a picture, similar to the following, using Adobe Photoshop Touch (iPad): -.

Are there special tools on Photoshop Touch that I should concentrate on? Is it really possible to get this type of effect floating / levitation with Photoshop Touch?
The explanations or links to tutorials, thoughts and comments, would be greatly appreciated, because I can't understand how it's done.
Thank you.
-= Jazzdude =-Quick response: Compositing. (Yes. I don't know.)
Longer answer: seriously, if it was me, I probably take a picture of each card in the stack and they accordingly after extraction and isolate each layer. (Check tutorials PS Touch as I think there is one in there any extract/selection of objects on a layer.) To get the perspective effect, you would have to take each stroke of each card from different angles. (for example, because the King is down, you would take a picture of the King in a way it's like you're almost hovering above him.) Ace, since it is at the top, almost would be level when taking the photo.) This will take time and patience and would be much easier if you had a configuration small studio with lighting consistent. (This would allow easier in composite if all your images have similar lighting.)
One last thing: so that the image to be more convincing, I would add some more shading by combustion. None of the cards are casting shadows of each other.
WE EDIT: I forgot to mention: the dimensions/size of your project in PS Touch will determine how many layers you will be able to work with. for example, a 4000 x 4000 pixels will give you max about 2 to 3 layers, so that a small project of 2000 x 2000 pixels will earn you more (maybe about 8 to 10). Keep this in mind because you will need about 6 layers or more.
-
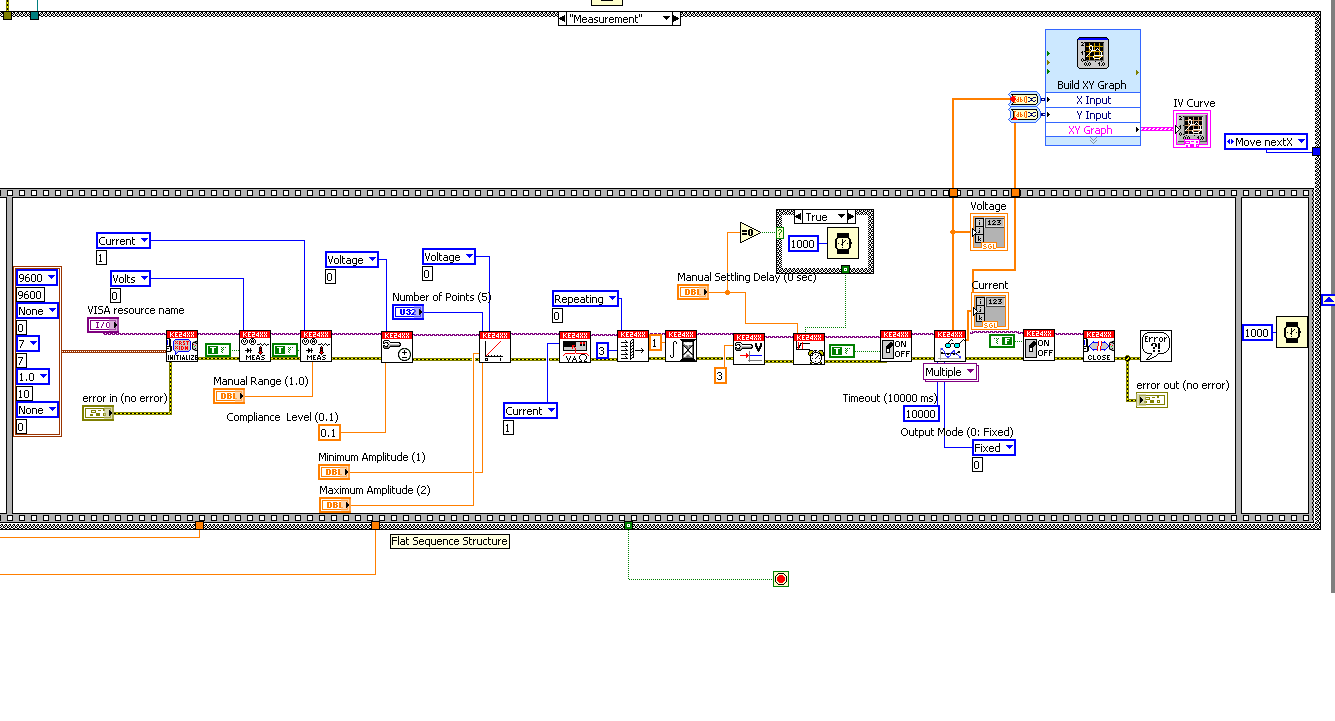
sweep the voltage keithley 2400
Hi friends,
I ve made a small program (reusing an I found in the web) to generate a curve using Keithley 2400. I want to sweep the voltage of 1V-1 using for example 10 points and get the current in a graph and a table.
However, something is not because I have only (not yet correct) measure and no image in the chart and no data in the table.
Could someone advise me here, please?
Any help is welcome!
Thank you
Hi LabVIEWers,
I ve you have a problem receiving data from Keithley 2400.
I m using a distributed (attached) Keithley LabVIEW example and suddenly it does not work. When I run the program it sends the information to the Keithley and a scan is performed. The problem is when the scan is done, no data back to the program so I can't save all data or see any result in a chart or table.
I ve tried to debbug program using the option to highlight and it is for me that the data are intended to the curve, but I have nothing (just #0 in the output of the Sub - VI last before the graph).
The strange thing is that this program works so far, no idea what can be the problem?
Thank you very much!!
-
I have five-point-something Lightroom thing set up on a laptop and a desktop Apple computer. Both will import images from a CD or a DVD (I have my film scanned and the images on a disk). I can't change the images on the Mac, but I can edit images on the PC. What is going on? Also, when I try to export edited disk images, where are they going? I can't find them on my hard drive. Thank you!
Your entire development is off? You may be able to disconnect and reconnect. You can check this thread for more suggestions:
I was expecting an error message indicating that the development module is disabled, however. If this isn't what you're talking about, please show us a screenshot of the 'dark' buttons
Mike
-
The images are are more recognized records in my current projects - RH 9
I worked on 4 projects for start and stop of 6 months now without any major problems. However 4 days ago when I tried to add an image to one that I am working currently on, I noticed that the images directory was no longer. None of the images of the project did not appear in the pages, or if I was confused enough by the present. If I try and select the 'Browse' button in the popup for images to add that overall the program freezes and never UN freezes, I have to force close via Task Manager.
I also tried it with the sample sites and the same problem occurs. Then I decided to copy the usb project and asked a colleague to load the trial version and open a project. He has no problem with the projects in the sample, but with the project, that I gave him, it's still not announced the pictures folder in the directory. If he tries to add an image via browse it does not freeze however it opens 'My images' instead of the opening of the images directory. The same thing happens when you select an existing image, it does not find the directory.
We have tried to identify ways to import an entire folder, so we can add the images directory with no luck. You can add a new directory of images and add an image to the project and that's fine. However I want to manually import images 850ish by project in the solution. Also, if I select the 'Import' from the file menu form my RoboHelp freezes.
I use RoboHelp 9 and Windows 7 Enterprise and I have 125 GB of free space. The projects are on my local c: under 'My Documents' where RoboHelp origianlly added folders.
I have also run a disk scan and have disabled RoboHelp and uninstalled and reinstalled with no luck, same issues happening.
Any advice would be appreciated. I'm finishing the project ready for a live version at the request within a period of weeks.
Concerning the problem of gel when you browse, maybe the dialog box fell into the ditch at the edge of your screen. This would explain why your PC freezes but your colleague not.
Try this:
Click on the button as usual, making sure not to click on something else later.
Press Alt, SPACEBAR, M.
Press an arrow key.
Waggle madly the mouse until you see the window attached to your cursor.
Click to move the window where you want it.
HTH,
Amber
-
How to optimize the area available for a character that I can see the image correctly?
Currently I can't see the image very well because it covers the navigation bar. But if I do the bar disappear, the region because the image becomes smaller too! How can I make the box for the character picture matches the size of the actual image?
This has happened
Each time Firefox opened
== I started using Firefox
Add toolbars to see the entire height of the image of persona is 3000px by 200px (I don't think that all of the personality of image width can be seen on anything except a screen wide TV screen).
Firefox comes with 3 tool bars, bar menus, Navigation bar and toolbar of bookmarks. It can vary depending on your operating system and if you have of large or small icons toolbar selected, but on my system, I need to have 10 Toolbars list to see the entire height of the character, I chose.
YMMVView > Toolbars - Customize
Then click on the Add New Toolbar button, name the new toolbar (I named spacer them 1-7)and then add a space to each new toolbar. Repeat until you have 7 more toolbars. When you are finished - click " fact ". -
Color of the image area measurement
HIII
I want commensurate with colours (RGB) of the region of the image and have the result in the table of red, green and blue color samples
and display the histogram
Thank you
If you have the NI Vision Development Module, you should have a "IMAQ ColorHistogram" function available. It should provide what you are looking for.
Again, you must ensure that your images are acquired correctly. This by far isn't a simple thing (refer to this thesis for more information).
Norbert
-
Browse the folders with image files, I cannot see the thumbnail icons for images correctly. I know, it should be possible, but I can't do it.
When I first open a folder in Explorer, I see the correct images for a fraction of a second, then all images are replaced by the thumbnail of the image file (which looks like part of a digital SLR).
I put all folders to display picture to display the preview and the filter, and the "always show icons never thumbnails" is not checked. Display file icon "on the photos' is unchecked (I tried checking, too, without change). I also deleted the thumbnails using disk cleanup as suggested on another question, but which did not allow them.
The result is that, if I want to open an image for editing or downloading, I have to use a third-party application (for example, Pentax Photo Browser) to preview images, and then return to the Explorer window to select the correct file by name. Don't try to difficulty of these things that are not broken.izzlecrate,
You might want to try it and I just did this procedure myself a moment ago and surprising, it worked! First of all I must tell you that I have Windows Vista, but the information I got was for Windows 7 and it worked.First: You must create a NEW FOLDER and put it on your desktop.
Second: Move or copy the contents of the original file in the NEW FOLDER on the desktop. I copied the content, just in case something went wrong.
Third: After that is finished and all the contents are inside you.
Fourth: On the desktop right click on the folder and click Properties at the bottom of the box.
Fifth: Click Customize tab at the top and then the Middle click on DEFAULT settings for the folder. Click on apply to, click OK and your doneNOW! You can move the folder wherever you want by drag-and - drop the folder and when it's done and that's the best part, you should see the thumbnails of the folder on the EDGE of the folder that you just created. It worked for me and I hope it works for you.
I have 10 years of experience with my computer and have troubleshooted my friends for viruses and other computer problems successfully. I'm advanced computer user.That this is done, it restores the folder its original settings. Good luck! Rick
-
The images are placed in the workspace, but nowhere else
So I do a folder and I placed several images and got things just right, but when I look at my PAGES in the Panel on the right, there is no images on this subject. When I go to export to PDF, there are no images.
I'm working from a model, I am disconnected just to get the correct size for the file, but I can see the images... I can manipulate them, they are there. But nowhere else.
I use CS5.5 for Mac, and I need an answer as soon as I'm on a deadline!
Thank you in advance people who are smarter than me!
Kevin
Don't mess with the operating system yet.
The quick way to find out if a layer is not printable is to look at the name. If the type is italic it's unprintable. You can also select the layer, and then choose layer Options from the flyout panel.
-
Can you write extendscript code to export selected area in the image document
Hello
I don't know if this feature already exists.
I have an extension Panel. I want to select some objects/objects in the document and when I click on the "Export to Image" button on the Panel, selected area must get exported to image.
I tried extendscript API on the document object.
var  file = new File("/d/innovate/iconRollover.png");
var  selection = app.activeDocument.selection[0];
if(selection != null && selection != undefined)
{
       app.activeDocument.imageCapture(file, app.activeDocument.cropbox);
    //app.activeDocument.imageCapture(file, selection.geometricBounds);
}
This script works very well if you select unique object(groupItem/PathItem). BUIT when you select more than two elements, it does not work.
It is supposed to capture the entire area selected in the document and export in png.
Let me know if you need more information.
If you have CC, it works since version 19 on
var file = new File("/d/innovate/iconRollover.png"); app.activeDocument.exportSelectionAsPNG(file); -
Selection tool sensitive to color in a limited area of the image
Hi all
For my work, I am interested in the measure of the area of pixel of the dark (black) in the sub picture, even the smallest. For less complex images, I used the magic wand and the selection tools to select my black areas and have Photoshop CC 2015 do measures on my selection. The problem with the image below that I have is that there are so many blackheads and they are scattered all over the image. Non-continuous the magic wand option unfortunately does not work for me in this case, because some of the dark spots have the same color as the other dark areas in the picture. So far, I only managed to make a good choice by selecting each point individually, which is a very tedious and somewhat subjective work. What I would like is a sort of quick selection tool with a tolerance as the magic wand option, so I can just fly over areas with small black to select tasks that these. I don't think that this is available in Photoshop, I'm looking for alternatives. That would also work for me, it is to have a way to limit the area that the magic wand tool selects objects of. For example, set a small area (as one of the white ice blocks) and then use the selection option discontinuous of the wand in this ice blocks so it will only select the dark stains on the ice block. If I can do this several times and combine the selections, I should be defined as well. Is it possible to achieve such a thing in Photoshop? In other words, what I would basically is the type of features in the background removal tool, but then make a selection in the foreground based on a color. All other ideas, suggestions, tips and tricks are also welcome! I hope my question is clear and that there is a solution for my problem. I'm very new to photoshop, so please be very clear in your answer, so I can understand every step .
Edit: I noticed that I posted this maybe in the wrong part of the forum (?), I was a bit in a hurry at work. My apologies. If there is no matter what mod around to place them in the right sub-forum, please do!


It works for you?
To see it in full screen, double click on the image.
1 use the curves to increase the contrast
2. place an empty layer below the image and fill it white
3. return to the top layer, click on the layer to bring up the layer Style
4. in the section mixture if move the top left right slider until the black dots you want are isolated.
Also, consider using this technique after the first change the mode to grayscale
-
How to change your settings to allow you to be able to place images and things outside of the artboard when you work? I have it on a single file and I opened another and the setting seems to have changed, but I can't find where to change it.
I think that things are there, but just hidden.
Try this:
Make sure that your cursor is not in a text box, and then type a W.
-
I'm retouching of images taken on my iPhone 6 more with Photoshop CS6. I'm doing my color correction and add effects and all that. Before you export the image I review and be sure to what I has no more sharpness and the lines are smooth and it looks good overall. I export it to JPEG, max quality with the establishment of reference standards. I then open the image and it seems fine, as it did in photoshop. My problems begin to occur when I try to download on Twitter as my profile picture. I tried downloading from my office directly on the site via google chrome. When I download the image then begins to have jagged edges and overlooks the tablets. So I thought it was some performance settings, then I tweaked them and restarted a couple of times and still the same result. He would go on my desk but when uploaded to twitter as my profile picture is horrible. So I tried emailing the image of myself and the download through my phone. I opened the image on my iphone and it seemed fine as he did on my desktop but when I downloaded the image it makes then look blurry. I had this problem when downloading photos Twitter via my iphone, so it doesn't surprise me. I have read different forums saying: you must download it from the office, so I thought it would work like this. This could be a problem of twitter than compresses uploaded photos? Other people can do very much the same way, but it does not work for me. Please someone help me before I put my computer in an oven microwave.
This could be a problem of twitter than compresses uploaded photos?
Yes. The rest, we can answer. You wrote a lot, but very little discussion. Instead of accurate information you lose yourself in the vague descriptions. Screw color management to the wrong dimensions that trigger resizing server-side it could be any number of things here.
Mylenium


Maybe you are looking for
-
I need to access a site that takes only supported firefox 27 or 30 and Mozilla automatically by default 37.where can I get a download on Mozilla?
-
Satellite 5200 - secondary screen disappeared
The little digital clock on the LCD of the sub at the front of my model 5200 has disappeared and I can't show him; the fashion icon is only. Someone at - there a solution to this, please?
-
How to write with a pencil Apple then convert to text (mac)
I just got my apple pencil - I would use to take notes, and then convert handwritten notes to text, but I can't understand it! I can write things but how to convert to text? I'm a mac household only.
-
Dear community, WARNING:I'm not very s\u0026 in Labview so please forgive me if my code and concepts are not as elegant, as it should. I'm expiereincing a problem with the Classes of Labview and Multithreading.I try to describe the problem, then I ha
-
Screen resolution continues to change by its self.
I have a Dell Inspiron 6400 with NVIDIA. When I start my laptop a pop said that the Starforce driver is blocked. Then when I connect to the internet my screen goes 8-bit and a pop-up warns my color depth to be over 298. I then put it to 38-bit and my