Snap without resizing
Hello world
I tried to find a way to break my windows for residents without resizing the window. So, I want that there is overlap between the windows.
I want to align the sides and corners.
Still, it comes without resizing.
Thank you
Hello world
I tried to find a way to break my windows for residents without resizing the window. So, I want that there is overlap between the windows.
I want to align the sides and corners.
Still, it comes without resizing.
Thank you
Hello
Sorry, but the Aero Snap feature is made specifically for snap and resize the windows. If you take to the top of the screen, it will maximize the window and slap on the side of the screen will snap and resize the window to screen.
I hope this helps.
Thank you for using Windows 7
Tags: Windows
Similar Questions
-
Drag and drop into Photoshop layer without resizing the image source
Hello
I use Photoshop CS5, 64-bit Windows 7.
I went through the next steps and do so that I'm not:
1. open an existing file of photopshop.
2. in the window my file Explorer, select 100 png files and drag to open the photoshop image chart area.
Result: Photoshop resizes the png file and place it under a coat. She also asked me to commit the sizing for each individual file, I did slip and fall. Sometimes it takes like 100% scale, sometimes, 98%, sometimes of 102%. If I change to 100%, then it is not the original size. The image become larger and blurry.
Expected result: place 200 png as a separate layer of the photopshop opened without resizing files.
My png files are icons that do not require resizing. I can't change 200 pictures just to get it to the original size!
I tried other things:
I disabled the "Preferences-> general-> Resize Image in Place. I also disabled "Place or Drag Raster Images as smart objects".
I always get the same result. I don't need anything smart here. Let me only to place images without any intelligent substance!
I also went to help and google. I couldn't find what I need.
Thank you!
You can try file > Scripts > load files into stack.
MTSTUNER
-
Hello
I am not able to use the crop tool as I want. So I hope you can help me.
I want to crop a part of my picture in a fixed ratio (almost 4:3) but without any resizing. If I select a zone of 40x30pixel, I want the resulting image to have a size of 40 x 30 pixels. I understand, that I can enter a fixed-size result using the crop tool, but I only want to enter into a relationship.
Is it possible to do?
Thank you for helping
Two ways:
1. with the crop tool enter 4 in x 3 in a 4:3 ratio.
Do not fill the resolution field

2. Select the rectangular marquee tool and choose fixed ratio and 4 x 3 in the fields.

MTSTUNER
-
How to adjust the size of a video, without resizing its proportions?
I want to show a video on the half top of the screen and another video on the bottom of the screen. I would also like to register the motion to this: top half began to appear slowly and then take over the video completely. My goal is to make a drawing to disappear by having a hand pass it on. If the camera is always completely, this could be a smooth transition.
Thank you!
Put a video on video 1 and one directly above, on Video 2.
Apply the effect of cropping on the video 2 video and use the tools in the effects Panel to crop the video as needed so that both are visible in the video at the same time. (You can also change the scale of the two videos settings in the properties of the motion, also on the Panel applied effects). Then you would keyframe animation of culture settings.
You don't say what version of the program you are using, but it's the way that you would in version 11.
-
Crop a picture to certain dimensions without resizing.
I use Photoshop CS5. I've read the tutorials on how to crop the images according to the dimensions indicated. But it does really allows us to draw a box of any size but the respective ratio (according to the width and height) and we can crop the image of what is in the box. On the economy, the picture is either developed or contracted to adjust the height, and the given width.
But I don't want to. I don't want any expansion or contraction of the image. While cropping, I want the box to be the exact size as shown in the toolbar. How do I get there?
When you leave the field empty resolution in the crop tool all happens it is the DPI setting is changed to the acreage pixels do not change. If you want to do this and not see a change in the size of the harvest on the display using the rectangle selection tool to define the area of crops then menu Image > crop. view
-
Export the images embedded without resizing.
An old Enigma illustrator I thought I'd see if anyone has solutions to. It is perhaps something changed in CS5.
When you have an image embedded in an EPS file (for example) and you want to get this image in photoshop and illustrator, but you want that there is no resampling, what are you doing?
That is a pixel is equal to one pixel, not more not less.
The only reliable method I have found is to try to put the image so that the information of 'links' indicates that the scale is 100% x 100% and then export at 72 dpi, with something lossless (or copy and paste to the PS).
The downside is that the mathematics involved are devilishly difficult (at least for me, maybe I wasn't paying attention that day at school).
No idea what the multiplier would be to get up to 100 20.935 (4 point something).
I would like to find a better solution. Or equation, I guess. Ideas anyone?

Save to PDF and open it in Photoshop, where a dialog box appears and offers you the possibility to extract the images to their resolution. Give it a try
-
LR 3.5 opens a window maximized without ability to resize
Just upgraded from 3.4 to 3.5 on my WIN 7 64 bit machine and LR open now in the enlarged without normal window resize options (Minimize, Maximize, Close) options. Fortunately, I have 2 monitors so I am able to open other applications on my second monitor because my first is covered 100% of LR. The only way to close LR is to use Alt F4.
I tried to change the properties of the shortcut LR for example to run Normal Window, reduced or enlarged, but the results are always the same. Except that reduced opening causes LR open on my second monitor and does not cover 100% of my screen BUT it is still without resizing (Minimize, Maximize, Close) options and there is no available area for me to "drag" LR posted on this second monitor interface.
Here is a screenshot of the upper part of the interface and the blue background of my office. Note that there is no 'border' above the file | Change | Library | Menu photo with which 'slide' make the window or where you would normally find reduce them, enlarge and closure options in the upper right corner.

I love LR, but also need to be a good neighbor with my other apps. < g >.
Anyone know of a solution?
Thank you.F type as many times as needed to retrieve the button min/max etc.
HAL
-
resize unique columns of table front panel
I have a bunch of columns on my front and some of them contain lon channels, while others have only a maximum of 2-3 strings in them.
I'm looking for a way to resize each column without resizing all the others at the same time. If I have them all the same length and the length of the string max I get the table is much too large to fit on the screen space and navigation in labview VI leaves much to be desired.
His cosmetic event but would help me see clearer information and as the information are all locked in long strings his does not work well with what im doing then.
Watch multicolumn ListBox or tables. They allow the customization of the column widths and are specially designed for user interfaces. Protect your data in a table to the schema for the treatment, but the indicators on the front panel.
Lynn
-
BI Publisher RTF model - fill a cell with a group without line breaks for each element
I have a fairly rigid rtf model with multiple cells. A cell in particular just display a value of a single group.
I want to display all the values of group in the cell, but instead of display each value on a new line of the
cell and cell resizing, I need a way to repeat the values (we hope) without resizing the cell.
Thus, for example, given a simple group such as < GROUP > < VALUE > where the GROUP contains the VALUES 1, 2, 3, 4 and 5.
a normal <?-foreach: GROUP? > <? VALUE? > <? end foreach? > product
CELL OUTPUT: 1
2
3
4
5
What I would like is to be able to output the following (assume the slot size cell is not resized one appears exactly as it does in the rtf)
CELL OUTPUT: 1 2 3
4 5
The tricky part is that I'd love to be able to have the text wrapping, once he arrives at the edge of the cell. Is there a simple way to do this?
After a search in a dozen of nets beforehand of course, I find the answer, about 10 minutes after the announcement.
Knew it was something simple!
-
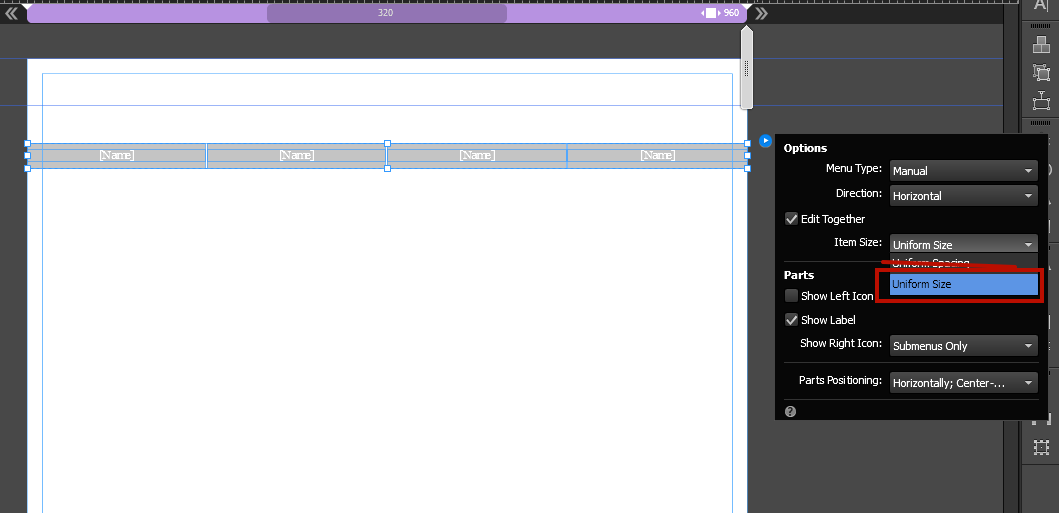
Fullscreen menu: how to RESIZE for each breakpoint in the reagent?
I have a menu full screen-width in my site.
For each breakpoint, I want to the size of the menu to the width of the width of the breakpoint page and to create a mobile drop down when the size of the page becomes small to support the menu width to full screen.
PROBLEM: Even with the options 'Format text on current breakpoint' selected, when I resize the menu, each menu instance is resized. In the breakpoint, the narrowings of menu, while the smallest breakpoint, the menu is correct for the width of the page. When I hide the menu inside a breakpoint and add new menu in the hope of resizing for this breakpoint, double menus are added for each instance of breakpoint. Again, I selected on current breakpoint Format text. I like to keep my menu to full screen width.
Most important breakpoint = good

Smaller breakpoint = impossible to resize without resizing of all instances of the menu

In the order in the menu was receptive you must use the method of uniform size.
-
Photoshop elements 6 is resize my pictures
I did 8 4x2s which will be boxes at a party. I wanted to print on an 8 1/2 x 11 cardstock, so I created a new file that is 8 1/2 by 11 300 resolution and white background. When I drag my images in this file, it is resized. It is resized to 5 1/4 by 2 1/2. I asked this question before, and someone suggested that I save files and use the file and it works without resizing, but it is such a pain. Can someone guide me through the best way to do this please. (Either by the way, my 4 x 2 have a stroke within 75 px for a border. I don't know if that's a waste it or not.
Thank you so much Gaye
Thank you very much. I'm just not a not save the file after I flattened. Flatten then recorded and I edit then copy paste edit and it worked without resizing! Lord, I knew that it was just something little.
Of course, it seems that a lot of work for such a simple thing!
Thanks again
Gaye
-
not able to resize objects in the perspective grid
I placed a rectangel on the right side of the perspective grid. Then I tried to resize by clicking and dragging its corner with the perspective grid tool. The only thing that happened was the rectangle settles into the right perspective without resizing grid. Lynda video expects straignt. I have some parameter does not correctly set?
Thank you
Display > display the bounding box
-
Hello
In CS4, is there a way to disable the snap without having to go through the preferences? Equivalent photoshops of Ctrl + Shift +; or whatever it is?
On a separate note (Cross message WARNING!) does anyone know where to get the addons of firefox for all the stuff from adobe search? This little floating box is rather illusory.
Thanks for the help guys and girls.
With gratitude
Hari Karam Singh
Choose View > Guides and click on align Guides if you checked. Same thing for grids. If you dissable the snap to Smart Guides, you will need to change this in the Preferences dialog box.
-
Resize the photo but not the vector mask?
If I use a vector for a picture of drawing as a mask, can I then change the picture and hide individually?
There is a point in the center of the photo which allows me to move the mask, but how can I resize the photo without resizing the mask and resize the mask without resizing the photo?
Thank you
Hold down the Alt/Option + click this point blue Center to move/adjust the mask without worrying if the thumbnail of the layer is active.
Regarding resizing regardless of them, I'm not aware of all the shortcuts except for:
Decouple (click/enable/disable the link between the thumbnail of the layer and the mask thumbnail)
Select the thumbnail of the mask.
Change the values (W/H) in the PI. (You can also do the same thing here for the active layer thumbnail)
Here is a tip that I use a lot of the time:
Use AutoShapes like masks. It is those who have points in the canvas "controller" that allow to resize, change the angles etc.
Example:
A. open/import an image file.
B. Edit > cut the image/bitmap to the Clipboard.
C. adding a Rectangle object rounded on the Web and have it active before moving on to the next step.
D. Edit > paste inside the contents of the Clipboard (the image).
The result is your image with the a vector mask was consistent with the auto shape (in this case, the rounded Rectangle).
That's the problem - select the vector mask thumbnail and you will see again "anchor controllers" there: resize and corner radius.
h
-
Automatic shutdown of the docking windows
I use several graphics programs, Aftereffects, Nuke, Maya, Photoshop... When I resize and position my windows they jump into a lack of home that often covers the major part of my screen with an empty window close. Is it possible I can get windows to go where I place them without resizing? Seems quite restorative to me, but I can not understand.
Hello
Thanks for posting in the Microsoft community! You have reached the right forum for your question.
This feature of Windows 7 is called Aero Snap or home. It can be disabled through accessibility.
a. Click Start or press the key and the type of Windows easy but do not hit
.
b. click on accessibility in the list above.
(c) in section of all parameters,
d. click on make the mouse easier to use.In this new window, navigate do it is easier to manage the windows section and uncheck box prevent windows from being automatically arranged when moved to the edge of the screen. Click OK at the bottom right to save your settings.
Aero Snap should now be disabled.
Hope this information is helpful and let us know if you need more assistance. We will be happy to help.


Maybe you are looking for
-
I want my computer to recognize the only Japanese character sets
When a page contains Japanese characters (Hirigana and Katakana) all I see are boxes with numbers and letters. How can I get my computer or browser to correctly display this language?
-
Multi-record acquisition and fetch registration number
My question relates to the fact an acquisition multi-record and go look for more than one record by extraction, but less than the total number of records. Let's say I am absorbing N records and go pick up j at a time where 1
-
Wallpapers flashes a blue screen with a desktop screen
Product: HP ENVY TouchSmart 15 t-j000 Select Edition CTO Notebook PC, model C9G48AAR, product number: C8P45AVProblem: Once connected, the screen flashes start screen randomly and does not respond to any input.Effort: We followed the instructions on t
-
HP 4050N printer does not print
I installed this printer on the hp 4050 pilot pcl5 and it worked fine a few times... tried to use it today and it doesn't print at all. I uninstalled and reinstalled and still do not, print or make it print the test page. When initially, I tried to
-
Update installation problem (error code: c8000210)
original title: update installation problem Error C8000210