accumulation of ink c8165a
The accumulation of ink in the status bar under the cartridge on my 9800 printer storage area reached worrying proportions. Is there a way to clean up this massive accumulation?
Hey Jackeen.
Thanks for the update to your subject and further information. I'd be careful scraping cone "ink" to make sure none gets on the internal printer rolls or on your clothing. However, as long as you are gentle it should not pose a problem to do as you described. I would advise using a free cloth and some water from the tap to remove the remaining ink after scraping the cone that you described.
Good luck
Jason
Tags: HP Printers
Similar Questions
-
Accumulation of ink in the printhead, producing prints from steraking
Hello:
We have an HP Photosmart Premium all-in-One (AIO) printer, copier, Scanner.
We receive in stairs horizontal white streaks the bar black, shown in a report of print quality.
We had seen in the past when necessary to clean printheads changed, etc.
This time, removal of ink cartridges and print heads (the chariot holding the ink cartridges), I discovered a heavy accumulation of black ink (not black photo) on the print head. There was a lot of "gunk".
After a lot of careful cleaning and by installing a new black ink cartridge, the problem of dragging seems if go away, however, we got vertical streaks on the typescripts, located printing roller online with printing black-cartdidge
in the print head. After successive cleanings of the hand, long rollers (black), the problem seems to have disappeared, although I always test things.
The report print quality looks great, no more vertical streaks.
This required to make several of the main roller cleaning, internal long black to remove black ink has adhered. It seems that this roller can be removed to be cleaned. It seems that this roll is part of a motor gear set and is not easily removable.My comments/questions are:
Pages 78 and 79 of the 'series of HP Photosmart Premium C309 User Guide', States the following in the article titled, "to assess the value of print quality.
"If all the colored bars have regular white streaks, please refer to the following steps.
If the line 11 on the diagnostic page reads PHA TTOE completed: 0, align the printer.
If line 11 on the diagnostic page displays a different value or alignment is not need help, clean the print head. »When we run the report of print quality, we get the next State. PHA TTOE completed: 1.
Is this value of 1, good, bad...?I didn't see any leak of the black print cartridge.
No idea what can be causing the accumulation of (filth) ink in the print head (the chariot holding the ink cartridges)?If so, what can I do to avoid this problem in the future?
Thank you.
DaleB
Printers you mentioned have different textbooks available for various reasons. One of the reasons is the LaserJet 4 m is a printer of business and the Photosmart is a consumer printer based. Business such as the LaserJet 4 m printers are supposed to manage a high volume and because of this expectation, there a lot of replaceable parts that owners need to know how to get to maintain and replace these parts when necessary. So the manual available for this LaserJet printer will have a more in depth break down parts of the printer and how to disassemble and reassemble the printer. External documents and guides the user to the Photosmart will not have this information available, because it doesn't have the same capacity or replaceable parts.
-
Accumulated L7600 ink usage information are different on the "Inks" tab and the tab 'use '.
I have a HP Officejet Pro L7680 all-in-one
{Removed privacy}. When I type the IP address in my browser, a very informative Web page is displayed. However, information on the use of accumulated ink are different on the "Inks" tab and the "Use" of the Web page tab. The "Inks" tab specifies the following black: 197,54 ml, yellow: 68,89 ml, Magenta: 160,93 ml and Cyan: 156,46 ml. The 'Use' tab specifies the black following: 197,57 ml, yellow: 68,91 ml, Magenta: 42,53 ml and Cyan: 32,41 ml. Why is the different information? What information is correct?Fix.
-
7310xi all-in-One: ink cartridge leak on bottom of 7310xi printer all in one
Printing on paper is wavy line down the entire page. A self-test shows lines in black and tricolor bars. I cleaned the contacts on the cartridges as directed. Carts and springs for the cartridges look ok. What does not seem normal is the accumulation of ink on the bottom of the printer directly under the ink cartridges. Of course, I had a cartridge leaking at some point. The pile of ink stand high enough and is probably interfere with something. Sometimes after that it prints a page, I hear a noise like metal on metal grinding. Then the message transport jam error will appear. When I remove the rear door of the printer there nothing wrong apparently. It's ok for me to use metal tongs to remove the pile of ink while the printer is on (since it is the only way you can reach the battery), or is it a good way to electrocute me?
-
CP2025: physically cleaning CP2025 ink roll
Ink red stripes sometimes my copies. Not the cartridge as I changed it out. The control panel cleaning cartridge does not. Notice that the horizontal roll back printer has accumulated red ink on it. Can I clean this roller with rubbing alcohol? If not alcohol, how can I clean the roller?
I would not recommend using any cleaning solution or chemical of any kind on a transfer roller. Also, while cleaning the roller with a dry cloth, you can deform the surface and your impressions will not clear and sharp, be extremely careful with this component.
If you want to test to see if the secondary transfer roller is actually put toner on the paper, just some white sheets of printing paper and see if the toner is on the back of their. It is normal that the transfer rollers get toner on them over time.
It is the steamroller you're talking about?
You can get the show together above for about US $30. try searching with the manufacturer HP RM1-4838-000. It is likely that the magenta cartridge that you in place had something dirty the cleaning squeegee, causing toner continually put on the transfer belt resulting in this magenta toner get on your secondary transfer roller, as well as other locations inside the printer. I had to disassemble these printers before and remove the transfer belt to get the printer toner spills, so they could reprint cleanly.
-
I have a printer HP PSC 1310 series all-in-One. Recently, I installed an empty ink cartridge, and now in the middle of the page printing is blurred. Looks almost like the printer is adding a shadow to the text in the Center. I tried to re - align the cartridges, but the problem remains. Can it be fixed without getting a new ink cartridge? What's my alternative?
The most likely cause is the accumulation of ink on the MICR band. The HP work on this web page has been deleted, but said something like the following:
HP Deskjet, HP Business Inkjet and inkjet printers from HP Color - cleaning of the band of vertical in Print flaws coding, shifts of margin or margins 'staircase by steps.
QUESTION:
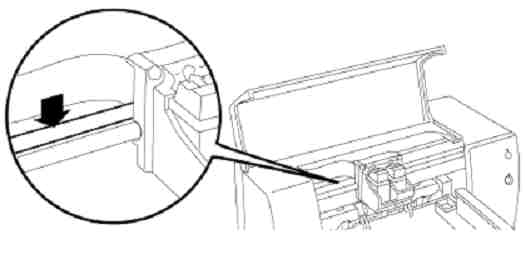
The coding is the band one located just behind the stem of transport semi-claire. It aims to help the print cartridge faithfully keep track of its position as it moves along the stem of transport. Sometimes dust, ink or oil can accumulate on this strip and cause the following problems:
- Prints "stairs" to the bottom of the left margin of the self-test page.
- The margins left or right of the self-test are not properly placed.
- Ink cartridges carriage slams on the left side of the printer.
- Automatic test double-print or obscured shows the letters.
- Defects to flow the length of a printed page (portrait orientation), or on the whole page (landscape orientation).
- Printing stops and the lights of the Control Panel on the printer indicate an error.
- Gaps appear in the printed text or images.
- Slow printing
CAUTION:
Do not clean the strip of coding for the following symptoms: media pick questions, paper jam tilt, ink cartridge, missing points or rejection white stripes with printing and smeared or streaked black ink.
SOLUTION:
Clean the Strip coding inside the printer by following the steps below:
NOTE:
Extreme care must be taken during the cleaning process. If too much pressure is placed on the band of coding, it could become scratched (destruction of the engraving on the Strip), bent, broken or even move inside the printer. Damage of this type, the printer must be returned to HP for repair.
- With the printer on, open the top cover to the support to move to the center of the printer.
- Unplug the power cord from the printer.
- Place the cradle on the extreme right.
- Identify the MICR band a semi-claire, located just above the round, metal, stem from the cradle.
Figure 1: The coding of semilight Strip.
CAUTION:
When you pull the fabric along the strip of coding in step 5, enter the Strip gently, to make sure that the tape does not break. Pull the canvas in one direction from right to left, otherwise there is a risk that the coding strip can is dislodged from its mounting lugs.
- Moisten a clean rag or tissue with water, then enter Strip gently between thumb and forefinger and gently pull the wet cloth on the entire length of the Strip in a direction from right to left. Repeat this step with another part of the canvas to make sure to remove any foreign bodies.
- Place the cradle in the extreme left position and repeat step 5 on the right side of the encoding Strip, began as far back as soon as possible. Yet once, gently pull the fabric in a direction from right to left.
- Allow the coding Strip dry or dry gently with a cloth clean and dry, the MICR band.
- Place the crib near the Center and then plug the power cord into the printer.
- Close the top cover to the support back to the right side of the printer.
- Print a self-test to make sure that the printer is working correctly.
-
Pavilion a6312p: Photosmart 7510 prints blank page
I have a HP Photosmart 7510, who served me well for over a year until what I tried to use it today. I tried to print a letter in Microsoft Word 2010, and the printer produces a blank page. The ink levels are good, in fact, I have a brand new black and photo black installed this week. I tried to print a test page and nothing printed except the logo of Microsoft of color and words, printer Windows-Page of Test, the text is so light that I could barely read. I have cleaned the printheads twice, and represented the test page with the same result. I don't know what else to do. The HP Scan and print doctor said all control very well.
I used the printer every day since the installation of the new black cartridges and it was working fine until today, so I know this isn't the issue. I hope there, can someone give me an overview of this issue.
Hi bankercop,
I see that you have a hard time getting black ink for printing with the Photosmart 7510, I would like to offer a suggestion. Have you tried cleaning the print head manually?
Accumulation of ink can lead to this problem and the own automatic does not built / dried ink in the head.
Although this guide: 'Is missing or does not have the print head' or "Print head is not detected, missing or not installed correctly" appears for HP Photosmart e-all-in-one 7510 Printer series, addresses, a print head missing, the cleaning steps are the same.
I hope this helps you. See you soon!
-
5512: 5512 printer will not print black - 3 of all colors print correctly
Hello
The 5512 will not print black. New cartridge installed. Clean print head run more than 5 times without problem. There was many 5512 'no black printing problem' not noticed on this forum with many courses of resolution. I followed the instructions found on so many comments, but unfortunitely, the problem still exist. I noticed there were some done private view so I don't know that there is a similar problem that needs to be processed offline. Thanks in advance for any help provided.
Thank you all for the suggestions.
Nothing has worked for don't solve the "no black ink.
So, I took the print head of cart and carefully protected the small circuit board on the back side. There is a large accumulation of ink on the bottom of the Assembly. I sat the nozzles at the bottom of the distribution of very hot water and allowed some time to soak. From there on, I used carefully some fabric material and q-tips to wipe the nozzles. Then I got very hot water, and he ran to the top of the side of the Assembly to the screens and through the nozzles. This effort lead to a very large discharge of ink black and color. I dried the Assembly and reassembled the transport to the printer. Placed all the cartridges back in, ran clean printhead once and then guess what? the printer now prints black and color inks better than he has in years.
Total time needed to perform this cleanup was less than 30 minutes from start to finish.
Good luck to all of you who have this problem.
Before the rampage of the printer, it is interesting to try this fix.
Good luck!
-
Cartridges lights flash on full cartridges
My officejet pro K8600dn shows lights flashing on the printer cartridges, while the cartridges are full. Putting the printer turned off and didn't help. When I do a very strong push on the cartridges, that the lamps are going out and I can print. Then the lights flashing again. By the way: I only use original HP cartridges. My desktop computer HP Pavilion and OS Windows 7 pro 64 x, has already the latest version of the software and the driver, but it does not solve the problem.
Using authentic HP inks? I would clean the contacts on the cartridges to make sure the accumulation of ink was not causing and delivered with the printer being able to read that the cartridges are inserted correctly. If after manual cleaning, you still have a problem, I would like to do a hard reset of the printer. A hard reset will attempt to restore the printer to a known working condition and no user parameters are lost with a hard reset. First of all, start by cleaning, I know the model presented is not the same, but the cleaning cartridge is what one wants to follow. To do this:
- Open the cartridge door.
-
HP Photosmart 7350 will not print in black and white
This camera has served me well for printing color photos and other things for several years.
Ink is EXPENSIVE, and I have several text documents I want to print. I have several
56 ink cartridges (black).
I can simply not a black and white "no photo" to print.
I tried with the 56 and 57 (beside him) inside AND out. I tried to select in grayscale,
in all three sub-options (high quality cartridge, black only, optimized for the FAX). Tape
is NOT yet on the 56 cartridge. I do not use any mode of 'keep the ink' I know.
The best I can get using the FAX setting optimized (I think) is very pale, a bad quality
print page - words too dark, I can barely read (light grey). I suspect it is sucking
the cartridge (cyan-magenta-whatever) 57 to print it.
I have trouble-shot days before that by typing. I googled this problem both
in the HP forum and out through Google. What I'm trying to make is so basic and...
I dare say, 'simple', that I can't believe is not possible.
Thanks in advance!
The print head is the rectangular silver part at the bottom of the cartridge on this particular model. It would seem that the question be electronic printer failed, but before you give up, please try soaking in hot water with one of the printheads. It is possible for the accumulation of ink on the print heads to leave a stain on the fabric during the test, this could be confused with the strong task resulting from a cartridge to work.
-
Mgr. device Showed monitor, MS Installer errors, Photosmart C-20 aircraft photo/Scanner, pre-Win95?
The Device Manager has a yellow exclamation on bkgr point to the MONITOR. 1187 views, all apparently MS Installer errors, error investigation and somewhere I saw something about problems later that Win 95, so some things may not have been updated with newer models. It says "Contact provider", which is HP.
I just want to UNINSTALL the fragment (?) of Photosmart C - 20 digital camera / scanner that was installing obviously, still NEED and seems to block my 1310 Series (two all-in-one) Copier/scanner.
Currently my all-in - One Series 1310 print, but do not copy or scan, from the control panel of the printer, since trying to add the C-20 aircraft-photo/scanner. My system restore does not go as far as when I tried to install this digital camera, so how do I just get rid of it and go back to normal? I also reinstall .NET framework 2.0 and my all-in-one set? No problem, disc supplied. Thanks in advance. 19/10/12
My computer is a Compaq Presario, a pre-95, XP Home 2002, and of course, I will share once again how the problem was resolved in the case where those who seek it missed it.
I have no idea how the SOFTWARE MODEL got WRONG uploaded, during the time period when. NETframeworks have been updated, but someone on the forum of CNET XP was actually the first to give me a link to clean all components of SOFTWARE EVIL, a/k/a a "scrubber". I'll keep the icon on my desktop in case never happens again.
Implementation of the programme of eradication of HP has been much easier than you thought instructions, executing and then reinstall each of the "4 steps". I simply click on the FILE, and a long list of components came that could be removed with a single click! Including the four steps, which are at the bottom of the list.
Then I decided to clean the permanent Contacts on the printer all-in-One Series 1310, was using new cartridges, but was always a popup the color cartridge has been installed incorrectly. Contacts just got an accumulation of ink so that it was not to be read or recognized correctly. So, I reinstalled the correct software my disc instead of a new download, in which case it could have been a mistake even in this process. The red flashing light on cartridge exploded, and the copier and scanner has started working again. I am so happy. This printer of love. Once I got this link, it's very simple. Hope this helps someone else. And that we elect the right President today. Probably people who work must be on the first polling place, so I'll wait a little while. Everyone have a good day.
-
Office Jet 6310 printer all in one
The cartridge made a rattling noise very strong when he moves to the right side of the printer. I cleaned the entire accumulation of ink but the clicking continues. There are no other problems. The paper and the scanner works and now the printer has been clean the large prints. Does anyone know why he would do this noise?
Thank you
tl2222
Some noises can expect that the printer is being used more in addition to overtime. The documentation that I found on the printer by clicking when the carriage moves in the machine indicates that we should remove the cartridges one at a time and inspect and also inspect where they adapt the machine to ensure that they are not damaged and to check the debris or the broken parts in the channel of distribution. Also, you stated that the printer has been cleaned. Where the rolls of paper cleaned too? Paper dust can accumulate on the reels of overtime can also lead to the printer with rattling noise.
Finally, I would like to try a hard reset.
- With the printer plugged directly into a wall outlet and turned on, unplug the power cord from the back of the printer.
- Then unplug the power cord from the wall outlet.
- Wait at least 30-60 seconds
- Plug the power cord into the wall outlet first. If a module with the power cord, make sure that the light of the module and then reconnect power cord on the back of the printer
- The printer should turn itself back on, but if not to use the power button on front panel to turn on machine.
-
HP c 4450 - impression gradually migrate out of page
Lately, the margins are migrating to the right during a print job. Printing starts fine, but little by little the left margin expands until the guy runs off the page. I have been using this all-in-one for a few years without any problems. There has been no change in my operating system or Microsoft Word. I recently had a couple of paper jams which I erased completely. I turned off and unplugged the unit several times. Any suggestions?
This problem may be caused by the accumulation of ink on the MICR band. You can clean the Strip as shown in the post here. Don't forget to heed the warnings, the Strip is fragile and can be damaged. It has very thin lines that are required to correctly position the transport, if these are damaged the band would need to be replaced.
-
HP Designjet 5500PS Tube and ink questions
Hi there, our 5500PS 42 "is having a crisis of anger Monday morning.
I'll start by noting that last week we had to disassemble the machine to remove the accumulation of particles of rubber on the gable end of belt (right panel). While we've disassembled him we gave him a good clean and service. At the end of last week, we were printing on its fine, colors were good and all aligned.
When I'm at work this morning, however, I activated him and sent a job. Before she began to prepare the print heads, it is flashed to 'replace' on all ink cartridges (they all have about 90% to them). So, I jumped all out, waited a few seconds and jump back in. This did nothing. So I turned off then on again. This time, it gave me the error
"The wrong type of system of tubes replace tubes system, turn on/off.
So, I turned off, open the left rear door and disconnected the power cable and reconnected. After turning it back on, the error of tube to replace had disappeared, but now he tells me to replace all my ink again.
Any ideas or suggestions? Would be greatly appreciated, especially since our 5500PS 60 "is offline at the moment pending a new belt tensioner kit, so we have no printer to work!
Best regards, Andre
Check the muticolored at both ends cable that goes to the center of the Assembly to the rear. Also check the front connectors that mate with the cartridges. Since there are 6 of them, it is usually easy to a place that may be sitting hurt. When you get this message, remove all the ink cartridges 6 and then put back them in one at a time. If it is ok, then delete that one and insert the following and continue like that. Sometimes just a bad cartridge can cause the message to replace all the.
-
New printer, getting the veins through every few lines of print black ink
Hi @Badgermitt,
Thanks for joining the Forums of HP Support for a solution to your printing problem.
I understand that you use a HP Officejet 5740 e-all-in-one printer with a PC of Windows 8 and the printed text has black steaks through every few lines. I would like to help with that.
Black lines through the text is usually due to present an accumulation of debris around of the cartridge that can usually be solved by cleaning cartridges or ink. This can be done in the control panel of the printer.
Cleaning of the cartridges is discussed in this support material designed to be used with this problem - solve print quality problems.
Please let me know if that solves the problem, or if you need assistance.
In fact, if it helps you to find a solution, please click on the 'accept as Solution' and the 'thumbs up' buttons down below in this message.

Thank you!

Maybe you are looking for
-
Satellite Pro A300 - required DVD replacement
Hi, I am a beginner. Have two variants of the A300. A single DVD drive broken and has been deleted (not by me). Want to replace it, but another player does not fit so can not easy to find a replacement. Any ideas? Thank you.
-
I want to buy a cell phone with IMEI No. Without Bill? How to check s not robbed?
I want to buy a cell phone with IMEI No. Without Bill? How to check s not robbed?
-
Fehlercode 0 x 80070002 bei einer Dateisicherung auf Windows Vista Home Premium
ICH habe einen Windows Vista Home Premium pc will Dateisicherung machen, er macht alles und eine und am Schluss kommt der Fehlercode keep 0 x 80070002. Jetz konnte ich seit 3 month schon keine mehr machen kann mir bitte helfen someone safety LG Baske
-
Cannot log on locally on Windows7/8
My server had hardware error, once fixed, so I have to reinstall Windows 2003 Server and recreate the DC under the same name. After that I logged on locally as an administrator on the Windows workstations XP to remove user profiles existing and then
-
Is possible let activate domain multi UCS VM - FEX and sign up for the same vCenter
Hi Experts, We have 7 domain UCS. But only a vCenter. Now, we want to enable VM - FEX on each UCS area and sign up for the same vCenter. Is - it work? I have found no description limit configuration on this relationship. Or we create 7 vCenter for ea